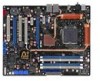
Asus P5N32-E SLI Plus P5N32-E SLI Plus User''s Manual for English Edtion - Page 78
BIOS menu screen, Menu bar - overclock settings
 |
View all Asus P5N32-E SLI Plus manuals
Add to My Manuals
Save this manual to your list of manuals |
Page 78 highlights
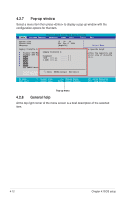
4.2.1 BIOS menu screen Menu items Menu bar Configuration fields General help Main Phoenix-Award BIOS CMOS Setup Utility Extreme Tweaker Advanced Power Boot Tools Exit System Time System Date Language Legacy Diskette A: Primary IDE Master Primary IDE Slave SATA1 SATA2 SATA3 SATA4 SATA5 SATA6 HDD SMART Monitoring 15 : 30 : 36 Sat, Jan 21 2006 [English] [1.44M, 3.5 in.] [ST321122A] [ASUS CDS520/A] [None] [None] [None] [None] [None] [None] [Disabled] Select Menu Item Specific Help Change the day, month, year and century. Installed Memory Usable Memory 512MB 511MB F1:Help ESC: Exit ↑↓ : Select Item →←: Select Menu -/+: Change Value Enter: Select SubMenu F5: Setup Defaults F10: Save and Exit Sub-menu items Legend bar 4.2.2 Menu bar The menu bar on top of the screen has the following main items: Main For changing the basic system configuration Extreme Tweaker For changing the overclocking settings Advanced For changing the advanced system settings Power For changing the advanced power management (APM) configuration Boot For changing the system boot configuration Tools For configuring options for special functions Exit For selecting the exit options and loading default settings To select an item on the menu bar, press the right or left arrow key on the keyboard until the desired item is highlighted. • The BIOS setup screens shown in this chapter are for reference purposes only, and may not exactly match what you see on your screen. • Visit the ASUS website (www.asus.com) to download the latest BIOS information. 4-10 Chapter 4: BIOS setup
-
 1
1 -
2
-
3
-
4
-
5
-
6
-
7
-
8
-
9
-
10
-
11
-
12
-
13
-
14
-
15
-
16
-
17
-
18
-
19
-
20
-
21
-
22
-
23
-
24
-
25
-
26
-
27
-
28
-
29
-
30
-
31
-
32
-
33
-
34
-
35
-
36
-
37
-
38
-
39
-
40
-
41
-
42
-
43
-
44
-
45
-
46
-
47
-
48
-
49
-
50
-
51
-
52
-
53
-
54
-
55
-
56
-
57
-
58
-
59
-
60
-
61
-
62
-
63
-
64
-
65
-
66
-
67
-
68
-
69
-
70
-
71
-
72
-
 73
73 -
 74
74 -
 75
75 -
 76
76 -
 77
77 -
 78
78 -
 79
79 -
 80
80 -
 81
81 -
 82
82 -
 83
83 -
84
-
85
-
86
-
87
-
88
-
89
-
90
-
91
-
92
-
93
-
94
-
95
-
96
-
97
-
98
-
99
-
100
-
101
-
102
-
103
-
104
-
105
-
106
-
107
-
108
-
109
-
110
-
111
-
112
-
113
-
114
-
115
-
116
-
117
-
118
-
119
-
120
-
121
-
122
-
123
-
124
-
125
-
126
-
127
-
128
-
129
-
130
-
131
-
132
-
133
-
134
-
135
-
136
-
137
-
138
-
139
-
140
-
141
-
142
-
143
-
144
-
145
-
146
-
147
-
148
-
149
-
150
-
151
-
152
-
153
-
154
-
155
-
156
-
157
-
158
 |
 |
