Asus P6T DELUXE V2 User Guide - Page 174
Installing CrossFireX™ graphics cards
 |
View all Asus P6T DELUXE V2 manuals
Add to My Manuals
Save this manual to your list of manuals |
Page 174 highlights
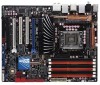
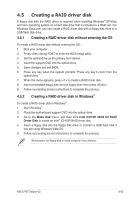
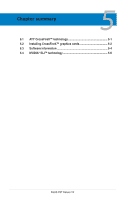
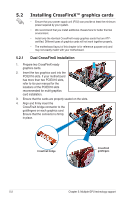
5.2 Installing CrossFireX™ graphics cards • Ensure that your power supply unit (PSU) can provide at least the minimum power required by your system. • We recommend that you install additional chassis fans for better thermal environment. • Install only the identical CrossFireX-ready graphics cards that are ATI®certified. Different types of graphics cards will not work together properly. • The motherboard layout of this chapter is for reference purpose only and may not exactly match with your motherboard. 5.2.1 Dual CrossFireX installation 1. Prepare two CrossFireX-ready graphics cards. 2. Insert the two graphics card into the PCIEX16 slots. If your motherboard has more than two PCIEX16 slots, refer to its user manual for the locations of the PCIEX16 slots recommended for multi-graphics card installation. 3. Ensure that the cards are properly seated on the slots. 4. Align and firmly insert the CrossFireX bridge connector to the goldfingers on each graphics card. Ensure that the connector is firmly in place. CrossFireX bridge CrossFireX goldfingers 5-2 Chapter 5: Multiple GPU technology support
-
 1
1 -
2
-
3
-
4
-
5
-
6
-
7
-
8
-
9
-
10
-
11
-
12
-
13
-
14
-
15
-
16
-
17
-
18
-
19
-
20
-
21
-
22
-
23
-
24
-
25
-
26
-
27
-
28
-
29
-
30
-
31
-
32
-
33
-
34
-
35
-
36
-
37
-
38
-
39
-
40
-
41
-
42
-
43
-
44
-
45
-
46
-
47
-
48
-
49
-
50
-
51
-
52
-
53
-
54
-
55
-
56
-
57
-
58
-
59
-
60
-
61
-
62
-
63
-
64
-
65
-
66
-
67
-
68
-
69
-
70
-
71
-
72
-
73
-
74
-
75
-
76
-
77
-
78
-
79
-
80
-
81
-
82
-
83
-
84
-
85
-
86
-
87
-
88
-
89
-
90
-
91
-
92
-
93
-
94
-
95
-
96
-
97
-
98
-
99
-
100
-
101
-
102
-
103
-
104
-
105
-
106
-
107
-
108
-
109
-
110
-
111
-
112
-
113
-
114
-
115
-
116
-
117
-
118
-
119
-
120
-
121
-
122
-
123
-
124
-
125
-
126
-
127
-
128
-
129
-
130
-
131
-
132
-
133
-
134
-
135
-
136
-
137
-
138
-
139
-
140
-
141
-
142
-
143
-
144
-
145
-
146
-
147
-
148
-
149
-
150
-
151
-
152
-
153
-
154
-
155
-
156
-
157
-
158
-
159
-
160
-
161
-
162
-
163
-
164
-
165
-
166
-
167
-
168
-
 169
169 -
 170
170 -
 171
171 -
 172
172 -
 173
173 -
 174
174 -
 175
175 -
 176
176 -
 177
177 -
 178
178 -
 179
179 -
180
-
181
-
182
 |
 |