Asus ROG MAXIMUS Z790 FORMULA Users Manual English - Page 39
Basic Setup, 2.1 CPU installation
 |
View all Asus ROG MAXIMUS Z790 FORMULA manuals
Add to My Manuals
Save this manual to your list of manuals |
Page 39 highlights
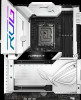
Chapter 2: Basic Setup Basic Setup 2 2.1 The installation diagrams in this section are for reference only. The motherboard layout may vary with models, but the installation steps are the same for all models. CPU installation • Ensure that you install the correct CPU designed for LGA1700 socket only. DO NOT install a CPU designed for LGA1155, LGA1156, LGA1151, and LGA1200 sockets on the LGA1700 socket. • The CPU fits in only one correct orientation. DO NOT force the CPU into the socket to prevent bending the connectors on the socket and damaging the CPU. • Ensure that all power cables are unplugged before installing the CPU. • Upon purchase of the motherboard, ensure that the PnP cap is on the socket and the socket contacts are not bent. Contact your retailer immediately if the PnP cap is missing, or if you see any damage to the PnP cap/socket contacts/motherboard components. ASUS will shoulder the cost of repair only if the damage is shipment/ transit-related. Install a heatsink or AIO cooler after installing the CPU. Please refer to the Motherboard Installation Guide on the ASUS support site, or to the user manual of the heatsink/AIO cooler for steps on installing the heatsink/AIO cooler. Chapter 2 Motherboard User Manual Take caution when lifting the load lever, ensure to hold onto the load lever when releasing the load lever. Letting go of the load lever immediately after releasing it may cause the load lever to spring back and cause damage to your motherboard. 2-1
-
 1
1 -
2
-
3
-
4
-
5
-
6
-
7
-
8
-
9
-
10
-
11
-
12
-
13
-
14
-
15
-
16
-
17
-
18
-
19
-
20
-
21
-
22
-
23
-
24
-
25
-
26
-
27
-
28
-
29
-
30
-
31
-
32
-
33
-
 34
34 -
 35
35 -
 36
36 -
 37
37 -
 38
38 -
 39
39 -
 40
40 -
 41
41 -
 42
42 -
 43
43 -
 44
44 -
45
-
46
-
47
-
48
-
49
-
50
-
51
-
52
-
53
-
54
-
55
-
56
-
57
-
58
-
59
-
60
-
61
-
62
-
63
-
64
-
65
-
66
-
67
-
68
-
69
-
70
-
71
-
72
-
73
-
74
-
75
-
76
 |
 |
