Asus RS120-E3 User Guide - Page 115
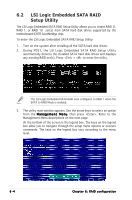
the Management Menu.
 |
UPC - 610839630707
View all Asus RS120-E3 manuals
Add to My Manuals
Save this manual to your list of manuals |
Page 115 highlights
10. When finished setting the selected logical drive configuration, select A c c e p t from the menu, then press . 11. When finished setting the selected logical drive configuration, select A c c e p t from the menu, then press . 12. Follow steps 5 to 10 to configure additional logical drives. 13. When prompted, save the configuration, then press to return to the Management Menu. Before using, we recommend completing the 6.2.4 steps to initiate the fresh logical drive manually. ASUS RS120-E3/PA4 6-9
-
 1
1 -
2
-
3
-
4
-
5
-
6
-
7
-
8
-
9
-
10
-
11
-
12
-
13
-
14
-
15
-
16
-
17
-
18
-
19
-
20
-
21
-
22
-
23
-
24
-
25
-
26
-
27
-
28
-
29
-
30
-
31
-
32
-
33
-
34
-
35
-
36
-
37
-
38
-
39
-
40
-
41
-
42
-
43
-
44
-
45
-
46
-
47
-
48
-
49
-
50
-
51
-
52
-
53
-
54
-
55
-
56
-
57
-
58
-
59
-
60
-
61
-
62
-
63
-
64
-
65
-
66
-
67
-
68
-
69
-
70
-
71
-
72
-
73
-
74
-
75
-
76
-
77
-
78
-
79
-
80
-
81
-
82
-
83
-
84
-
85
-
86
-
87
-
88
-
89
-
90
-
91
-
92
-
93
-
94
-
95
-
96
-
97
-
98
-
99
-
100
-
101
-
102
-
103
-
104
-
105
-
106
-
107
-
108
-
109
-
 110
110 -
 111
111 -
 112
112 -
 113
113 -
 114
114 -
 115
115 -
 116
116 -
 117
117 -
 118
118 -
 119
119 -
 120
120 -
121
-
122
-
123
-
124
-
125
-
126
-
127
-
128
-
129
-
130
-
131
-
132
-
133
-
134
-
135
-
136
-
137
-
138
-
139
-
140
-
141
-
142
-
143
-
144
-
145
-
146
-
147
-
148
-
149
-
150
-
151
-
152
-
153
-
154
-
155
-
156
-
157
-
158
-
159
-
160
-
161
-
162
-
163
-
164
-
165
-
166
-
167
-
168
-
169
-
170
-
171
-
172
 |
 |

ASUS RS120-E3/PA4
ASUS RS120-E3/PA4
ASUS RS120-E3/PA4
ASUS RS120-E3/PA4
ASUS RS120-E3/PA4
6-9
6-9
6-9
6-9
6-9
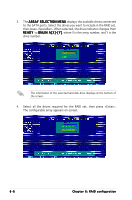
10.
When finished setting the selected logical drive configuration, select
Accept
Accept
Accept
Accept
Accept from the menu, then press <Enter>.
11.
When finished setting the selected logical drive configuration, select
Accept
Accept
Accept
Accept
Accept from the menu, then press <Enter>.
12.
Follow steps 5 to 10 to configure additional logical drives.
13.
When prompted, save the configuration, then press <Esc> to return to
the Management Menu.
Before using, we recommend completing the 6.2.4 steps to initiate the
fresh logical drive manually.