Asus RS120-E3 User Guide - Page 18
Chassis cover
 |
UPC - 610839630707
View all Asus RS120-E3 manuals
Add to My Manuals
Save this manual to your list of manuals |
Page 18 highlights
2.1 Chassis cover 2.1.1 Removing the front cover 1. Use a Phillips screwdriver to remove the screw on each front end of the top cover. 2. Loosen the two thunbscrews on the rear panel to release the top cover from the chassis. 3. Firmly hold the cover and slide it toward the rear panel for about half an inch until it is disengaged from the chassis. 4. Released a drive tray by pushing the spring lock to the right. Then , firmly hold the tray level and pull all the drive trays out of the bay. 2-2 Chapter 2: Hardware setup
-
 1
1 -
2
-
3
-
4
-
5
-
6
-
7
-
8
-
9
-
10
-
11
-
12
-
 13
13 -
 14
14 -
 15
15 -
 16
16 -
 17
17 -
 18
18 -
 19
19 -
 20
20 -
 21
21 -
 22
22 -
 23
23 -
24
-
25
-
26
-
27
-
28
-
29
-
30
-
31
-
32
-
33
-
34
-
35
-
36
-
37
-
38
-
39
-
40
-
41
-
42
-
43
-
44
-
45
-
46
-
47
-
48
-
49
-
50
-
51
-
52
-
53
-
54
-
55
-
56
-
57
-
58
-
59
-
60
-
61
-
62
-
63
-
64
-
65
-
66
-
67
-
68
-
69
-
70
-
71
-
72
-
73
-
74
-
75
-
76
-
77
-
78
-
79
-
80
-
81
-
82
-
83
-
84
-
85
-
86
-
87
-
88
-
89
-
90
-
91
-
92
-
93
-
94
-
95
-
96
-
97
-
98
-
99
-
100
-
101
-
102
-
103
-
104
-
105
-
106
-
107
-
108
-
109
-
110
-
111
-
112
-
113
-
114
-
115
-
116
-
117
-
118
-
119
-
120
-
121
-
122
-
123
-
124
-
125
-
126
-
127
-
128
-
129
-
130
-
131
-
132
-
133
-
134
-
135
-
136
-
137
-
138
-
139
-
140
-
141
-
142
-
143
-
144
-
145
-
146
-
147
-
148
-
149
-
150
-
151
-
152
-
153
-
154
-
155
-
156
-
157
-
158
-
159
-
160
-
161
-
162
-
163
-
164
-
165
-
166
-
167
-
168
-
169
-
170
-
171
-
172
 |
 |

Chapter 2:
Hardware setup
Chapter 2:
Hardware setup
Chapter 2:
Hardware setup
Chapter 2:
Hardware setup
Chapter 2:
Hardware setup
2-2
2-2
2-2
2-2
2-2
2.1
Chassis cover
2.1.1
2.1.1
2.1.1
2.1.1
2.1.1
Removing the front cover
Removing the front cover
Removing the front cover
Removing the front cover
Removing the front cover
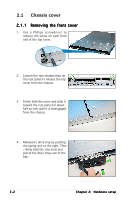
1.
Use a Phillips screwdriver to
remove the screw on each front
end of the top cover.
3.
Firmly hold the cover and slide it
toward the rear panel for about
half an inch until it is disengaged
from the chassis.
2.
Loosen the two thunbscrews on
the rear panel to release the top
cover from the chassis.
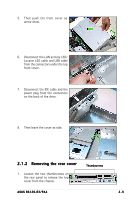
4.
Released a drive tray by pushing
the spring lock to the right. Then
, firmly hold the tray level and
pull all the drive trays out of the
bay.