Asus RS702D-E6 PS8 User Guide - Page 108
RAID 1, Virtual, Drive, Disk Write Cache, Accept, When creating a, set, proceed to step 10.
 |
View all Asus RS702D-E6 PS8 manuals
Add to My Manuals
Save this manual to your list of manuals |
Page 108 highlights
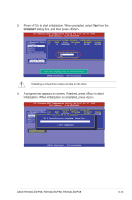
8. When creating a RAID 1 or a RAID 10 set, select DWC from the Virtual Drive menu, and then press . When creating a RAID 0 set, proceed to step 10. 9. Select On to enable the Disk Write Cache setting, and then press . LSI Software RAID Configuration Utility Ver A.60 Jul 30, 2008 BIOSViVretrusailonDrivAe.(0s8).C0o9n1f6ig1u3r4e4dR LD 0 RA1IEDasy C7oS7ni2fiz4ge7uMrBatio#nSt-r2iApReRsAY SELS6Et4CrTiKIpBOSNzMENUSOtNaLtIuNsE Management Menu PORT # Configure Initialize 0 DNLIN A00-00 Objects Rebuild 1 DNLIN A00-0C1hange DWC Check Consistency Off Virtual Drive 0 On RAID = 1 Size = 77247MB DWC = Off RA = On Accept SPAN = NO Disk Write Cache Setting Of VD Cursor Keys, SPACE-(De)Select F2-ChIdInfo F3-SlotInfo F10-Configure Esc-Quit Enabling DWC can improve the performance, but with the risk of data loss. 10. When finished setting the selected virtual drive configuration, select Accept from the menu, and then press . LSI Software RAID Configuration Utility Ver A.60 Jul 30, 2008 BIOSVViretrusailonDrivAe.(0s8).C0o9n1f6ig1u3r4e4dR LD RAIEDasy CoSnifizgeuratio#nSt-riApReRsAY SELSEtCrTiIpOSNzMENUStatus 0 1 77247MB 2 64 KB ONLINE Management Menu Configure PORT # Initialize 0 DNLIN A00-00 Objects Rebuild 1 DNLIN A00-01 Check Consistency Virtual Drive 0 RAID = 1 Size = 77247MB DWC = Off RA = On Accept SPAN = NO Accept This VD Configuration And Go To Next VD Cursor Keys, SPACE-(De)Select F2-ChIdInfo F3-SlotInfo F10-Configure Esc-Quit 6-8 Chapter 6: RAID configuration
-
 1
1 -
2
-
3
-
4
-
5
-
6
-
7
-
8
-
9
-
10
-
11
-
12
-
13
-
14
-
15
-
16
-
17
-
18
-
19
-
20
-
21
-
22
-
23
-
24
-
25
-
26
-
27
-
28
-
29
-
30
-
31
-
32
-
33
-
34
-
35
-
36
-
37
-
38
-
39
-
40
-
41
-
42
-
43
-
44
-
45
-
46
-
47
-
48
-
49
-
50
-
51
-
52
-
53
-
54
-
55
-
56
-
57
-
58
-
59
-
60
-
61
-
62
-
63
-
64
-
65
-
66
-
67
-
68
-
69
-
70
-
71
-
72
-
73
-
74
-
75
-
76
-
77
-
78
-
79
-
80
-
81
-
82
-
83
-
84
-
85
-
86
-
87
-
88
-
89
-
90
-
91
-
92
-
93
-
94
-
95
-
96
-
97
-
98
-
99
-
100
-
101
-
102
-
 103
103 -
 104
104 -
 105
105 -
 106
106 -
 107
107 -
 108
108 -
 109
109 -
 110
110 -
 111
111 -
 112
112 -
 113
113 -
114
-
115
-
116
-
117
-
118
-
119
-
120
-
121
-
122
-
123
-
124
-
125
-
126
-
127
-
128
-
129
-
130
-
131
-
132
-
133
-
134
-
135
-
136
-
137
-
138
-
139
-
140
-
141
-
142
-
143
-
144
-
145
-
146
-
147
-
148
-
149
-
150
-
151
-
152
-
153
-
154
-
155
-
156
-
157
-
158
-
159
-
160
-
161
-
162
-
163
-
164
 |
 |
