Asus VG278HR VG278HR Series User Guide for English Edition - Page 25
Troubleshooting (FAQ), Problem, Possible Solution - driver
 |
View all Asus VG278HR manuals
Add to My Manuals
Save this manual to your list of manuals |
Page 25 highlights
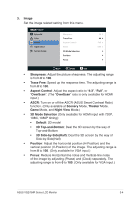
3.3 Troubleshooting (FAQ) Problem Possible Solution Power LED is not ON • Press the button to check if the monitor is in the ON mode. • Check if the power cord is properly connected to the monitor and the power outlet. The power LED lights amber and • Check if the monitor and the computer are in the there is no screen image ON mode. • Make sure the signal cable is properly connected the monitor and the computer. • Inspect the signal cable and make sure none of the pins are bent. • Connect the computer with another available monitor to check if the computer is properly working. Screen image is too light or dark • Adjust the Contrast and Brightness settings via OSD. Screen image bounces or a wave • Make sure the signal cable is properly connected to pattern is present in the image the monitor and the computer. • Move away electrical devices that may cause electrical interference. Screen image has color defects (white does not look white) • Inspect the signal cable and make sure that none of the pins are bent. • Perform All Reset via OSD. • Adjust the R/G/B color settings or select the Color Temperature via OSD. 3D function is not working well • Make sure the input source is DVI (Dual-link) or HDMI, and the cable is connected. DVI (Single-link) & VGA are not supported for 3D function. • For DVI source: Make sure the screen resolution setting is 1920x1080 at 120Hz, 110Hz or 100Hz. For HDMI source: Make sure your graphics card or DVD player support HDMI 1.4. • Make sure the power button of wireless 3D glasses is turned on. Charge the wireless glasses if its battery is in low status. • Make sure the computer was installed with Microsoft® Windows Vista or Windows 7 operating system, and NVIDIA 3D drivers. • Visit NVIDIA website (http://www.nvidia.com/) for more information about system requirements, setup instructions, and PC games supported. 3-9 Chapter 3: OSD (On-Screen Display) Menu
-
 1
1 -
2
-
3
-
4
-
5
-
6
-
7
-
8
-
9
-
10
-
11
-
12
-
13
-
14
-
15
-
16
-
17
-
18
-
19
-
 20
20 -
 21
21 -
 22
22 -
 23
23 -
 24
24 -
 25
25 -
 26
26 -
 27
27
 |
 |
