Audiovox FPE3000 User Manual
Audiovox FPE3000 Manual
 |
View all Audiovox FPE3000 manuals
Add to My Manuals
Save this manual to your list of manuals |
Audiovox FPE3000 manual content summary:
- Audiovox FPE3000 | User Manual - Page 1
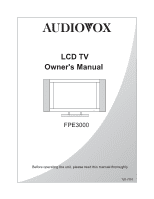
LCD TV Owner's Manual FPE3000 Before operating the unit, please read this manual thoroughly. 128-7081 - Audiovox FPE3000 | User Manual - Page 2
of this LCD TV. We recommend that you thoroughly read this manual before use to fully enjoy the many functions and excellent effects of this LCD TV. Retain this manual in an easily accessible location for future reference. Note: Screen displays and illustrations in this manual may differ from the - Audiovox FPE3000 | User Manual - Page 3
3 - Audiovox FPE3000 | User Manual - Page 4
4 - Audiovox FPE3000 | User Manual - Page 5
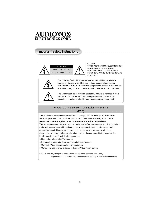
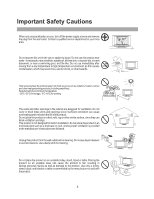
When any unusual situation occurs, turn off the power supply at once and remove the plug from the wall outlet. Contact a qualified service department in your local area. Do not expose this unit in the rain or spatter by liquid. Do not use this product near water - for example, near a bathtub - Audiovox FPE3000 | User Manual - Page 6
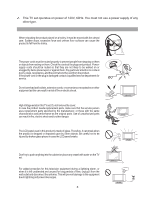
wall outlets, extension cords, or convenience receptacles on other equipment as this can result in a risk of fire or electric shock. High Voltage exists in this TV set. Do not remove the cover. In case the product needs replacement parts, make sure that the service person uses replacement parts - Audiovox FPE3000 | User Manual - Page 7
7 - Audiovox FPE3000 | User Manual - Page 8
Identification of controls Front Remote sensor On/Standby Indicator Light SOURCE MENU CH CH VOL VOL POWER To enter into MENU Channel up Volume up Channel down To select input signal Volume down Power on/ Standby 8 - Audiovox FPE3000 | User Manual - Page 9
input VGA input Antenna input HDTV YPbPr inputs (480p, Earphone jack PC audio line in Audio inputs 720p,1080i) DC input DVD input (480i) from power Speaker supply outputs HDTV Audio inputs 9 - Audiovox FPE3000 | User Manual - Page 10
Identification of controls(continued) Remote Control power on/Standby Volume down To enter into MENU Colour/ sound system select Zoom mode select Auto correct picture Picture mode select Keypad Video Input select Still picture OSD position select Adjusting Bass Sound mute Channel up Volume up - Audiovox FPE3000 | User Manual - Page 11
. Do not throw the batteries into a fire. Dispose of used batteries in the specified manner. Do not drop, dampen or disassemble the remote control. 30 30 16FT Notes: There should be no obstacle between the TV and the transmitter. Use the remote control within the effective range as the above figure - Audiovox FPE3000 | User Manual - Page 12
) : You can view all unscrambled channels by using the TV's channel keys. "B" position on the RF switch (not supplied) : You can view the scrambled channels via the converter/descrambler by using the converter's channel keys. Note: Consult your Dealer or Service Center for the type of splitter, RF - Audiovox FPE3000 | User Manual - Page 13
R + PHONE LINE IN R L R L L Plug into AC outlet. Household power outlet AC cord AC power adapter 1. Connect the female plug to the AC socket on AC adapter. 2. Connect the AC adapter to the DC power input of the set. 3. Connect the male plug to the wall outlet as illustrated. Notes: + This - Audiovox FPE3000 | User Manual - Page 14
Installation(continued) Connecting video/audio equipment To ANT input VILDEO S-VIDEO Y Cb Cr Y Pb Pr VGA DC +24V ANT IN +12V +5V R HDTV AV PHONE LINE IN R L R L L To S-video input Y Yellow (video) W white (audio L/MONO) R red (audio R) R W To audio Y R w inputs To video input - Audiovox FPE3000 | User Manual - Page 15
Installation(continued) Connecting DVD player and speakers VILDEO S-VIDEO Y Cb Cr Y Pb Pr VGA DC +24V ANT IN +12V +5V R HDTV AV PHONE LINE IN R L R L L Red Black Red To YCbCr inputs G B R To audio R w inputs To speaker To speaker To YCbCr outputs G B R To audio R w outputs - Audiovox FPE3000 | User Manual - Page 16
Installation(continued) Connecting YPbPr terminals VILDEO S-VIDEO Y Cb Cr Y Pb Pr VGA DC +24V ANT IN +12V +5V R HDTV AV PHONE LINE IN R L R L L To YPbPr G B R inputs R w To audio inputs W White (audio L/MONO) R Red (audio R, Pr) G Green (Y) B Blue (Pb) To YPbPr outputs G BR ( - Audiovox FPE3000 | User Manual - Page 17
Installation(continued) Connecting VGA interface VILDEO S-VIDEO Y Cb Cr Y Pb Pr VGA DC +24V ANT IN +12V +5V R HDTV AV PHONE LINE IN R L R L L To VGA input interface To LINE in Equipment with VGA output interface To LINE out To VGA output interface 17 - Audiovox FPE3000 | User Manual - Page 18
Installation(continued) Elevation adjustment You can adjust the angle of the LCD TV as follows. The elevation can be adjusted from -5o to +10o. - 18 - Audiovox FPE3000 | User Manual - Page 19
up menu, press MENU button repeatedly to select different menu pages. In MENU operations, the CH5/6buttons are used to select item upwards or downwards; the VOL+/- buttons are used to Menu overview in TV mode PICTURE setting menu PICTURE SETTING Brightness 50 Contrast 50 Color 50 Sharpness - Audiovox FPE3000 | User Manual - Page 20
A/B MPAA G A MPAA PG A MPAA PG-13 A MPAA R A MPAA NC-17 A MPAA X A move, change TV RATING Rating TV-Y TV-Y7 TV-G TV-PG TV-14 TV-MA A/B FV V S L D A B A A AAA A A AAA A A AA A move, change, return CHANGE PASSWORD New Password - Audiovox FPE3000 | User Manual - Page 21
button on the remote control to turn the set on. Turning Off With the power on, press the POWER button to turn off the set, and the set is in standby mode. * Always unplug the AC adapter from the product and power outlet when not using for a long period of time. Notes: This TV set can automatically - Audiovox FPE3000 | User Manual - Page 22
button to select Antenna or Cable. Antenna: If using a VHF/UHF antenna (2-68). Cable: If using Cable TV (2-125). CHANNEL SETTING Auto search Source Current conditions where adjustment is necessary for a better picture and sound, use Fine tuning. Use 0~9 digit buttons or CH5/6 buttons to select - Audiovox FPE3000 | User Manual - Page 23
-11 Press 0-9 button 110 Note: the period of two-press should be within 3 seconds. Use CH5/6 button Press CH5 button, the channel number increases; Press CH6 button, the channel number decreases. Use previous channel button Press this button to switch between the current channel and previous - Audiovox FPE3000 | User Manual - Page 24
Select for a normal picture. Mild: Select for a fine/soft picture. Adjusted settings are stored in User mode. Using STILL button You can still current screen picture by pressing STILL button on the remote. Using AUTO.ADJ button Press AUTO.ADJ button on the remote to adjust picture for best viewing - Audiovox FPE3000 | User Manual - Page 25
right channel VOL+ stronger stronger decreases the left channel MONO/SAP/STEREO Notes: !You can quickly adjust Bass and Treble by using Bass+/ Bass- and Treb+/Treb- buttons on the remote. !You can quickly select audio mode by MTS button. MONO MONO MONO STEREO (If the program is STEREO) SAP (If - Audiovox FPE3000 | User Manual - Page 26
System setup SETUP Color sys Language OSD position OSD background AUTO Eng Upper Left Opaque or key to change To enter into SETUP menu 1. Press MENU button repeatedly to display SETUP menu. 2. Press CH5 or CH6 button to select item. 3. Press VOL+ or VOL- button to confirm or - Audiovox FPE3000 | User Manual - Page 27
item. Press VOL- or VOL+ button to select an OSD position in your preference. Notes: You can quickly select OSD menu position by using OSD POSITION button on the remote. Setting OSD Background From the SETUP menu, press CH5/6to select OSD Background item. Press VOL- or VOL+ button to select Opaque - Audiovox FPE3000 | User Manual - Page 28
repeatedly to set sleep time between: 0, 10, 20, 30, 60, 90,120,180,240 minutes. If you select 0 minute, it means the sleep timer function is turned off. Turn off 0 Use CLK button Press CLK button, the Current time menu bar appears. Use CH5/6 to select hour or Current time 0:40 minute - Audiovox FPE3000 | User Manual - Page 29
CCD Mode setting item. Press VOL- or VOL+ button to cycle between Captions 1, Captions 2, Text 1, Text 2, XDS (extended data services), Captions 3, Captions 4, Text 3, Text 4 and normal TV. Closed Captioning will display text on the screen for the hearing impaired. CCD and Vchip SETTINGS CCD Mode - Audiovox FPE3000 | User Manual - Page 30
SETTING menu. 2. Press CH5 or CH6 button to select MPAA Rating Sys .... RATING SETTING ... MPAA Rating Sys ... TV Block Settings ... Change Password 3. Press VOL + or VOL- button to enter into MOVIE RATING sub-menu. 4. , R, NC-17 and X will be blocked. * To exit the menu, press ENTER button. 30 - Audiovox FPE3000 | User Manual - Page 31
) * PG and Above (parental guidance suggested) * 14 and above (14 years and up) Press VOL+/- to enter TV RATING Rating A/B FV V S L D TV-Y A TV-Y7 B TV-G B TV-PG B TV-14 B AAA A AAA A TV-MA B AA A move, change, return You can also block the criteria for - Audiovox FPE3000 | User Manual - Page 32
> or key to change Adjusting Color temperature You can select different Color temperature to obtain correct white. Press MENU button, use CH5/6 to select Color Temp item, press the VOL+/- to select between PICTURE SETTING Brightness Contrast Saturation Sharpness Color Temp 25 25 25 25 - Audiovox FPE3000 | User Manual - Page 33
. Use AUTO. ADJ button When PC signal format changes or when you switch to PC mode by button, the set corrects picture automatically including frequency and phase to obtain the best display. During the process of auto correction, all buttons on the remote control and set's panel do not work until - Audiovox FPE3000 | User Manual - Page 34
> or key to change Adjusting Color temperature You can select different Color temperature to obtain correct white. Press MENU button, use CH5/6 to select Color Temp item, press the VOL+/- to select between PICTURE SETTING Brightness Contrast Phase Frequency Color Temp 25 25 25 25 9300K - Audiovox FPE3000 | User Manual - Page 35
35 - Audiovox FPE3000 | User Manual - Page 36
36 - Audiovox FPE3000 | User Manual - Page 37
37 - Audiovox FPE3000 | User Manual - Page 38
38 - Audiovox FPE3000 | User Manual - Page 39
39 - Audiovox FPE3000 | User Manual - Page 40
40 - Audiovox FPE3000 | User Manual - Page 41
FPE3000 LCD display Connections Quantity Detachable Speakers (x2) R F: TV/CATV 75ohms coaxial 1 Model specific R emote Control (Infrared) Composite Video input 1 Manual S-Video input (4pin DIN) 1 Wall mounting instructions 29.6 x 19.0 x 3.3 inches Power supply 8.3 x 2.1 x 4.2 inches * - Audiovox FPE3000 | User Manual - Page 42
42 - Audiovox FPE3000 | User Manual - Page 43
PRINTED IN RECYCLED PAPER 43 128-7081
-
 1
1 -
 2
2 -
 3
3 -
 4
4 -
 5
5 -
 6
6 -
 7
7 -
8
-
9
-
10
-
11
-
12
-
13
-
14
-
15
-
16
-
17
-
18
-
19
-
20
-
21
-
22
-
23
-
24
-
25
-
26
-
27
-
28
-
29
-
30
-
31
-
32
-
33
-
34
-
35
-
36
-
37
-
38
-
39
-
40
-
41
-
42
-
43
 |
 |
Before operating the unit, please read this manual thoroughly.
FPE3000
Owner's Manual
LCD TV
128-7081