Audiovox XMH10A Home Guide
Audiovox XMH10A - XM Satellite Radio Receiver Manual
 |
UPC - 044476036965
View all Audiovox XMH10A manuals
Add to My Manuals
Save this manual to your list of manuals |
Audiovox XMH10A manual content summary:
- Audiovox XMH10A | Home Guide - Page 1
- Audiovox XMH10A | Home Guide - Page 2
4 Cautions and Warnings 5 Contents XMH-10A 6 Installation/Wiring Precautions 7 Setting Up and Installing Your Kit 7 Cabling Interconnections 7 Installing/Positioning the Antenna 7 Interconnect Diagram 8 Installing the Xpress In the Cradle 9 Aiming Your XM® Home Antenna 10 Warranty 16 - Audiovox XMH10A | Home Guide - Page 3
you for purchasing the Audiovox Xpress XM® Satellite Radio Home Kit. You are one step closer to experiencing the latest innovation in XM Satellite Radio. XM Satellite Radio will revolutionize your vehicle or in-home entertainment. XM is America's number one satellite radio service with more than - Audiovox XMH10A | Home Guide - Page 4
installation instructions, may cause harmful interference to radio radio/TV technician for help. Warning: The FCC and FAA have not certified XM Satellite Radio Receivers for use in any aircraft (neither portable nor permanent installation). Therefore, XM Satellite Radio, Inc. cannot support - Audiovox XMH10A | Home Guide - Page 5
Cautions and Warnings 1. Do not install the Home Cradle in a position that obstructs viewing of any home entertainment component, such as a television, or not installed in accordance with these instructions, it could cause harmful interference to radio or television reception. If this condition - Audiovox XMH10A | Home Guide - Page 6
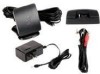
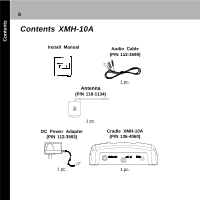
Contents 6 Contents XMH-10A Install Manual Audio Cable (P/N 112-3599) Antenna (P/N 118-1134) 1 pc. 1 pc. DC Power Adapter (P/N 112-3592) Cradle XMH-10A (P/N 136-4060) 1 pc. 1 pc. - Audiovox XMH10A | Home Guide - Page 7
Satellite Radio as soon as the Xpress XM Receiver and home kit installation are complete. Set up your Xpress home kit using the following installation instructions, or enlist the help of a professional installer. 2. Installing/Positioning the Antenna For best reception, the supplied antenna should - Audiovox XMH10A | Home Guide - Page 8
/ Wiring Precautions 8 a. In a major city, where XM ground repeaters are present, you can usually place the antenna away from a window and still achieve the desired results. If you experience a loss of signal or audio, reposition the antenna inside the home or outside as necessary. b. You can also - Audiovox XMH10A | Home Guide - Page 9
a. After making sure the connectors and guide pin hole are properly lined up, gently lower the Xpress XM Receiver into the cradle and gently press down on the Xpress XM Receiver to mate the connectors together. DOCKING STATION TOP VIEW CONNECTOR GUIDE PIN DOCKING STATION FRONT VIEW 16-PIN SYSTEM - Audiovox XMH10A | Home Guide - Page 10
Installation / Wiring Precautions 10 b. The Xpress XM Receiver should now be nestled securely in the docking station. DOCKING STATION REAR VIEW ANT IN RF CONNECTOR AUDIO OUT CONNECTOR DC IN CONNECTOR 4. Aiming your XM Home Antenna If the Xpress display says "NO SIGNAL," the antenna needs to - Audiovox XMH10A | Home Guide - Page 11
sign on the right. To access and use this screen, refer to the Xpress XM Satellite Radio Receiver User Guide. Adjust the antenna location until the maximum number of "Satellite" bars is displayed. The Xpress XM Receiver will receive programming as long as either the satellite or terrestrial signal - Audiovox XMH10A | Home Guide - Page 12
Installation / Wiring Precautions 12 a. Positioning the XM Antenna The antenna supplied with the Xpress XM Home Kit is a high gain type that can receive XM's signal from one of XM's satellites and/or, depending on where you live, XM's terrestrial repeaters. It is recommended that the antenna be - Audiovox XMH10A | Home Guide - Page 13
antenna up, find a wall location that ensures a strong signal. It is recommended that you use an extension cord to temporarily locate your Xpress XM antenna outdoors while optimizing the antenna location with the "Antenna Aiming" screen. 2. Attach four screws to the wall using the template provided - Audiovox XMH10A | Home Guide - Page 14
, use the Terk by Audiovox XM-EXT50. This is an XM approved 50 foot amplified extension cable available at your local consumer electronics retailer. Failure to do so could damage the unit. 5. Apply power to the Xpress XM Receiver as outlined in the associated User Guide and obtain an audio output - Audiovox XMH10A | Home Guide - Page 15
is mounted outside, route the cable from the antenna position to the interior of the home, working the cable through the basement, under a window sill, etc.; make adjustments and volt wall receptacle; then press the Xpress XM Receiver Power button ( ) to energize the unit. You are now ready to enjoy - Audiovox XMH10A | Home Guide - Page 16
WARRANTY AUDIOVOX ELECTRONICS replacement within the terms of this Warranty, the product is to be delivered with proof of warranty coverage (e.g. dated bill of sale), specification the product, damage to speakers, accessories, or vehicle and home electrical systems, malfunction of satellite - Audiovox XMH10A | Home Guide - Page 17
TO THE REPAIR OR REPLACEMENT PROVIDED ABOVE AND, IN NO EVENT, SHALL THE COMPANY'S LIABILITY EXCEED THE PURCHASE PRICE PAID BY PURCHASER FOR Warranty gives you specific legal rights and you may also have other rights which vary from state to state. U.S.A. : AUDIOVOX ELECTRONICS CORPORATION, 150 - Audiovox XMH10A | Home Guide - Page 18
128-7476G
-
 1
1 -
 2
2 -
 3
3 -
 4
4 -
 5
5 -
 6
6 -
 7
7 -
8
-
9
-
10
-
11
-
12
-
13
-
14
-
15
-
16
-
17
-
18
 |
 |