Behringer AT108 Manual - Page 6
Control Elements - used
 |
View all Behringer AT108 manuals
Add to My Manuals
Save this manual to your list of manuals |
Page 6 highlights
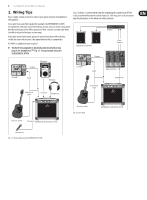
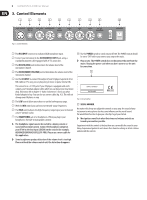
6 ULTRACOUSTIC AT108 User Manual 3. Control Elements (1) (2) (3) (4) (5) (6) (7) (8) (9) (10) Fig. 3.1: Control elements (1) The MIC INPUT connector is a balanced XLR microphone input. (2) Connect your instrument to the INSTR(UMENT) INPUT jack, using a standard instrument cable equipped with 1/4" TS connectors. (3) The MIC VOL(UME) control determines the volume level of the microphone channel. (4) The INSTR(UMENT) VOL(UME) control determines the volume level of the instrument channel. (5) Use the CD INPUT to connect the output of your CD player, tape deck, CD or MD walkman. This way you can play along to music or guitar tutorial CDs. This connector is a 1/4" TRS jack. If your CD player is equipped with cinch outputs, you'll need an adapter cable, which you can buy at your local music shop. Illustration 4.4 in chapter 4. "Audio Connections" shows you what kind of adapter to buy. You can also use a mono cable (fig. 4.5). This will not damage your CD player or amp. (6) The LOW control allows you to boost or cut the lowfrequency range. (7) With the MID control you can boost/cut the mid-range frequencies. (8) The HIGH control adjusts the high-frequency range to give your instrument a more "cutting" sound. (9) The HEADPHONES jack is for headphones. When you plug in your headphones, the built-in loudspeaker is muted. ◊ The headphone signal can also be routed to a mixing console or sound reinforcement system. Connect the headphone output on your AT108 to the line input (LINE IN) on the console (for example, BEHRINGER EURORACK UB1222FX-PRO). Please use a mono cable for this application. ◊ Some headphones produce distortion if the volume level is too high. Please cut back the volume control until the distortion disappears. (10) Use the POWER switch to switch on your AT108. The POWER switch should be set to "Off" before you connect your amp to the mains. ◊ Please note: The POWER switch does not disconnect the unit from the mains. Unplug the power cord when you don't want to use the unit for some time. (11) Fig. 3.2 Serial number (11) SERIAL NUMBER. No matter which way you adjust the controls on your amp: the sound of your instrument or microphone also has some influence on the overall sound. We would therefore like to give you a few tips to get you started. ◊ Most guitars sound best when their tone and volume controls are turned up as much as possible. Experiment with the controls to find out how you can modify the sound to your liking. Experienced guitarists write down their favorite settings or attach stickies underneath the controls.
-
 1
1 -
 2
2 -
 3
3 -
 4
4 -
 5
5 -
 6
6 -
 7
7 -
 8
8 -
 9
9
 |
 |
