Behringer B-CONTROL DEEJAY BCD2000 Manual - Page 8
The FX CONTROL The OUTPUT The microphone input MIC INPUT - b control deejay
 |
View all Behringer B-CONTROL DEEJAY BCD2000 manuals
Add to My Manuals
Save this manual to your list of manuals |
Page 8 highlights
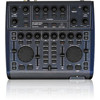
B-CONTROL DEEJAY BCD2000 3. CONTROL ELEMENTS AND CONNECTIONS The various control elements of your BCD2000 are described in this chapter. All controls and connections are explained in detail, and there are several useful tips on their use. 3.1 Control surface Fig. 3.1: The BCD2000’s control elements The microphone input section (MIC INPUT) Set the volume of the microphone signal with the MIC LEVEL control. The CLIP LED illuminates as soon as the microphone signal level is too high and could possibly cause audible distortion. If this happens, slightly turn the MIC LEVEL control counterclockwise. The microphone input section has a 2-band equalizer (EQ HIGH for high frequencies and EQ LOW for low frequencies). Use the TALKOVER button to activate the software’s talkover function. The talk-over function reduces the master output signal and can come in handy when your own voice needs to be prominently heard. When you want to make an announcement, also press button . The ON AIR button routes the microphone signal to the master output signal. The FX CONTROL section These four controls as well as the buttons A to D can have various software functions assigned to them. By default they are assigned to the two effects sections. Use the ANALOG INPUT buttons to select the input source. If the buttons are not pressed, the signals from decks A and B of the software are played back. When you press a button, the analog input signal will be added to the corresponding deck in the B-DJ software. Deck A can play back the phono input A or the microphone signal. Deck B plays back the signal applied at input B (phono or CD). The input source for deck A is chosen in the control panel (see chapter 2.3), while the input source for deck B is selected on the rear panel (phono/line switch ). The OUTPUT section The PHONES output (1/4" stereo connector) is used for connecting headphones. Use the PHONES control to adjust the volume for the headphones output . 8 3. CONTROL ELEMENTS AND CONNECTIONS
-
 1
1 -
2
-
 3
3 -
 4
4 -
 5
5 -
 6
6 -
 7
7 -
 8
8 -
 9
9 -
 10
10 -
 11
11 -
 12
12 -
 13
13 -
14
-
15
-
16
-
17
 |
 |
