Behringer DDM4000 Quick Start Guide - Page 7
Controls - case
 |
View all Behringer DDM4000 manuals
Add to My Manuals
Save this manual to your list of manuals |
Page 7 highlights
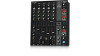
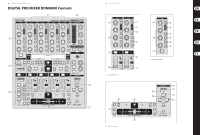
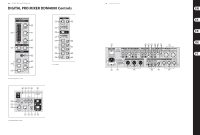
12 DIGITAL PRO MIXER DDM4000 DIGITAL PRO MIXER DDM4000 Controls (EN) Controls (1) The input select switch lets you switch between two signal sources. Select Line to hear the signal of the Line input (67). Select Phono/Line to listen to the incoming source signal at the Phono/Line (68) input. (2) The GAIN knob adjusts the level of the input signal. The actual level is displayed on the level meter (3). (3) The 7-segment LED meter indicates the level of the input signal. (4) Each input channel features a 3-band equalizer (HIGH, MID and LOW) with kill feature, giving you up to 12 dB of boost and a maximum cut of -∞ dB (kill). The kill feature lets you mute the given frequency range. When each EQ knob is turned fully left, the signal is effectively muted. All EQ parameters can be adjusted in Channel Setup. (5) The MODE push button changes the functionality of the preset push button (6) from Multi to Single. (6) The preset push buttons P1, P2 and P3 allow you to store and activate equalizer presets. When activated in Single Mode, these push buttons provide a maximum cut of -∞ dB (kill function). (7) Press the PFL push button to listen in on the channel's signal using headphones. (8) The fader controls the channel volume. (9) The CURVE switch adjusts the response of the fader. In SOFT Mode, the fader responds slower to steady fader movement in the upper range and quicker in the lower range. In SHARP Mode, the fader adjusts the volume quicker in the upper third and slower in the lower range. In MID Mode, the fader responds in a linear fashion. Since a difference in volume levels is heard when switching between modes, don't use this switch while playing music! (10) The CF ASSIGN push button lets you determine on which side of the crossfader (20) (A or B the signal is to be heard. (11) The GAIN knob adjusts the level of the microphone signal at the MIC 1 input. (12) This switch determines which signal is to be displayed on the level meter (13). IN VU shows the unprocessed input level which helps you to adjust the microphone signal correctly. XMC VU shows the level after it has passed the Ultramic processor. (13) The 7-segment LED meter indicates the level of the microphone channel. (14) The microphone channel strip features a 3-band equalizer (HIGH, MID and LOW). The range is ±12 dB. (15) The ON/OFF push button turns the microphone channel on and off. (16) The MIC SETUP push button opens the Mic Setup menu on the display. This allows you to adjust the settings of the equalizer, the Ultramic processor and the MIC FX (effects processor). (17) The XMC ON push button activates the ULTRAMIC processor, which includes a 2-band compressor and expander. Ultramic settings can be adjusted in Mic Setup. (18) The MIC FX ON push button activates the microphone effects processor. Select the effect in Mic Setup. (19) The TALK ON push button activates the Talkover function. This attenuates the volume level of the music as soon as you speak into the microphone. This is a very useful function to make yourself heard over the music being played. You can adjust all the relevant settings in Talk Setup. (20) The replaceable crossfader is used to fade between the signals that are assigned to its two sides A and B. You can assign the stereo channels and sampler using the CF Assign push buttons (10) and (65). (21) The CF ON push button activates the crossfader. When the push button is not pressed, the signals of the individual channels are routed straight to the Main outputs. (22) There are 3 Kill push buttons (HIGH, MID and LOW) on each side of the crossfader which let you mute the given frequency range. In Crossfader Setup, it is possible to activate a special X-OVER mode that enhances the crossfader's functionality in combination with the Kill push buttons. 13 Quick Start Guide (23) Press the FULL FREQ push button to remove any frequency cuts of the KILL EQ (22). (24) The CURVE knob lets you seamlessly adjust the response of the crossfader. The REVERSE function allows you to reverse the configuration of the crossfader. This way you can toggle between Channel A and B at the flick of a switch. (25) REVERSE HOLD activates a permanent Reverse function. The crossfader fades between sides A and B in the reverse direction. This means that A is now on the right and B on the left side. (26) REVERSE TAP activates a momentary Reverse function. This means that A and B are interchanged as long as the TAP push button is held down. (27) Press the BOUNCE TO MIDI CLK push button to activate the bouncing. Once the push button is pressed, the signal repeatedly jumps from A to B and back again corresponding to the interval pre-selected by using the BEAT push buttons (28). (28) The BEAT push buttons let you determine the Bounce rate, which can range between one and 16 beats. (29) These LEDs indicate the number of beats you have chosen. (30) The OUTPUT A knob controls the volume of output A ((73)). (31) The BALANCE knob adjusts the stereo panning of output A. (32) The OUTPUT B knob controls the volume of output B ((74)). (33) The high-resolution, 22-segment OUTPUT LEVEL meter indicates the level of the output signal on OUTPUT A. (34) ULTRAMIZE ON/OFF push button: The Ultramizer is an effect that enhances the loudness and assertiveness by dynamic compression. In Ultramizer Setup, you can configure the Ultramizer. (35) The LOAD push button lets you load the user settings of the entire mixer. The settings that are active when the device is turned off are loaded when the device is switched back on again. (36) Connect the headphones to the PHONES jack (1/4" TRS connector). (37) The OUTPUT knob controls the volume of the head-phones. (38) The MIX knob adjusts the balance between PFL signal and PGM signal (PFL = Pre Fader Listening, fader independent pre-listening of individual channels; PGM = Program, Master signal). When the knob is turned completely to the left, you only hear the PFL signal, whereas when turned completely to the right the Master signal is heard. Between these two positions, you can adjust the mix of both signals. (39) The PUNCH EQ function helps synchronize two tracks. You can orient yourself to the snare or the bass drum or both. Press the SNARE or BASS push button to emphasize the selected sound in the headphones. (40) When the SPLIT push button is pressed, the PFL signal is heard in the left headphone and the PGM signal is only heard in the right headphone. (41) The graphic display shows BPM values, effect names and effect parameters as well as channel assignments. It also leads you through Console Setup. (42) The FX ON push button activates the effects unit. (43) Press the FX ASSIGN push button to assign an effects unit to a signal source (push button flashes). The possible input sources are listed on the display. Select the preferred source by turning and pressing the PARAMETER knob (45). (44) The DEPTH knob adjusts the effect intensity (depth). For some effects, it also lets you adjust the mix between the original signal (dry) and the effect signal (wet). (45) Press the PARAM (eter) knob to select the effect parameters. By turning the knob, you can change the parameter shown on the display. (46) Press SELECT/LOW to access the effects list (on the display). Turn and press the knob (45) to load a preset. (47) Press the PARAM/MID push button to access the effect parameters. Turn the knob (45) to change the parameter value. (48) Press DEFAULT/HIGH to restore a preset. (49) Depending on the selected effect, the BEAT push buttons can adjust time-related parameters. However, the values entered are not in milliseconds or similar units, but in beats. (50) To enter the tempo manually, tap this push button (at least 2x) in the rhythm of the music (TAP). By keeping the AUTO BPM/TAP push button pressed a little longer (> 1 s), the automatic tempo input (AUTO BPM) is reactivated. (51) Turn the CONSOLE SETUP knob to adjust the tempo of the MIDI Clock (press and turn simultaneously = coarse adjustment). A short press on the knob confirms the entry made. A long press on the knob lets you access Console Setup. (52) The MIDI START/STOP/ESC turns on the MIDI Clock. (53) The ADJUST push buttons let you transfer the tempo of the BPM counter to the MIDI Clock. (54) Press the INSERT push button to add the sampler signal to the channel (Insert Mode). If the push button is not activated, the sampler is mixed to the selected channel (Mix Mode). In both cases, playback is initiated with the REC SOURCE push buttons. When the sampler is routed to the crossfader, the LED of the INSERT push button goes out. (55) The VOLUME/MIX knob controls the volume of the sampler (in Mix Mode) as well as the volume balance between input signal and Sampler (in Insert Mode). (56) The REC SOURCE push buttons let you select the channel for recording and playing back samples. (57) Press the PFL push button to listen in on the sampler signal with the headphones. (58) SAMPLE LENGTH adjusts the recording time (1-16 beats or endless recording ∞). (59) RECORD/IN lets you record to the Sampler. Select a bank beforehand. By pressing the push button a second time, the recording is stopped (only in ∞ Mode).
-
 1
1 -
 2
2 -
 3
3 -
 4
4 -
 5
5 -
 6
6 -
 7
7 -
 8
8 -
 9
9 -
 10
10 -
 11
11 -
 12
12 -
13
-
14
-
15
-
16
-
17
-
18
-
19
 |
 |
