Behringer NU12000DSP Quick Start Guide - Page 7
Step 2: Controls, Paso 2: Controles, Etape 2 : Réglages, Schritt 2: Regler, Passo 2: Controles
 |
View all Behringer NU12000DSP manuals
Add to My Manuals
Save this manual to your list of manuals |
Page 7 highlights
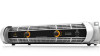
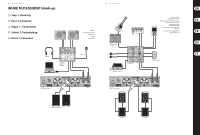
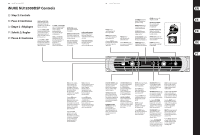
12 iNUKE NU12000DSP iNUKE NU12000DSP Controls (EN) Step 2: Controls (ES) Paso 2: Controles (FR) Etape 2 : Réglages (DE) Schritt 2: Regler (PT) Passo 2: Controles POWER SUPPLY jack accepts power cables that use twist-locking Neutrik powerCON 32 A connectors (cable not included). NOTE: A Neutrik powerCON 32 A connector and assembly instruction sheet are included in the packaging with your iNUKE amplifier. Power cable is not included. POWER SUPPLY Connectez un câble d'alimentation équipé d'un connecteur à verrouillage Neutrik powerCON 32 A. REMARQUE : Un connecteur Neutrik powerCON 32A et les instructions d'assemblages sont inclus avec votre amplificateur iNUKE. Le cordon secteur n'est pas inclu. La toma POWER SUPPLY acepta cables de alimentación que usen conectores Neutrik powerCON 32 A con sistema de fijación de rosca. NOTA: Con su amplificador iNUKE se incluye un conector Neutrik powerCON 32A y la tabla con las instrucciones de montaje. El cable de alimentación no está incluido. NETZANSCHLUSS akzeptiert Netzkabel mit Neutrik powerCON 32 A-Drehriegelanschluss. HINWEIS: Ein Neutrik powerCON 32A Anschluss und eine Montageanleitung sind im Lieferumfang Ihres iNUKE Verstärkers enthalten. Das Netzkabel ist nicht enthalten. FONTE DE ALIMENTAÇÃO o jack aceita cabos de alimentação que usam conectores com trava de torção Neutrik powerCON 32 A. NOTA: Um conector Neutrik powerCON 32A e a folha de instruções de montagem estão inclusos na embalagem do seu amplificador iNUKE. O cabo de alimentação não está incluso. 13 Quick Start Guide INPUTS Route line-level input signals into these combination jacks using XLR, balanced ¼" TRS, or unbalanced ¼" TS connectors ENTRADAS Conecte su fuente de sonido al amplificador a traves de conectores TRS de 6,3 mm, o XLR. Las tomas TRS tambien aceptan conectores TS de 6,3 mm. ENTRÉES Connectez votre le signal d'entree a l'ampli a l'aide des embases Jack stereo 6,35 mm, ou XLR. L'entree Jack recoit les fiches symetriques (Jack stereo) ou asymetriques (Jack mono). EINGÄNGE Leiten Sie Linepegel-Eingangssignale über XLR-Stecker, symmetrische 6,3-mm-Stereoklinken- oder unsymmetrische 6,3-mmKlinkenstecker zu diesen Kombinationsbuchsen. ENTRADAS INPUT Encaminhe os sinais de entrada de nivel de linha para estes conectores de combinacao utilizando conectores XLR, TRS de ¼" balanceados ou TS de ¼" nao balanceados. XLR Plug ¼" TS Plug ¼" TRS Plug BREAKER (automated fuse). After eliminating the cause of faulty operation, simply depress the BREAKER and power up the unit again. The BREAKER acts in place of common discardable fuses. BREAKER WARNING: Take the following actions BEFORE resetting the breaker: • Unplug the AC main cable • Press the POWER button to the extended "OFF" position • Turn all input gain control elements down • And then, reset the breaker, connect the unit to the mains, switch ON and slowly increase the gain to the target volume BREAKER (fusible automático). Sencillamente presionando este interruptor puede volver a ponerse en funcionamiento el fusible disparado una vez se hayan eliminado las fuentes de error. El fusible automático BREAKER sustituye los habituales cortacircuitos fusibles. AVERTENCIA RELATIVA AL INTERRUPTOR AUTOMÁTICO: Realice los pasos siguientes ANTES de reiniciar el interruptor automático: • Desconecte el cable de alimentación • Pulse el botón POWER hasta que quede en la posición "OFF" • Coloque al mínimo todos los controles de ganancia de entrada • Después de eso, reinicie el interruptor automático, conecte de nuevo la unidad a la corriente eléctrica, enciéndala y suba lentamente la ganancia hasta el volumen que quiera Le commutateur BREAKER (coupe-circuit) remplace un fusible classique. Si la protection a sauté, une simple pres-sion sur ce commutateur permet de la remettre en fonction une fois la cause du problème localisée et supprimée. AVERTISSEMENT QUANT AU DISJONCTEUR : Effectuez les actions suivantes AVANT de réarmer le disjoncteur : • Débranchez le câble secteur • Mettez le bouton POWER en position "OFF" • Placez tous les réglages de gain au minimum • Puis, réarmez le disjoncteur, connectez l'appareil au secteur, mettez-le sous tension et montez doucement le gain jusqu'au volume souhaité BREAKER (Sicherungsautomat). Durch einfaches Drücken auf diesen Schalter kann der ausgelöste Automat nach Beseitigung aller Fehlerquellen wieder in Betrieb genom-men werden. Der BREAKER ersetzt die sonst üblichen Schmelzsicherungen. WARNHINWEIS ZUM TRENNSCHALTER: Treffen Sie folgende Maßnahmen, BEVOR Sie den Trennschalter zurücksetzen: • Ziehen Sie das Netzkabel ab • Drücken Sie die POWER- Taste bis zur erweiterten "OFF/AUS" Position • Drehen Sie alle Eingangsverstärkungsregler zurück • Dann können Sie den Trennschalter zurücksetzen, das Geräte ans Stromnetz anschließen, einschalten und langsam die Verstärkung bis zur Ziellautstärke erhöhen BREAKER (disjuntor automático). Depois de premir este interruptor, é possível colocar novamente em funcionamento o dispositivo accionado após a eliminação de todas as fontes de erros. O BREAKER substitui os fusíveis tradicionais. AVISOS SOBRE O DISJUNTOR: Tome as seguintes providências ANTES ao reinicializar o disjuntor: • Desligue o cabo AC principal • Aperte o botão POWER e coloque-o na posição "OFF" estendida • Abaixe todos os elementos do controle de ganho de entrada • E então, reinicialize o disjuntor, conecte a unidade à rede, ligue-a, e aumente aos poucos o ganho até chegar ao volume desejado TWIST- LOCKING SPEAKER OUTPUTS connect the amplifier to the speakers using professional speaker cables with twist-locking plugs. SALIDAS DE ALTAVOZ CON FIJACION DE TIPO BAYONETA Conecte este amplificador a los altavoces usando cables de altavoz profesionales con conectores con sistema de fijacion de tipo bayoneta. CONNEXIONS POUR ENCEINTES À VERROUILLAGE Connectez l'ampli aux enceintes a l'aide de fiches professionnelles a verrouillage. DREHRIEGELBOXENAUSGÄNGE Verbinden Sie den Verstärker über die Drehriegelstecker professioneller Boxenkabel mit den Lautsprechern. TWIST- LOCKING SPEAKER OUTPUTS Conecte o amplifiçador aos alto-falantes usando cabos para altofalantes profissionais com plugues de travamento de giro. VENTILATION FAN speed adjusts automatically to ensure trouble-free operation. VENTILADOR La velocidad de este ventilador se ajusta de forma automatica para asegurarle un funcionamiento continuo y sin problemas. VENTILATEUR La vitesse du ventilateur se regle automatiquement. LÜFTER Die Lüftergeschwindigkeit ist automatisch geregelt und gewährleistet einen reibungslosen Betrieb. VENTILADOR DE VENTILAÇÃO A velocidade do ventilador é automaticamente ajustada, assegurando assim um funcionamento sem quaisquer problemas.
-
 1
1 -
 2
2 -
 3
3 -
 4
4 -
 5
5 -
 6
6 -
 7
7 -
 8
8 -
 9
9 -
 10
10 -
 11
11 -
 12
12 -
13
-
14
-
15
-
16
 |
 |
