Behringer VIRTUBE VT100FXH Quick Start Guide - Page 8
Controls, Controles
 |
View all Behringer VIRTUBE VT100FXH manuals
Add to My Manuals
Save this manual to your list of manuals |
Page 8 highlights
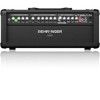
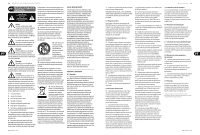
14 VIRTUBE VT250FX/VT100FX/VT50FX/VT100FXH VIRTUBE VT250FX/VT100FX/VT50FX/VT100FXH Controls (EN) Controls (1) The INPUT socket is the 1/4" connector for your guitar. Please use a standard 1/4" TS connector. (23) The VTC push button activates and deactivates the VTC Virtual Tube Circuitry. (2) The CLEAN CHANNEL LED lights up when the CLEAN channel is active. (24) The CD IN connector allows you to connect the output signal of a CD player, tape deck, or CD/MD walkman. (3) The GAIN control determines the volume of the CLEAN channel. (25) The LINE OUT/PHONES jack is for headphones connection. (4) The CRUNCH button (VT100FXH and VT100FX only) allows you to add some slight distortion to your clean sound, giving it a bit of "dirt" or "crunch". (5) The BASS control in the EQ section allows you to raise or lower the bass frequencies on the CLEAN channel. (26) The POWER switch turns your VIRTUBE on and off. (27) The VIRTUBE is connected to the mains using a standard IEC receptacle. (28) FUSE HOLDER/VOLTAGE SELECTOR. (6) With the MIDDLE control you can raise or lower the (29) This is where the fan of the unit is located. midrange frequencies on the CLEAN channel. (30) The SPEAKER OUT connectors (only one on the VT100FX (7) The TREBLE control adjusts the treble frequencies on the CLEAN channel. and VT50FX) can be used to connect external speakers with a miminum impedance of 4 Ω. The outputs of the VT250FX deliver 50 Watts of power per channel (L/R). (8) Press the CHANNEL button to switch between the CLEAN Always use speakers with a minimum impedance of 8 Ω and OVERDRIVE channels. The channel LED lights up to ensure maximum power output. when the channel is activated. (31) The FX LEVEL button allows you to adapt the FX LOOP (9) The OVERDRIVE CHANNEL LED lights up when the to the operating level of an external effects device channel is active. (+4 dBu/-10 dBV). (10) The GAIN control determines the amount of gain applied and hence the degree of distortion in the OVERDRIVE channel. (11) The OD1/OD2 button (VT100FXH and VT100FX only) switches between two different overdrive sounds. (12) The BASS control in the EQ section allows you to raise or lower the bass frequencies on the OVERDRIVE channel. (13) With the MIDDLE control (VT100FXH and VT100FX only) you can raise or lower the midrange frequencies on the OVERDRIVE channel. (32) The VIRTUBE provides a serial insert path for inserting external effects (e.g. reverb processor). To do so, connect the FX SEND jack to the input of the effects device. (33) Connect the FX RETURN jack to the output of the external effects device. The VT250FX has two jacks (L/R) because it is a stereo amplifier. (34) Use the FOOTSWITCH jack to connect the 1/4" TRS plug of the footswitch supplied with the unit. (35) SERIAL NUMBER. (14) The TREBLE control adjusts the treble frequencies on the OVERDRIVE channel. (15) Use the CONTOUR control for additional, highly characteristic adjustment of the midrange, allowing you to easily create traditional as well as ultra-modern guitar sounds. Check Out behringer.com for Full Manual (16) The VOLUME control adjusts the volume level of the OVERDRIVE channel. (17) The DIGITAL FX LED lights up when the effects processor is active. (18) Use the FX PRESET control to select one of 16 effects. (19) The FX LEVEL control adjusts the mix ratio between the original and the effect signal. (20) The REVERB LEVEL control determines the effect intensity of the additional reverb effect. (21) The FX LOOP MIX control (VT100FXH and VT100FX only) determines the effect intensity of the external effect. (22) The MASTER VOLUME control adjusts both the overall volume and the line out/headphones volume. 15 Quick Start Guide (ES) Controles (1) El conector jack de 6,3 mm rotulado INPUT es la entrada del VIRTUBE a la que debes conectar tu guitarra. Utiliza cables estándar con conectores jack mono de 6,3 mm. (2) El LED CLEAN CHANNEL se ilumina cuando el canal "limpio" está activo. (3) Con este control GAIN regulas el volumen del canal CLEAN. (4) El botón CRUNCH (solo VT100FXH y VT100FX) te permite distorsionar levemente el sonido "limpio" de tu guitarra, dándole un carácter más sucio y "crujiente". (5) El control BASS de la sección EQ te permite aumentar o atenuar las frecuencias bajas del canal CLEAN. (6) El control MIDDLE te permite aumentar o atenuar las frecuencias medias del canal CLEAN. (7) El control TREBLE te permite regular las frecuencias altas del canal CLEAN. (8) Con el botón CHANNEL puedes conmutar entre los canales CLEAN y OVERDRIVE. El LED del canal activo se ilumina. (9) El LED OVERDRIVE CHANNEL se ilumina cuando el canal está activo. (10) Con el control GAIN regulas la preamplificación y, por ende, la cantidad de distorsión del canal OVERDRIVE. (11) Con el botón OD1/OD2 (solo VT100FXH y VT100FX) conmutas entre 2 tipos de overdrive distintos. (12) El control BASS de la sección EQ te permite aumentar o atenuar las frecuencias bajas del canal OVERDRIVE. (13) El control MIDDLE (solo VT100FXH y VT100FX) te permite aumentar o atenuar las frecuencias medias del canal OVERDRIVE. (14) El control TREBLE te permite regular las frecuencias altas del canal OVERDRIVE. (15) El control CONTOUR te permite alterar el rango medio de frecuencias de manera que puedas producir fácil y rápidamente desde sonidos tradicionales hasta supermodernos. (16) Con el control VOLUME regulas el volumen del canal OVERDRIVE. (17) El LED DIGITAL FX se ilumina cuando el procesador de efectos está activo. (18) Con el control FX PRESET puedes seleccionar uno de los 16 efectos. (19) Con el control FX LEVEL regulas la relación entre la señal original sin efecto y la señal con efecto. (20) Con el control REVERB LEVEL determinas la cantidad de efecto de la reverb independiente. (21) Con el control FX LOOP MIX (solo VT100FXH y VT100FX) determinas la cantidad de efecto de los procesadores externos. (22) Con el control MASTER VOLUME regulas el volumen general, de los auriculares y de la salida de línea. (23) Accionando el pulsador VTC se activa y desactiva la conmutación Virtual Tube, VTC. (24) En la entrada CD IN puedes conectar las salidas de un reproductor de CD, cintas o MD. (25) Conecta tus auriculares en la salida LINE OUT/PHONES. (26) Con el interruptor POWER se enciende el VIRTUBE. (27) La conexión a la red eléctrica se realiza mediante un conector IEC estándar. (28) PORTAFUSIBLES/SELECCIÓN DE VOLTAJE. (29) Aquí se encuentra el ventilador del amplificador. (30) En las salidas SPEAKER OUT (los VT100FX y VT50FX solo tienen una salida) puedes conectar altavoces externos con impedancia mínima de 4 Ω. Las salidas del VT250FX proporcionan, por canal, 50 vatios (L/R). Utiliza solo altavoces con impedancia de 8 Ω para un funcionamiento óptimo. (31) El botón FX LEVEL te permite ajustar los conectores del bucle de efectos (FX LOOP) al nivel operativo del procesador de efectos externo (+4 dBu/-10 dBV). (32) El VIRTUBE cuenta con una ruta de inserción serial para efectos externos (por ejemplo, una reverb). Para hacer uso de esta ruta, conecta la salida FX SEND con la entrada del procesador de efectos externo. (33) Conecta la salida del procesador de efectos en la entrada FX RETURN. El VT250FX dispone de 2 entradas (L/R) dado que se trata de un amplificador estéreo. (34) Enchufa el pedal suministrado en el conector FOOTSWITCH. (35) NÚMERO DE SERIE. Si quiere acceder al manual de instrucciones completo, vaya a la página web behringer.com
-
 1
1 -
2
-
 3
3 -
 4
4 -
 5
5 -
 6
6 -
 7
7 -
 8
8 -
 9
9 -
 10
10 -
 11
11 -
 12
12 -
 13
13 -
14
-
15
 |
 |
