Belkin F1D102 User Manual - Page 11
Adding Slave Units
 |
UPC - 722868233405
View all Belkin F1D102 manuals
Add to My Manuals
Save this manual to your list of manuals |
Page 11 highlights
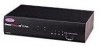
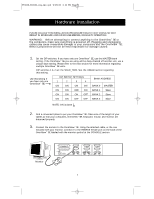
P73039_F1D102-eng_man.qxd 9/26/00 3:42 PM Page 10 Usage (continued) Adding Slave Units This assumes you already have a MASTER unit (or MASTER and slave units) set-up and working properly. Below is the procedure of daisy-chaining a new slave unit. • Set the DIP switches of the slave unit to a unique slave BANK setting. • Connect the computers using the same procedure outlined in steps 5 to 9 in the Hardware Installation section, page 6. DO NOT POWER UP THE COMPUTERS YET. • Connect the power supply to the OmniView™ SE, and plug it into any available AC outlet. This is necessary to initialize the unit. You will see the LED display on the front panel show the unit's bank address setting. • Using the F1D108-CBL daisy-chain cable, connect one end to the "Master Input/Slave Output" of the unit. Refer to the diagram on page 11. • If the previous unit is the MASTER, then the other end of the cable connects to the Master Input/Slave Output port of the MASTER (such as cable 1 in the diagram on page 11). • If the previous unit is a slave, then the other end goes to the Slave Input port of the previous slave unit (such as cables 2 and 3 in the diagram on page 11). • RESET the MASTER unit by pressing the BANK/SCAN and CHANNEL buttons simultaneously. This is necessary for the MASTER unit to detect the newly added slave unit. • Verify that the MASTER unit has detected the new slave by pressing the BANK/SCAN button. If it detected the new slave properly, the LED "1" on the new slave unit will blink. If you have many slave units, you may have to press the BANK/SCAN button a couple of times to cycle through the preexisting slave units before reaching the newly added unit. • Now you can power up the computers connected to the newly added slave unit. After all of the computers have booted up, you may need to RESET the MASTER unit again to detect the presence of powered computers on the new slave unit. 10
-
 1
1 -
2
-
3
-
4
-
5
-
 6
6 -
 7
7 -
 8
8 -
 9
9 -
 10
10 -
 11
11 -
 12
12 -
 13
13 -
 14
14 -
 15
15 -
 16
16 -
17
-
18
 |
 |
