BenQ MS513 DLP Projector MS513, MX514, MW516 User Manual
BenQ MS513 DLP Projector Manual
 |
View all BenQ MS513 DLP Projector manuals
Add to My Manuals
Save this manual to your list of manuals |
BenQ MS513 DLP Projector manual content summary:
- BenQ MS513 DLP Projector | MS513, MX514, MW516 User Manual - Page 1
MS513/MX514/MW516 Digital Projector User Manual - BenQ MS513 DLP Projector | MS513, MX514, MW516 User Manual - Page 2
Important safety instructions 3 Introduction 7 Projector features 7 Shipping contents 8 Projector exterior view 9 Positioning your projector 15 Choosing a location 15 Obtaining a preferred projected image size 16 Connection 19 Connecting a computer or monitor...20 Connecting Video source - BenQ MS513 DLP Projector | MS513, MX514, MW516 User Manual - Page 3
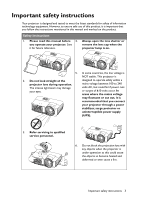
instructions mentioned in this manual and marked on the product. Safety Instructions 1. Please read this manual before 4. you operate your projector connect your projector through a power stabilizer, surge protector or uninterruptible power supply (UPS). 3. Refer servicing to qualified service - BenQ MS513 DLP Projector | MS513, MX514, MW516 User Manual - Page 4
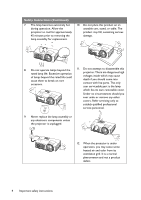
you ever undo or remove any other covers. Refer servicing only to suitably qualified professional service personnel. 9. Never replace the lamp assembly or any electronic components unless the projector is unplugged. 12. When the projector is under operation, you may sense some heated air - BenQ MS513 DLP Projector | MS513, MX514, MW516 User Manual - Page 5
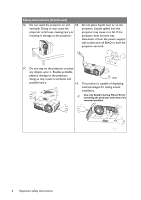
Safety Instructions (Continued) 13. Do not place this projector in any of 14. Do not block the ventilation holes. the following environments. - Space that is poorly ventilated or confined. Allow at least 50 cm clearance from walls and free flow of air around the projector. - Locations where - BenQ MS513 DLP Projector | MS513, MX514, MW516 User Manual - Page 6
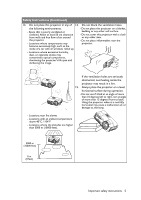
may cause it to fail. If the resulting in damage to the projector. projector does become wet, disconnect it from the power supply's wall socket and call BenQ to have the projector serviced. 17. Do not step on the projector or place any objects upon it. Besides probable physical damage to the - BenQ MS513 DLP Projector | MS513, MX514, MW516 User Manual - Page 7
MX514, MW516 are projectors short time after turning it off . • HDMI - Connecting a variety of audio/video components from digital signal. auto-adjustment - Automatically determines the best picture timings for the displayed image input signal contrast/brightness settings, and is proportional to - BenQ MS513 DLP Projector | MS513, MX514, MW516 User Manual - Page 8
is only supplied in some specific regions. Please consult your dealer for detailed information. Projector QDiugiictkal SPtraortjeGctuoirde Quick start guide Power cord VGA cable User manual CD Warranty card* Remote control with battery Optional accessories 1. Spare lamp kit 2. Ceiling mount - BenQ MS513 DLP Projector | MS513, MX514, MW516 User Manual - Page 9
view Front/upper side 1 2 3 4 5 6 7 8 Rear/lower side 9 10 11 12 13 14 15 1. External control panel (See "Projector" on page 10 for details.) 2. Lamp cover 3. Zoom ring 4. Focus ring 5. Vent (heated air exhaust) 6. Front IR remote sensor 7. Projection lens 8. Quick-release button 9. USB input jack - BenQ MS513 DLP Projector | MS513, MX514, MW516 User Manual - Page 10
settings. 13. 6. II POWER Toggles the projector between standby mode and on.See "Starting up the projector" on page 25 and "Shutting down the projector Up, / Down) Manually corrects distorted images resulting problem. See "Indicators" on page 65 for details. AUTO Automatically determines the best - BenQ MS513 DLP Projector | MS513, MX514, MW516 User Manual - Page 11
an improper attachment through the use of the wrong gauge or length screws. You can purchase a BenQ projector ceiling mount kit from the place you purchased your BenQ projector. BenQ recommends that you also purchase a separate Kensington lock compatible security cable and attach it securely to both - BenQ MS513 DLP Projector | MS513, MX514, MW516 User Manual - Page 12
timer setting directly. See "Setting the presentation timer" on page 40 for details. II Power Toggles the projector between standby mode and on. See "Starting up the projector" on page 25 and "Shutting down the projector" on page 46 for details. Keystone/Arrow keys ( / Up, / Down) Manually corrects - BenQ MS513 DLP Projector | MS513, MX514, MW516 User Manual - Page 13
27. 16. Page Up/Down 21. Teaching Template Page up/down arrows when connected Displays the selectable bar for teachers through USB to a PC. See "Remote details. Template" on page 44. 17. Mute 22. CC Toggles projector audio between on and Display the video term description on off. - BenQ MS513 DLP Projector | MS513, MX514, MW516 User Manual - Page 14
. • Replace only with the same or equivalent type recommended by the battery manufacturer. • Dispose of the used battery according to the battery manufacturer's instructions. • Never throw a battery into a fire. There may be danger of an explosion. • If the battery is dead or if you will not be - BenQ MS513 DLP Projector | MS513, MX514, MW516 User Manual - Page 15
from the ceiling in front of the screen. Purchase the BenQ Projector Ceiling Mounting Kit from your dealer to mount your projector on the ceiling. Set Front Ceiling in the SYSTEM SETUP: Basic > Projector Position menu after you turn the projector on. 3. Rear Table Select this location with the - BenQ MS513 DLP Projector | MS513, MX514, MW516 User Manual - Page 16
the projector lens to the screen, the zoom setting (if available), and the video format each factors in the projected image size. The projector should the projection distance. BenQ has provided a table of screen sizes to assist you in determining the ideal location for your projector. There are two - BenQ MS513 DLP Projector | MS513, MX514, MW516 User Manual - Page 17
offset (mm)" value. This will determine the final placement of the screen in relation to the horizontal plane of the projector. For example, if you are using the MX514/MS513 and measured projection distance was 5.0 m (5000 mm), the closest match in the "Average" column is 5040 mm. Looking across - BenQ MS513 DLP Projector | MS513, MX514, MW516 User Manual - Page 18
Projection distance MX514/MS513 Screen size Distance from screen (mm) Vertical off- Diagonal W H Min length Aver- Max length set (mm) BenQ recommends that if you intend to permanently install the projector, you should physically test the projection size and distance using the actual projector - BenQ MS513 DLP Projector | MS513, MX514, MW516 User Manual - Page 19
to: 1. Turn all equipment off before making any connections. 2. Use the correct signal cables for each source. 3. Ensure the cables are firmly inserted. • In the connections shown below, some cables may not be included with the projector (see "Shipping contents" on page 8). They are commercially - BenQ MS513 DLP Projector | MS513, MX514, MW516 User Manual - Page 20
connected to a projector. connect the MONITOR-OUT signal output jack on the projector to an external monitor following the instructions below: To connect the projector to a monitor: 1. Connect the projector to a computer as described in "Connecting the projector is connection method when the projector - BenQ MS513 DLP Projector | MS513, MX514, MW516 User Manual - Page 21
projector and the Video source device as described below: Terminal name HDMI Terminal appearance Reference HDMI "Connecting an HDMI source device" on page 22 Component Video S-Video Video COMPUTER S-VIDEO VIDEO "Connecting a Component Video source device" on page 23 "Connecting - BenQ MS513 DLP Projector | MS513, MX514, MW516 User Manual - Page 22
to the HDMI signal input jack on the projector. Once connected, the audio can be controlled by the projector OnScreen Display (OSD) menus. See "Audio Settings" on page 56 for details.. 2. Connect the other end of the HDMI cable to the HDMI jack on the projector. • If the selected video image is not - BenQ MS513 DLP Projector | MS513, MX514, MW516 User Manual - Page 23
source device to determine if it has a set of unused Component Video output jacks available: • If so, you can continue with this procedure. • If not, you will need to reassess which method you can use to connect to the device. To connect the projector to a Component Video source device: 1. Take - BenQ MS513 DLP Projector | MS513, MX514, MW516 User Manual - Page 24
you can also continue with this procedure. • If not, you will need to reassess which method you can use to connect to the device. To connect the projector to an S-Video/Video source device: 1. Take an S-Video/Video cable and connect one end to the S-Video/Video output jack of the Video source device - BenQ MS513 DLP Projector | MS513, MX514, MW516 User Manual - Page 25
Operation Settings menu, the projector will turn on automatically after the power cord has been connected and power Rotate the focus ring to adjust the image clearness. If the projector is still projector is activated for the first time, select your OSD language following the onscreen instructions. - BenQ MS513 DLP Projector | MS513, MX514, MW516 User Manual - Page 26
to optimize the picture quality. To do this, press AUTO on the projector or remote control. Within 3 seconds, the built-in Intelligent Auto Adjustment function will re-adjust the values of Frequency and Clock to provide the best picture quality. • The screen will be blank while Auto is functioning - BenQ MS513 DLP Projector | MS513, MX514, MW516 User Manual - Page 27
Use build-in test pattern You can adjust the image shape and focus status by observing the input signal content, or using the test pattern build-in OSD manual from OSD or remote control for better observe the shape changed. Open the OSD menu and go to the SYSTEM SETUP: Advanced > Test Pattern - BenQ MS513 DLP Projector | MS513, MX514, MW516 User Manual - Page 28
image is noticeably wider at either the top or bottom. It occurs when the projector is not perpendicular to the screen. To correct this, besides adjusting the height of the projector, you will need to manually correct it following one of these steps. • Using the remote control Press / on the - BenQ MS513 DLP Projector | MS513, MX514, MW516 User Manual - Page 29
/ to menu on. select a preferred language. 2. Use / to highlight the SYSTEM SETUP: Basic menu. 4. Press MENU/EXIT twice* on the projector or remote control to leave and save the settings. *The first press leads you back to the main menu and the second press closes the OSD menu. Operation 29 - BenQ MS513 DLP Projector | MS513, MX514, MW516 User Manual - Page 30
if necessary) and write the password you used in this manual, and keep the manual in a safe place for later recall. Setting a password Once a password has been set, the projector cannot be used unless the correct password is entered every time the projector is started. 1. Open the OSD menu and go to - BenQ MS513 DLP Projector | MS513, MX514, MW516 User Manual - Page 31
password in this manual, and you BenQ service center to decode the number. You may be required to provide proof of purchase documentation to verify that you are an authorized user of the projector. Changing the password 1. Open the OSD menu and go to the SYSTEM SETUP: Advanced > Security Settings - BenQ MS513 DLP Projector | MS513, MX514, MW516 User Manual - Page 32
. Remember to enter the new password next time the projector is started. 7. To leave the OSD menu, press MENU/EXIT. Disabling the password function To disable password protection, go back to the SYSTEM SETUP: Advanced > Security Settings > Power on lock menu after opening the OSD menu system - BenQ MS513 DLP Projector | MS513, MX514, MW516 User Manual - Page 33
will be scaled by the projector depending upon the 'aspect ratio' setting, which may cause some image distortion or loss of picture clarity. See "Selecting the aspect ratio" on page 34 for details. Changing Color Space In the unlikely event that you connect the projector to a DVD player via the - BenQ MS513 DLP Projector | MS513, MX514, MW516 User Manual - Page 34
and computers are in 4:3 ratio,and digital TV and DVDs are usually in 16:9 or 16:10 ratio. With the advent of digital signal processing, digital display devices like this projector can dynamically stretch and scale the image output to a different aspect than that of the image input signal. To change - BenQ MS513 DLP Projector | MS513, MX514, MW516 User Manual - Page 35
full screen. You could adjust the zoom setting or move the projector towards the screen to increase the image size if necessary. You is most suitable for images which are already in a 16:9 aspect, like high definition TV, as it displays them without aspect alteration. 5. 16:10: Scales an image so that - BenQ MS513 DLP Projector | MS513, MX514, MW516 User Manual - Page 36
on the remote control or projector repeatedly until your desired mode is best viewing in a blackened (little light) environment. 5. User 1/User 2 mode: Recalls the settings customized based on the current available picture modes. See "Setting the User 1/User 2 mode" on page 36 for details. Setting - BenQ MS513 DLP Projector | MS513, MX514, MW516 User Manual - Page 37
needs, you can make adjustments tothese functions by highlighting them and pressing / on the projector or remote control Adjusting Brightness The higher the value, the brighter the image. And the lower the setting, the darker the image. Adjust this control so the black areas of the image appear - BenQ MS513 DLP Projector | MS513, MX514, MW516 User Manual - Page 38
provide a set of suitable source images to measure color reproduction. These tools are not provided with the projector, however, your projector supplier patterns and can be used to test the color presentation on monitors, TVs, projectors, etc. You can project any image from the disc on the screen - BenQ MS513 DLP Projector | MS513, MX514, MW516 User Manual - Page 39
you have made all of the desired adjustments. 9. Press MENU/EXIT to exit and save the settings. Creating your own startup screen In addition to selecting the projector preset startup screen from among BenQ logo, Black or Blue screen, you can make your own startup screen that is an image projected - BenQ MS513 DLP Projector | MS513, MX514, MW516 User Manual - Page 40
presentation time on the screen to help you achieve better time management when giving presentations. Follow these steps to utilize this function: 1. Press Timer Set up on the remote control or go to the SYSTEM SETUP: Basic > Presentation Timer menu and press MODE/ ENTER to display the Presentation - BenQ MS513 DLP Projector | MS513, MX514, MW516 User Manual - Page 41
displays a confirmation message. You can decide whether to restart, continue or turn off the timer by following the on-screen instruction. Remote paging operations Connect the projector to your PC or notebook with a USB cable prior to using the paging function. You can operate your display software - BenQ MS513 DLP Projector | MS513, MX514, MW516 User Manual - Page 42
activated with an audio input connected,the audio can still be heard. The automatic switch to Eco Blank Mode after the projector is turned on for over the projector lamp You can set the blank time in the SYSTEM SETUP: Basic > Operation Settings > Eco Blank Timer menu to let the projector return the - BenQ MS513 DLP Projector | MS513, MX514, MW516 User Manual - Page 43
a correct connection to the projector audio input. See "Connection" on page 19 for how the audio input is connected. Muting the sound To temporarily turn off the sound: 1. Press MENU/EXIT and then press / until the SYSTEM SETUP: Advanced menu is highlighted. 2. Press to highlight Audio Settings and - BenQ MS513 DLP Projector | MS513, MX514, MW516 User Manual - Page 44
Use Teaching Template Making writing on the board easier for teachers, you can use build-in template by OSD or remote control. Open the OSD menu and go to the DISPLAY > Teaching Template . Choice Blackboard/ Whiteboard. > Off/ Letter Formation/ Musical Staff/ Worksheet/ Coordinate Chart. The - BenQ MS513 DLP Projector | MS513, MX514, MW516 User Manual - Page 45
whether to display reminder messages on screen. Use / to select your desired setting. • Splash Screen in the SYSTEM SETUP: Basic menu sets a preferred logo screen to be displayed during projector start-up. Use / to select a screen. Select the lamp saver mode • Using the remote control. Press Smart - BenQ MS513 DLP Projector | MS513, MX514, MW516 User Manual - Page 46
flashes orange, the projection lamp shuts down, and the fans will continue to run for approximately 90 seconds to cool down the projector. • To protect the lamp, the projector will not respond to any commands during the cooling process. • To shorten the cooling time, you can also activate the Quick - BenQ MS513 DLP Projector | MS513, MX514, MW516 User Manual - Page 47
/Cinema Brightness Contrast Color Tint 2. Sharpness PICTURE Brilliant Color On/Off Color Temperature Cool/Normal/Warm Primary Color R/G/B/C/M/Y 3D Color Management Hue Saturation Gain Save Settings 3. SOURCE Quick Auto Search Color Space Conversion On/Off Auto/RGB/YUV Operation 47 - BenQ MS513 DLP Projector | MS513, MX514, MW516 User Manual - Page 48
Language 4. SYSTEM SETUP: Basic Projector Position Menu display time Menu Settings Menu position Reminder message Direct power on Auto Power Off Operation Settings Eco Blank Timer Sleep Timer hr/12 hr On/Off On/Off Yes/No BenQ/Black/Blue/Purple BenQ/Black/Blue/MyScreen Yes/No 48 Operation - BenQ MS513 DLP Projector | MS513, MX514, MW516 User Manual - Page 49
All Settings 6. INFORMAT Current System Status ION • Source • Picture Mode • Resolution • Color System • Equivalent Lamp Hour • Firmware Version Note that the menu items are available when the projector detects at least one valid signal. If there is no equipment connected to the projector or - BenQ MS513 DLP Projector | MS513, MX514, MW516 User Manual - Page 50
1. DISPLAY menu Description of each menu • The default values listed in this manual, especially on pages 50-58, are for reference only. They may vary between the projectors due to the continuous improvement to the products. FUNCTION Wall Color Aspect Ratio Keystone Position DESCRIPTION Corrects - BenQ MS513 DLP Projector | MS513, MX514, MW516 User Manual - Page 51
present the 3D images. When 3D Sync function is enabled, the projector will enter a special picture mode and the current picture mode adjustment discover the inversion of the image depth, enable this function to correct the problem. This function is only enabled when the input signal is PC@120Hz, - BenQ MS513 DLP Projector | MS513, MX514, MW516 User Manual - Page 52
Reference Mode Brightness Pre-defined picture modes are provided so you can optimize your projector image set-up to suit your program type. See "Selecting a picture mode" on page 36 for details. Selects a picture mode that best suits your need for the image quality and further fine-tune the image - BenQ MS513 DLP Projector | MS513, MX514, MW516 User Manual - Page 53
. Color See "Selecting a Color Temperature" on page 38 for details. Temperature This function is only available when User 1/2 is selected. 3D Color Management Save Settings See "3D Color Management" on page 38 for details. This function is only available when User 1/2 is selected. Saves the - BenQ MS513 DLP Projector | MS513, MX514, MW516 User Manual - Page 54
4. SYSTEM SETUP: Basic menu FUNCTION Presentation Timer Language Projector Position Menu Settings DESCRIPTION Reminds the presenter to finish the presentation within a certain time frame. See "Setting the presentation timer" on page 40 for details. Sets the language for the On-Screen Display (OSD) - BenQ MS513 DLP Projector | MS513, MX514, MW516 User Manual - Page 55
projector" on page 25 for details. Auto Power Off Allows the projector to turn off automatically if no input signal is detected after a set period of time. See "Setting logo screen will display during projector Splash Screen start-up. Three options are available: BenQ logo, Black screen, or Blue - BenQ MS513 DLP Projector | MS513, MX514, MW516 User Manual - Page 56
you can connect the projector using a suitable RS-232 cable and update or download the projector's firmware. This function is intended for qualified service personnel. Selecting On enables the function and the projector displays the grid test pattern. It helps you adjust the image size and focus and - BenQ MS513 DLP Projector | MS513, MX514, MW516 User Manual - Page 57
captions in the primary language in your area). Monitor Out Selecting On enables the function. The projector can output a VGA signal when it is in standby mode and the COMPUTER 1 and MONITOR-OUT jacks are correctly connected to devices. See "Connecting a monitor" on page 20 for how to make the - BenQ MS513 DLP Projector | MS513, MX514, MW516 User Manual - Page 58
6. INFORMATION menu FUNCTION Current System Status DESCRIPTION Source Shows the current signal source. Picture Mode Shows the selected mode in the PICTURE menu. Resolution Shows the native resolution of the input signal. Color System Shows input system format, NTSC, PAL, SECAM, or RGB. Equivalent - BenQ MS513 DLP Projector | MS513, MX514, MW516 User Manual - Page 59
lens and case clean. Never remove any parts of the projector except the lamp. Contact your dealer if other parts need replacing. Cleaning the lens Clean the lens whenever case. Storing the projector If you need to store the projector for an extended time, please follow the instructions below: • Make - BenQ MS513 DLP Projector | MS513, MX514, MW516 User Manual - Page 60
is selected, the light output will be reduced and result in darker projected pictures, the projector protected for longer working life. Setting the projector in Economic/Smart Eco mode also extends the lamp operation life. To set Economic/Smart Eco mode, go into the SYSTEM SETUP: Advanced > Lamp - BenQ MS513 DLP Projector | MS513, MX514, MW516 User Manual - Page 61
below are for reference only. Please follow the actual on-screen instructions to prepare and replace the lamp. Status Message Install a new lamp for optimal performance. If the projector is normally run with Economic selected ("Setting Lamp mode eco function as Economic or Smart Eco mode" on - BenQ MS513 DLP Projector | MS513, MX514, MW516 User Manual - Page 62
to dispose of this lamp in a proper manner. • To assure optimal performance from the projector, it is recommended that you purchase a BenQ projector lamp for lamp replacement. 1. Turn the power off and disconnect the projector from the power outlet. If the lamp is hot, avoid burns by waiting for - BenQ MS513 DLP Projector | MS513, MX514, MW516 User Manual - Page 63
lamp in locations where water might splash on it, children can reach it, or near flammable materials. • Do not insert your hands into the projector after the lamp is removed. If you touch the optical components inside, it could cause color unevenness and distortion of the projected images. 6. Insert - BenQ MS513 DLP Projector | MS513, MX514, MW516 User Manual - Page 64
it into place. (a) (b) 10. Tighten the screw that secures the lamp cover. • Loose screw may cause a bad connection, which could result in malfunction. • Do not over tighten the screw. 11. Restart the projector. Do not turn the power on with the lamp cover removed. Resetting the lamp timer 12. After - BenQ MS513 DLP Projector | MS513, MX514, MW516 User Manual - Page 65
TEMP LAMP Power events Orange Off Green Flashing Off Green Off Orange Flashing Off Off Stand-by mode Off Powering up Off Normal operation 1. The projector needs 90 seconds to cool down as it was abnormally shut down without the normal cooling down process. Or Off 2. The - BenQ MS513 DLP Projector | MS513, MX514, MW516 User Manual - Page 66
correctly. Check the connection. Select the correct input signal with the SOURCE key on the projector or remote control. Open the lens cover. Blurred image Cause Remedy The projection lens is not correctly focused. The projector and the screen are not aligned properly. The lens cover is - BenQ MS513 DLP Projector | MS513, MX514, MW516 User Manual - Page 67
to 2.69, f = 21.95 to 24.18 mm (MW516) F = 2.55 f = 2.55 to 3.06 mm Offset: 130+-5% Zoom ratio:manual zoom, 1.1X(MX514/MS513)1.2X(MW516) Throw ratio: 1.97-2.17(60"@2.4m)(MX514/MS513) 1.2-1.5(38.7"@1m)(MW516) Lamp 190 W lamp Lamp life (normal/economic mode/smart eco mode)* 4500/6000/6500 Electrical - BenQ MS513 DLP Projector | MS513, MX514, MW516 User Manual - Page 68
Dimensions 301.7 mm (W) x 123.4 mm (H) x 232.5 mm (D) 232.5 123.4 301.7 Ceiling mount installation 228.0 68.3 71.2 Ceiling mount screws: M4 x 8 (Max. L = 8 mm) Unit: mm 242.1 71.2 20.0 65.4 149.5 82.4 301.7 68 Specifications 115.8 117.0 - BenQ MS513 DLP Projector | MS513, MX514, MW516 User Manual - Page 69
Timing chart Supported timing for PC input Resolution 720 x 400 640 x 480 800 x 600 1024 x 768 1024 x 576 1024 x 600 1024 x 59.887 59.978 60.000 66.667 74.546 75.020 75.060 119.518 119.854 119.989 *Supported timing for 3D function. Pixel Frequency (MHz) 28.322 25.175 31.500 31.500 36.000 40.000 - BenQ MS513 DLP Projector | MS513, MX514, MW516 User Manual - Page 70
Supported timing for HDMI input Resolution 720 x 400 640 x 480 800 x 600 1024 x 768 1280 x 800 1280 x 1024 1280 x 960 1440 x 900 1400 x 1050 1600 x 1200 - BenQ MS513 DLP Projector | MS513, MX514, MW516 User Manual - Page 71
60.00 50.00 60.00 50.00 60.00 50.00 Displaying a 1080i@60Hz or 1080i@50Hz signal may result in slight image vibration. Supported timing for Video and S-Video inputs Video mode NTSC* PAL SECAM PAL-M PAL-N PAL-60 NTSC4.43 Horizontal Frequency (kHz) 15.73 15.63 15 - BenQ MS513 DLP Projector | MS513, MX514, MW516 User Manual - Page 72
BenQ's written instructions, especially the ambient humidity must be inbetween 10% and 90%, temperature in-between 0°C and 35°C, altitude lower than 4920 feet, and avoiding to operate the projector manual or otherwise, without the prior written permission of BenQ Corporation. Disclaimer BenQ *DLP,
-
 1
1 -
 2
2 -
 3
3 -
 4
4 -
 5
5 -
 6
6 -
 7
7 -
8
-
9
-
10
-
11
-
12
-
13
-
14
-
15
-
16
-
17
-
18
-
19
-
20
-
21
-
22
-
23
-
24
-
25
-
26
-
27
-
28
-
29
-
30
-
31
-
32
-
33
-
34
-
35
-
36
-
37
-
38
-
39
-
40
-
41
-
42
-
43
-
44
-
45
-
46
-
47
-
48
-
49
-
50
-
51
-
52
-
53
-
54
-
55
-
56
-
57
-
58
-
59
-
60
-
61
-
62
-
63
-
64
-
65
-
66
-
67
-
68
-
69
-
70
-
71
-
72
 |
 |

Digital Projector
User Manual
MS513/MX514/MW516