Bernina 2500DCET Manual - Page 45
Cover stitch needle L, After threading, Re-threading, or changing, thread
 |
View all Bernina 2500DCET manuals
Add to My Manuals
Save this manual to your list of manuals |
Page 45 highlights
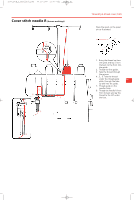
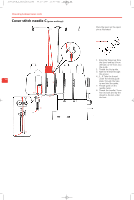
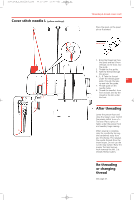
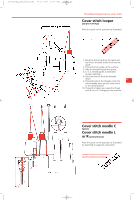
2500_DCE_2_englisch_neu 09.10.2007 15:00 Uhr Seite 45 Cover stitch needle L (yellow markings) 1 2 2 44 44 3 5 6 74 8 8 Threading 4-thread cover stitch Place the spool on the spool pin as illustrated. 1. Bring the thread up from the spool and lay it from the back to the front into the guide. 2. Thread the first guide. 3. Take the thread through the groove. 4., 5., 6. Take the thread under the thread guide 45 plate, through the take up and into the guide. 7. Thread guide on the needle clamp. 8. Thread the needle L from front to back and lay the thread to the left under the foot. After threading Lower the presser foot and close the looper cover. Switch the power switch to on «1». Test sew: Place a piece of fabric under the presser foot and needles, begin sewing. When sewing is complete, raise the needles by turning the handwheel away from you (clockwise). This releases the needle threads from the lower looper. Do not use the needle stop button! Raise the presser foot and remove work towards the left. Cut threads (thread cutter). Re-threading or changing thread See page 34.
-
 1
1 -
2
-
3
-
4
-
5
-
6
-
7
-
8
-
9
-
10
-
11
-
12
-
13
-
14
-
15
-
16
-
17
-
18
-
19
-
20
-
21
-
22
-
23
-
24
-
25
-
26
-
27
-
28
-
29
-
30
-
31
-
32
-
33
-
34
-
35
-
36
-
37
-
38
-
39
-
 40
40 -
 41
41 -
 42
42 -
 43
43 -
 44
44 -
 45
45 -
 46
46 -
 47
47 -
 48
48 -
 49
49 -
 50
50 -
51
-
52
-
53
-
54
-
55
-
56
-
57
-
58
-
59
-
60
-
61
-
62
-
63
-
64
-
65
-
66
-
67
-
68
-
69
-
70
-
71
-
72
-
73
-
74
-
75
-
76
-
77
-
78
-
79
-
80
-
81
-
82
 |
 |
