Bernina 732 Manual - Page 27
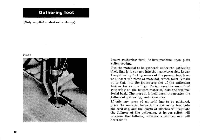
Darning, stockings
 |
View all Bernina 732 manuals
Add to My Manuals
Save this manual to your list of manuals |
Page 27 highlights
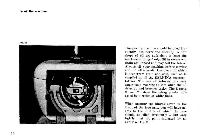
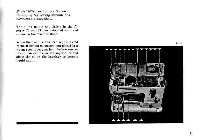
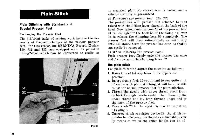
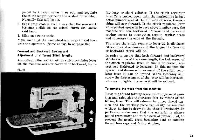
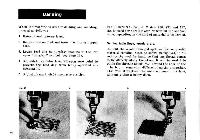
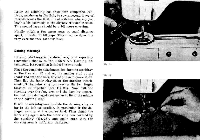
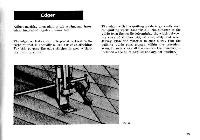
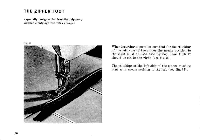
After the stitching has thus been completed, continue, as shown in fig. 24 b, to sew a second layer of threads across the first line of stitches, whereby you begin a bit outwards of the already stitched threads. This second layer should be a bit more covering. Finally stitch a few more rows at equal distance apart, in order to fill gaps. This must be done in a very even manner (see fig. 24 e ). Darning stockings Darning stockings is rendered easy and especially convenient thanks to the BERNTNA Darning Attachment. Its operation is indeed very simple. Place the complete attachment for darning stockings on the free arm 25 and set the smaller stud at the shank end into the bore hole of the arm cover at 51). Then lift the inner ring 58 of the darning attachment off the outer ring by pressing the two finger tongues 60 together (see fig. 26). Now pull the stocking over the free arm and the darning apparatus, until the damaged area comes to lie in the middle of the darning ring. It will be advantageous to slide the darning ring as far to the left as possible, in particular if the damaged aera is at the top or heal. Then clamp the inner ring again into the outer ring now covered by the stocking (fig. 26), and make sure that the stocking area is uniformly tightened. 61 51 Fig. 25 Fig. 2G
-
 1
1 -
2
-
3
-
4
-
5
-
6
-
7
-
8
-
9
-
10
-
11
-
12
-
13
-
14
-
15
-
16
-
17
-
18
-
19
-
20
-
21
-
 22
22 -
 23
23 -
 24
24 -
 25
25 -
 26
26 -
 27
27 -
 28
28 -
 29
29 -
 30
30 -
 31
31 -
 32
32 -
33
-
34
-
35
-
36
-
37
-
38
-
39
-
40
-
41
-
42
-
43
-
44
-
45
-
46
-
47
-
48
-
49
-
50
-
51
-
52
-
53
-
54
-
55
-
56
-
57
-
58
-
59
-
60
-
61
-
62
-
63
-
64
-
65
-
66
-
67
-
68
-
69
-
70
-
71
-
72
-
73
-
74
-
75
-
76
-
77
-
78
-
79
-
80
-
81
-
82
-
83
-
84
 |
 |
