Bissell Lift-Off® Multi Cyclonic Pet Vacuum User Guide - English - Page 13
Replace drive belt continued, Replace light bulb, Maintaining Pet TurboEraser™ Tool
 |
View all Bissell Lift-Off® Multi Cyclonic Pet Vacuum manuals
Add to My Manuals
Save this manual to your list of manuals |
Page 13 highlights
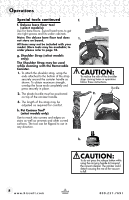
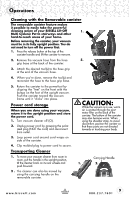
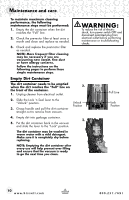
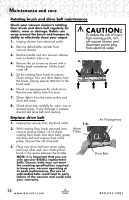
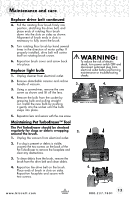
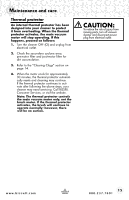
Maintenance and care Replace drive belt continued 4. Pull the rotating floor brush firmly into position, stretching the drive belt, and place ends of rotating floor brush down into the slots on sides as shown. Alignment of brush ends in slots is necessary to fully insert the brush. 5. Turn rotating floor brush by hand several times in the direction of motor pulley. If properly installed, drive belt will center itself on rotating brush crown. 6. Reposition brush cover and screw back into place. Replace light bulb 1. Unplug cleaner from electrical outlet. 2. Remove detachable canister and recline handle of vacuum. 3. Using a screwdriver, remove the one screw as shown and lift off the lens. 4. Remove the bulb from the socket by grasping bulb and pulling straight out. Install the new bulb by pushing it gently into the socket until the bulb snaps into place. 5. Reposition lens and secure with the one screw. Maintaining Pet TurboEraser™ Tool The Pet TurboEraser should be checked regularly for clogs or debris wrapping around the brush. 1. Unplug the vacuum from electrical outlet. 2. If a clog is present or debris is visible, unscrew the two screws on the back of the Pet TurboEraser to remove the faceplate and clear any obstructions. 3. To clean debris from the brush, remove the brush from the drive belt and clean debris. 4. Reposition the drive belt on the brush. Place ends of brush in slots on sides. Reposition faceplate and secure with two screws. WARNING: To reduce the risk of electric shock, turn power switch OFF and disconnect polarized plug from electrical outlet before performing maintenance or troubleshooting checks. 3. 4. 2. 4. www.bissell.com 13 800.237.7691
-
 1
1 -
2
-
3
-
4
-
5
-
6
-
7
-
 8
8 -
 9
9 -
 10
10 -
 11
11 -
 12
12 -
 13
13 -
 14
14 -
 15
15 -
 16
16 -
 17
17 -
 18
18 -
19
-
20
 |
 |