Blendtec Designer Series WildSide Owners Manual - Page 5
Installation, Operational Overview - cream
 |
View all Blendtec Designer Series WildSide manuals
Add to My Manuals
Save this manual to your list of manuals |
Page 5 highlights
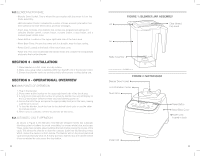
3.2 BLENDER MOTOR BASE • Blender Drive Socket: This is where the jar couples with the motor to turn the blade assembly. • LED Information Center: Indicates the number of times a blend cycle button has been pressed, the time left to blend, and error messages. • Touch Area: Consists of six buttons that contain pre-programmed settings for selective blender control, a pulse button, a power button, a stop button, and a manual speed control slider. • Power Button: Located on the upper right hand side of the touch area. • Motor Base Cover: Houses the power unit in a durable, easy-to-clean casing. • Power Cord: Located at the back of the motor base cover. • Power Unit: This unit is located with the blender motor and contains the computerized electronics that run the blender. SECTION 4 - INSTALLATION 1. Place blender on a flat, clean, and dry surface. 2. Make sure a plug outlet is available within two feet (61cm) of the blender motor. 3. Ensure that blender vents are unobstructed to allow proper cooling during use. SECTION 5 - OPERATIONAL OVERVIEW 5.1 MAIN POINTS OF OPERATION 1. Plug in the blender. 2. Press power button located on the upper right hand side of the touch area. 3. A cycle count (indicating the number of cycles the blender has run) will display on the LED Information Center for three seconds following power on. 4. Secure the lid to the jar and place the appropriately filled jar on the base, making sure the jar is secure. 5. To start the blender, touch the icon for the desired blend cycle or use the slider for manual control. 6. When cycle is complete, remove the blender jar and serve. 5.2 AUTOMATIC CYCLE OPERATION As shown in Figure 3, the Blendtec Total Blender Designer Series has automatic blending cycles for batters, ice crush, smoothies, ice cream, whole juice, and soups. These cycles have variable speed settings that will change during the course of the cycle. This allows the blender to draw the contents down into the blending vortex, which creates the desired, uniform texture. The blender will run its pre-programmed cycle and automatically shut off. If at any point you want to stop the blender before it has completed its cycle, press the stop button. 8 FIGURE 1: BLENDER JAR ASSEMBLY Lid Clear Vented Cap Insert Jar Blade Assembly The jar shown above is the WildSide Jar FIGURE 2: MOTOR BASE Blender Drive Socket LED Information Center Touch Area Power Button Motor Base Cover Power Cord located in back Power Unit 9
-
 1
1 -
 2
2 -
 3
3 -
 4
4 -
 5
5 -
 6
6 -
 7
7 -
 8
8 -
 9
9 -
 10
10 -
 11
11
 |
 |
