Bosch 11250VSRD Operating Instructions
Bosch 11250VSRD - 3/4 SDS Plus Rotary Hammer Manual
 |
UPC - 000346378603
View all Bosch 11250VSRD manuals
Add to My Manuals
Save this manual to your list of manuals |
Bosch 11250VSRD manual content summary:
- Bosch 11250VSRD | Operating Instructions - Page 1
Using Lire avant usage Leer antes de usar Operating/Safety Instructions Consignes de fonctionnement/sécurité Instrucciones de funcionamiento y seguridad 11250VSRD Boosscchhhhaammmmerer Call Toll Free for Consumer Information & Service Locations Pour obtenir des informations et les adresses de - Bosch 11250VSRD | Operating Instructions - Page 2
power tool or battery- operated (cordless) power tool. SAVE THESE INSTRUCTIONS Work area safety Keep work area clean and well lit. Cluttered or power tool. Keep cord away from heat, oil, sharp edges or moving parts. Damaged or entangled cords increase the risk of electric shock. When operating - Bosch 11250VSRD | Operating Instructions - Page 3
gasoline, carbon tetrachloride, ammonia, etc. may damage plastic parts. Risk of injury to user, power cord must only be serviced by a Bosch Factory Service Center or Authorized Bosch Service Station. SAVE THESE INSTRUCTIONS Rotary Hammer Safety Rules Hold tool by insulated gripping surfaces when - Bosch 11250VSRD | Operating Instructions - Page 4
Vibration caused by hammer-drill action may be harmful to your hands and arms. Secure the material being drilled. Never hold it in your hand or across legs. Unstable support can cause the drill bit to , such as those dust masks that are specially designed to filter out microscopic particles. -4- - Bosch 11250VSRD | Operating Instructions - Page 5
Current Hz Hertz Frequency (cycles per second) W Watt Power kg Kilograms Weight min Minutes Time s Seconds Time Diameter Size of drill bits, grinding wheels, etc. n0 .../min No load speed Rotational speed, at no load Revolutions or reciprocation per minute Revolutions, strokes - Bosch 11250VSRD | Operating Instructions - Page 6
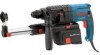
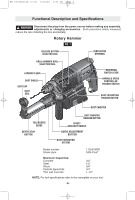
tool accidentally. Rotary Hammer FIG. 1 RELEASE BUTTON SELECTOR DIAL VENTILATION OPENINGS DRILL/HAMMER DRILL SELECTION DIAL LOCKING GUIDE DEPTH STOP BUTTON DUST CANISTER RELEASE BUTTON OFFSET AUXILIARY HANDLE GUIDE ADJUSTMENT BUTTON DUST EXTRACTION SYSTEM Model number Shank style 11250VSRD - Bosch 11250VSRD | Operating Instructions - Page 7
-plus® CHUCK DUST SHIELD NOTE: The high efficiency available from the rotary hammers can only be obtained if sharp and undamaged accessories are used. The FIG. 3 B LOCKING SLEEVE OFFSET AUXILIARY HANDLE The tool must be supported with the auxiliary handle, which can be swiveled 360˚. To reposition - Bosch 11250VSRD | Operating Instructions - Page 8
metal chips can self-ignite or ignite parts of the dust extraction system. ! CAUTION Do not drill into wood with dust extraction system mounted. from tool housing (Fig. 5). To install dust extraction system, align guide grooves with the grooves in tool housing and push toward tool until you - Bosch 11250VSRD | Operating Instructions - Page 9
or damaged filter from dust drilling depth X can be pre-set and/or repeated by using the depth gauge. After the auxiliary handle is installed, make sure the accessory has been fully inserted into the chuck before setting the depth gauge. Set the depth gauge by compressing the telescopic guide - Bosch 11250VSRD | Operating Instructions - Page 10
bit (Fig. 10). To lock adjustment, release button. To unlock adjustment, push the guide adjustment button. FIG. 9 DUST CAP DUST SEAL FIG. 10 GUIDE X HOUSING DEPTH STOP BUTTON TELESCOPIC GUIDE DUST CAP FOR SMALL DRILL BITS Your tool is equipped with a standard dust cap for use with with small - Bosch 11250VSRD | Operating Instructions - Page 11
Fig. 12). If required, remove the dust cap for small drill bits. To insert the dust cap for core bits, push (optional accessory) Operating Instructions VARIABLE SPEED CONTROLLED TRIGGER SWITCH torque reaction will twist the body of the rotary hammer in the opposite direction as the bit rotates, - Bosch 11250VSRD | Operating Instructions - Page 12
Rotary Hammer is designed for "SDS" Carbide Tipped Bits up to 3/4 inch diameter. Recall these instructions for safe operation: 1. Some materials require slow drilling speeds; whereas, others require higher speed to produce the best results. 2. All work must be supported or secured before drilling - Bosch 11250VSRD | Operating Instructions - Page 13
to prevent the drill bit from skipping. Maintenance Service ! WARNING Preventive the bearings should be replaced at Bosch Factory Service Center or Authorized Bosch Service Station. Bearings which become noisy ( cleaning agents and solvents damage plastic parts. Some of these are: gasoline - Bosch 11250VSRD | Operating Instructions - Page 14
BM 1619P02168 12-07 12/5/07 3:52 PM Page 14 * 360° Auxiliary Handle * Dust extraction system * Dust cap * Dust seal ** Dust cap (for hole saws) ** Vacuum adapter dust canister Accessories ** Vacuum hose Adapter ** Vacuum hose * Carrying Case (*= standard equipment) (**= optional accessories) Not - Bosch 11250VSRD | Operating Instructions - Page 15
BM 1619P02168 12-07 12/5/07 3:52 PM Page 15 Consignes générales de sécurité Veuillez lire et comprendre toutes les consignes. Si on n'observe pas toutes les ! AVERTISSEMENT consignes décrites ci-dessous, il y a risque de choc électrique, d'incendie et/ou de blessures corporelles graves. Dans - Bosch 11250VSRD | Operating Instructions - Page 16
situation dangereuse. Utilisez des brides ou d'autres moyens pratiques de brider ou de supporter la pièce sur une plate-forme stable. Tenir la pièce à que par un Centre de service usine de Bosch ou par une Station service agréée de Bosch. CONSERVEZ CES INSTRUCTIONS Règles de sécurité concernant - Bosch 11250VSRD | Operating Instructions - Page 17
peuvent être nocives pour vos mains et vos bras. Assujettissez l'ouvrage à percer. Ne le tenez jamais dans votre main ou par-dessus vos jambes. Un support instable peut faire gripper le foret, provoquant ainsi une perte de contrôle et des blessures. Ne tenez jamais la gâchette bloquée en position de - Bosch 11250VSRD | Operating Instructions - Page 18
BM 1619P02168 12-07 12/5/07 3:52 PM Page 18 Symboles IMPORTANT : Certains des symboles suivants peuvent être utilisés sur votre outil. Veuillez les étudier et apprendre leur signification. Une interprétation appropriée de ces symboles vous permettra d'utiliser l'outil de façon plus efficace et - Bosch 11250VSRD | Operating Instructions - Page 19
DU RÉSERVOIR À POUSSIÈRE POIGNÉE AUXILIAIRE DÉPORTÉE BOUTON DE RÉGLAGE DU GUIDE DISPOSITIF D'EXTRACTION DE LA POUSSIÈRE Numéro de modèle Type de tige Capacités maximales : Béton Acie Bois Mèches à pointe au carbure Mèches creuses à paroi mince 11250VSRD SDS-Plus® 19 mm 13 mm 19 mm 19 mm 38 mm - Bosch 11250VSRD | Operating Instructions - Page 20
3 SDS-plus® B MANCHON DE PARE- VERROUILLAGE POUSSIÈRE POIGNÉE AUXILIAIRE DÉPORTÉE La poignée auxiliaire, qui pivote sur 360°, doit être utilisée pour supporter l'outil. Pour repositionner et/ou faire pivoter la poignée, desserrez la manette, déplacez la poignée à la position désiré le long du - Bosch 11250VSRD | Operating Instructions - Page 21
terminer s'il est endommagé ou non. Remplacez-le immédiatement s'il est endommagé. Boos FIG. 5 RAINURES DU GUIDE Pour installer le dispositif d'extraction de la poussière, alignez les rainures du guide avec les rainures du boîtier de l'outil, et appuyez sur l'outil jusqu'à ce que vous entendiez qu - Bosch 11250VSRD | Operating Instructions - Page 22
la longueur de mèche désirée aura été exposée, appuyez sur le bouton de la butée de profondeur et faites-le glisser contre le logement du guide, puis relâchez le bouton (Fig. 9). La jauge de profondeur est à ressort et retournera dans sa position totalement allongée lorsque la pression aura été rel - Bosch 11250VSRD | Operating Instructions - Page 23
'à ce que vous entendiez qu'il se verrouille en place (Fig. 11). FIG. 11 BOUTON DE RETRAIT DU PARE-POUSSIÈRE BOUTON DE RÉGLAGE DU GUIDE PARE-POUSSIÈRE POUR MÈCHES DE PERÇAGE DE PETITE TAILLE PARE-POUSSIÈRE POUR LES MÈCHES EMPORTEPIÈCE DE 1 1/2 po DE CAPACITÉ MAXIMUM (Non - Bosch 11250VSRD | Operating Instructions - Page 24
BM 1619P02168 12-07 12/5/07 3:52 PM Page 24 poussière compatible avec un aspirateur (accessoire en option) doit être utilisé pour le dépoussiérage à la place du réservoir à poussière standard (Fig. 12). Si nécessaire, retirez le pare-poussière pour mèches de perçage de petite taille. Pour insérer - Bosch 11250VSRD | Operating Instructions - Page 25
BM 1619P02168 12-07 12/5/07 3:52 PM Page 25 CADRAN DE SÉLECTION DE PERCEUSE/PERCEUSE À PERCUSSION Le cadran sélecteur permet de régler l'outil en fonction de différentes applications de perçage ou de perçage à percussion. Appuyez sur le bouton de déclenchement et tournez le cadran sélecteur à - Bosch 11250VSRD | Operating Instructions - Page 26
ou tous les deux changements de balais, il est conseillé de faire remplacer les paliers par un centre de service d'usine Bosch ou une station service agréée Bosch. Si les paliers commencent à faire du bruit (à cause de surcharges importantes ou du toupillage de matériaux très abrasifs - Bosch 11250VSRD | Operating Instructions - Page 27
BM 1619P02168 12-07 12/5/07 3:52 PM Page 27 Accessoires * Poignée auxiliaire 360˚ * Dispositif d'extraction de la poussière * Pare-poussière * Joint étanche à la poussière ** Pare-poussière (pour les scies cloches) ** Réservoir à poussière compatible avec un aspirateur ** Adaptateur pour tuyau d' - Bosch 11250VSRD | Operating Instructions - Page 28
BM 1619P02168 12-07 12/5/07 3:52 PM Page 28 Normas generales de seguridad ! ADVERTENCIA Lea todas las instrucciones. Si no se siguen todas las instrucciones que aparecen a continuación, el resultado podría ser sacudidas eléctricas, incendio y/o lesiones graves. La expresión "herramienta mecá - Bosch 11250VSRD | Operating Instructions - Page 29
un Centro de Servicio de Fábrica Bosch o una Estación de Servicio Bosch Autorizada. GUARDE ESTAS INSTRUCCIONES Normas de seguridad El contacto con un cable que tenga corriente hará que ésta pase a las partes metálicas descubiertas de la herramienta y que el operador reciba sacudidas eléctricas. - Bosch 11250VSRD | Operating Instructions - Page 30
bien ventilada y trabaje con equipo de seguridad aprobado, como por ejemplo máscaras antipolvo que estén diseñadas especialmente para impedir mediante filtración el paso de partículas microscópicas. -30- - Bosch 11250VSRD | Operating Instructions - Page 31
BM 1619P02168 12-07 12/5/07 3:52 PM Page 31 Símbolos IMPORTANTE: Es posible que algunos de los símbolos siguientes se usen en su herramienta. Por favor, estúdielos y aprenda su significado. La interpretación adecuada de estos símbolos le permitirá utilizar la herramienta mejor y con más seguridad. - Bosch 11250VSRD | Operating Instructions - Page 32
DE EXTRACCIÓN DE POLVO Número de modelo Estilo de cuerpo Capacidad máxima: Hormigón Acero Madera Brocas con punta de carburo Brocas huecas de pared delgada 11250VSRD SDS-Plus® 19 mm 13 mm 19 mm 19 mm 38 mm NOTA: Para obtener las especificaciones de la herramienta, consulte la placa del fabricante - Bosch 11250VSRD | Operating Instructions - Page 33
BM 1619P02168 12-07 12/5/07 3:52 PM Page 33 Ensamblaje ! ADVERTENCIA Desconecte el enchufe de la fuente de energía antes de realizar cualquier ensamblaje o ajuste, o cambiar accesorios. Estas medidas de seguridad preventivas reducen el riesgo de arrancar la herramienta accidentalmente. - Bosch 11250VSRD | Operating Instructions - Page 34
de completar el taladrado y antes de almacenar la herramienta. Tenga sumo cuidado al desechar el polvo, ya que los materiales en forma de partículas finas pueden ser explosivos. Nota: No utilice el sistema de extracción de polvo cuando cincele, atornillo o corte roscas. El sistema de extracci - Bosch 11250VSRD | Operating Instructions - Page 35
BM 1619P02168 12-07 12/5/07 3:52 PM Page 35 INSTALACIÓN DEL RECIPIENTE PARA POLVO Para instalar el recipiente para polvo, empújelo hacia arriba, hacia el interior del sistema de extracción de polvo, hasta que oiga que queda fijo en la posición correcta (Fig. 6). CAMBIO DEL MICROFILTRO Para lograr - Bosch 11250VSRD | Operating Instructions - Page 36
BM 1619P02168 12-07 12/5/07 3:52 PM Page 36 cuando la presión se haya reducido. (Cuando taladre, la guía telescópica comprimirá la unidad hasta que acople el botón del tope de profundidad.) AJUSTE DE LA GUÍA TELESCÓPICA A LA LONGITUD DE LA BROCA Para que la utilización sea más conveniente cuando se - Bosch 11250VSRD | Operating Instructions - Page 37
BM 1619P02168 12-07 12/5/07 3:52 PM Page 37 se debe utilizar el recipiente para polvo con adaptador de aspiración (accesorio opcional), no el recipiente para polvo estándar (Fig. 12). Si es necesario, retire la tapa antipolvo para brocas taladradoras pequeñas. Para insertar la tapa antipolvo para - Bosch 11250VSRD | Operating Instructions - Page 38
de refuerzo, disminuya la presión justo antes de que la broca atraviese completamente la madera para evitar el astillado. Termine el agujero desde la parte posterior inmediatamente después de que la punta atraviese la pieza de trabajo. Si la broca se atasca, invierta la operación de taladrado para - Bosch 11250VSRD | Operating Instructions - Page 39
un rendimiento óptimo del motor, recomendamos que cada dos a seis meses se examinen las escobillas. Sólo se deben usar escobillas de repuesto Bosch genuinas diseñadas específicamente para su herramienta. RODAMIENTOS Después de 300-400 horas de funcionamiento, o después de cada segundo cambio de - Bosch 11250VSRD | Operating Instructions - Page 40
BM 1619P02168 12-07 12/5/07 3:52 PM Page 40 Accesorios * Mango auxiliar de 360 * Sistema de extracción de polvo * Tapa antipolvo * Sello antipolvo ** Tapa antipolvo (para sierras de copa) ** Recipiente para polvo con adaptador de aspiración ** Adaptador de manguera de aspiración ** Manguera de - Bosch 11250VSRD | Operating Instructions - Page 41
BM 1619P02168 12-07 12/5/07 3:52 PM Page 41 Notes: -41- - Bosch 11250VSRD | Operating Instructions - Page 42
BM 1619P02168 12-07 12/5/07 3:52 PM Page 42 Remarques : -42- - Bosch 11250VSRD | Operating Instructions - Page 43
BM 1619P02168 12-07 12/5/07 3:52 PM Page 43 Notas: -43- - Bosch 11250VSRD | Operating Instructions - Page 44
by law, shall be the repair or replacement of parts, without charge, which are defective in material or Service Station. For Authorized BOSCH Power Tool Service Stations, please refer to your phone directory. THIS LIMITED WARRANTY DOES NOT APPLY TO ACCESSORY ITEMS SUCH AS CIRCULAR SAW BLADES, DRILL
-
 1
1 -
 2
2 -
 3
3 -
 4
4 -
 5
5 -
 6
6 -
 7
7 -
8
-
9
-
10
-
11
-
12
-
13
-
14
-
15
-
16
-
17
-
18
-
19
-
20
-
21
-
22
-
23
-
24
-
25
-
26
-
27
-
28
-
29
-
30
-
31
-
32
-
33
-
34
-
35
-
36
-
37
-
38
-
39
-
40
-
41
-
42
-
43
-
44
 |
 |

IMPORTANT:
IMPORTANT :
IMPORTANTE:
Read Before Using
Lire avant usage
Leer antes de usar
For English Version
Version française
Versión en español
See page 2
Voir page 15
Ver la página 28
Operating/Safety Instructions
Consignes de fonctionnement/sécurité
Instrucciones de funcionamiento y seguridad
1-877-BOSCH99 (1-877-267-2499)
www.boschtools.com
Call Toll Free for
Consumer Information
& Service Locations
Pour obtenir des informations
et les adresses de nos centres
de service après-vente,
appelez ce numéro gratuit
Llame gratis para
obtener información
para el consumidor y
ubicaciones de servicio
Boschhammer
Boschhammer
Boschhammer
Boschhammer
Boschhammer
Boschhammer
Boschhammer
Boschhammer
Boschhammer
Boschhammer
11250VSRD
BM 1619P02168 12-07
12/5/07
3:51 PM
Page 1