Bosch 11250VSRD Operating Instructions - Page 8
Dust Extraction
 |
UPC - 000346378603
View all Bosch 11250VSRD manuals
Add to My Manuals
Save this manual to your list of manuals |
Page 8 highlights
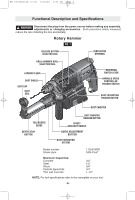
BM 1619P02168 12-07 12/5/07 3:52 PM Page 8 Dust Extraction ! WARNING Do not drill into metal with the dust extraction system mounted. Hot metal chips can self-ignite or ignite parts of the dust extraction system. ! CAUTION Do not drill into wood with dust extraction system mounted. Wood chips are typically too large and will clog the dust channel. ! WARNING Your tool is equipped with a dust canister, empty it frequently, after completion of drilling and before storing the tool. Be extremely careful of dust disposal, materials in fine particle form may be explosive. Note: Do not use the dust extraction system when chiselling, screwdriving or cutting threads. The dust extraction system retracts during operation so that the dust cap is always kept close to surface being drilled. The dust extraction system automatically switches on and off with the power tool. For maximum dust extraction efficiency, please observe the following. • The drill bit being used may not project beyond the dust cap as shown in figures 13 & 14. (Example for an SDS-plus drill bit: Max. total length approx. 160 mm, working length approx. 100 mm). • Pay attention that the dust cap faces flush against the workpiece or the wall. At the same time, this makes working at a right angle easier. • After reaching desired drilling depth, first pull the drill bit out of the hole and then switch the tool off. • Check the condition of the microfilter regularly. Replace a damaged microfilter immediately. REMOVING AND INSTALLING DUST EXTRACTION SYSTEM To remove dust extraction system, press and hold the dust extraction release button and pull away from tool housing (Fig. 5). To install dust extraction system, align guide grooves with the grooves in tool housing and push toward tool until you hear it lock into place (Fig. 5). MICROFILTER DUST CANISTER The integral dust extraction system collects dust in a canister supplied with your extraction system. The dust level of the dust canister can easily be checked through the transparent door (Fig. 6). For maximum efficiency, the dust canister should be emptied frequently during operation. REMOVING DUST CANISTER To remove dust canister, press the two canister release buttons and pull canister downward out of the dust extraction system (Fig. 6). CLEANING AND EMPTYING THE DUST CANISTER Before opening the dust canister, gently strike or tap it against a firm surface to loosen the dust from the microfilter. Open the transparent door and empty the dust canister. Close transparent door. Check the microfilter for damage. Replace it immediately when damaged. FIG. 5 GUIDE GROOVES Boosscchhhhaammmmerer TOOL HOUSING DUST EXTRACTION SYSTEM DUST EXTRACTION RELEASE BUTTON FIG. 6 CANISTER RELEASE BUTTON DUST CANISTER TRANSPARENT DOOR -8-
-
 1
1 -
2
-
 3
3 -
 4
4 -
 5
5 -
 6
6 -
 7
7 -
 8
8 -
 9
9 -
 10
10 -
 11
11 -
 12
12 -
 13
13 -
14
-
15
-
16
-
17
-
18
-
19
-
20
-
21
-
22
-
23
-
24
-
25
-
26
-
27
-
28
-
29
-
30
-
31
-
32
-
33
-
34
-
35
-
36
-
37
-
38
-
39
-
40
-
41
-
42
-
43
-
44
 |
 |
