Bosch REG-D1-875XE-01 Installation Instructions
Bosch REG-D1-875XE-01 Manual
 |
View all Bosch REG-D1-875XE-01 manuals
Add to My Manuals
Save this manual to your list of manuals |
Bosch REG-D1-875XE-01 manual content summary:
- Bosch REG-D1-875XE-01 | Installation Instructions - Page 1
INSTALLATION INSTRUCTIONS REG-D1 MAN-REG-D1-03 - Bosch REG-D1-875XE-01 | Installation Instructions - Page 2
use this apparatus near water. 6. Clean only with dry cloth. 7. Do not block any ventilation openings. Install in accordance with manufacturer instructions. 8. Do not install near any heat sources such as radiators, heat registers, stoves or other apparatus (including amplifiers) that produce heat - Bosch REG-D1-875XE-01 | Installation Instructions - Page 3
injury from tip-over. 13. Unplug this apparatus during lightning storms or when unused for long periods of time. 14. Refer all servicing to qualified service personnel. Servicing is required when the apparatus has been damaged in a way, such as power-supply cord or plug is damaged, liquid has been - Bosch REG-D1-875XE-01 | Installation Instructions - Page 4
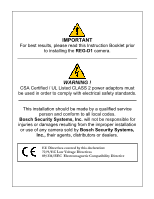
this Instruction Booklet prior to installing the REG-D1 camera. WARNING ! CSA Certified / UL Listed CLASS 2 power adaptors must be used in order to comply with electrical safety standards. This installation should be made by a qualified service person and conform to all local codes. Bosch Security - Bosch REG-D1-875XE-01 | Installation Instructions - Page 5
and used in accordance with the installation manual may cause interference to radio communications. However, there is no guarantee that supply box, within the box walls. 2) Route the composite cable between the camera and the power supply in steel conduit piping over the entire run of the cable - Bosch REG-D1-875XE-01 | Installation Instructions - Page 6
- D1 Camera Description 1 Unpacking 2 Parts List 2 Items Required for Installation 2 Initial Preparations 3 Guidelines 3 1. Mechanical Specification REG-D1 4 2. Input Power / Video Output Connections 5 3. Mounting Specification 6 4. Color Overview Camera Lens Setting 10 5. Troubleshooting - Bosch REG-D1-875XE-01 | Installation Instructions - Page 7
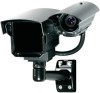
such as headlamps or sunlight, thus ensuring no bloomed-out or washed-out images of the license plates. The REG-D1 camera you have purchased is designed and configured to capture images of license plates under a wide range of ambient light to weather conditions. The all-weather housing with a covert - Bosch REG-D1-875XE-01 | Installation Instructions - Page 8
thoroughly to ensure nothing was damaged in transit. Contact Bosch Service Center if a problem is noted, see the rear page of this booklet for contact numbers. PARTS LIST (items supplied with unit) - REG-D1 camera assembly - Installation Instructions booklet - One 3mm Allen key ITEMS REQUIRED FOR - Bosch REG-D1-875XE-01 | Installation Instructions - Page 9
have been tested prior to shipment. After the wiring has been reconnected, it is advisable to check the camera's operation before installation. GUIDELINES The installation of the REG-D1 camera is explained in Sections 1 to 3. It is important that these steps are followed and to practice proper - Bosch REG-D1-875XE-01 | Installation Instructions - Page 10
1. MECHANICAL SPECIFICATIONS-REG D1 (See Section 6 - General Specifications, for more information) Front View Side View Bottom View *Optional mounting kits: EXMB028 or EXMB029 Figure 1 General Mechanical Specifications - 4 - - Bosch REG-D1-875XE-01 | Installation Instructions - Page 11
or wiring polarity. Note: Input voltage is 12VDC to 24VDC for DC input. The AC input range is 12VAC to 24VAC. Input Power Leads for REG and Color Camera Output Video BNC Connectors Figure 2 Power and Video Connections - 5 - - Bosch REG-D1-875XE-01 | Installation Instructions - Page 12
&The following installation guidelines must be followed: • Locate the camera such that it cannot be easily interfered with, either intentionally or accidentally. • Select a mounting surface capable of supporting the combined weight of the camera and mounting hardware under all expected conditions of - Bosch REG-D1-875XE-01 | Installation Instructions - Page 13
16 ft | 5 m REG-D1-816 16 - 26 ft | 5 - 8 m 23 ft | 7 m REG-D1-825 23 - 40 ft | 7 - 12 m 33 ft |10 m REG-D1-835 34 - 60 ft | 11 - 18 m 50 ft | 15 m REG-D1-850 56 - 82 ft | 17 - 25 m 72 ft | 22 m REG-D1-875 72 - 100 ft | 22 - 30 m 92 ft | 28 m ranges for use with number plates of size - Bosch REG-D1-875XE-01 | Installation Instructions - Page 14
Optimal distance calculated to allow license plates of 120 pixels wide. Most DVR application can provide readable plates larger than 80 pixels depending the amount of skew of the letters on the number plate. If the letters are skewed too much they will start to become unrecognizable and - Bosch REG-D1-875XE-01 | Installation Instructions - Page 15
the screen. Note: The 'R', Range is the distance from the camera to the license plate. Working below max range gives larger number plates and hence more accurate recognition but less lane area to be covered. If too close the license plate could disappear from the Field-of-View, especially for side - Bosch REG-D1-875XE-01 | Installation Instructions - Page 16
lens. Step 4.1 - Remove sunshield by loosening top bolt with a standard Philips screwdriver. Step 4.2 - Disconnect the power source to the camera and the video signal at the BNC connector. Step 4.3 - Remove the four cap screws with a 3mm Allen key. See Figure 4-1 on page 11. Step 4.4 - Carefully - Bosch REG-D1-875XE-01 | Installation Instructions - Page 17
Figure 6 Rear Housing Removal - 11 - - Bosch REG-D1-875XE-01 | Installation Instructions - Page 18
Remove Cap screw Loosen lens set screws Lens Figure 7 Housing Separation for Camera, Lens and Voltage Regulator Board Access - 12 - - Bosch REG-D1-875XE-01 | Installation Instructions - Page 19
4.1.4 - Re-tighten the set screws after focus adjustments have been completed. Step 4.1.5 - Locate the "Auto-Iris" adjustment. Step 4.1.6 - After adjustments are complete, re-install the Camera lens back on to the - Bosch REG-D1-875XE-01 | Installation Instructions - Page 20
5. TROUBLESHOOTING GUIDE PROBLEM POSSIBLE LIKELY SOLUTION CAUSE No Video Power Supply Connections Check the input power connections at the terminal block, at the "Video Connector" terminal block is correct. Check BNC connector. If still no video, connect the camera directly to the - 14 - - Bosch REG-D1-875XE-01 | Installation Instructions - Page 21
monitor. Check the video signal. If okay, the problem is with the interconnections. If still no video, contact Bosch Service Center. See rear page of this manual for contact information. Horizontal Scan Lines, Rolling Up or Down Ground Loop on video cable Check the coax cable shield is not - Bosch REG-D1-875XE-01 | Installation Instructions - Page 22
Poor Color Picture Quality Dim Image Iris closed Snowy Image (cont'd.) Noisy Power Supply Horizontal Scan Lines, Rolling Up or Down Ground Looping on video cable Increase iris level on lens Check connections. Relocate or replace power supply. Check the coax cable shield is not touching ground - Bosch REG-D1-875XE-01 | Installation Instructions - Page 23
any distance does not pose a hazard to the retina or cornea." When mounting and installing the REG-D1 camera, make sure proper safety equipment and procedures are used and practiced. This is to ensure the camera installation will not potentially cause any harm to people around the area and also the - Bosch REG-D1-875XE-01 | Installation Instructions - Page 24
6. GENERAL SPECIFICATIONS Power Consumption: 27W Max. Input Voltage: 12 - 24 VDC or 12 - 24 VAC Enclosure (housing): Aluminum casting and extrusion (sealed to IP66 / NEMA4) Viewing Windows: Polycarbonate and Acrylic Dimensions: 167mm H ( 6.57" ) 277mm W ( 10.9" ) 306mm L ( 12.0" ) - Bosch REG-D1-875XE-01 | Installation Instructions - Page 25
Note: - 19 - - Bosch REG-D1-875XE-01 | Installation Instructions - Page 26
Note: - 20 - - Bosch REG-D1-875XE-01 | Installation Instructions - Page 27
Note: - 21 - - Bosch REG-D1-875XE-01 | Installation Instructions - Page 28
. 130 Perinton Parkway Fairport, New York, 1450, USA Phone: + 1 800 289 0096 Fax: + 1 585 223 9180 [email protected] www.boschsecurity.us Europre, Middle East, Africa Bosch Security Systems B.V. P.O. Box 80002 5600 JB Eindhoven, The Netherlands Phone: + 31 40 2577 284 Fax: +31 40 2577 330
-
 1
1 -
 2
2 -
 3
3 -
 4
4 -
 5
5 -
 6
6 -
 7
7 -
8
-
9
-
10
-
11
-
12
-
13
-
14
-
15
-
16
-
17
-
18
-
19
-
20
-
21
-
22
-
23
-
24
-
25
-
26
-
27
-
28
 |
 |
INSTALLATION
INSTRUCTIONS
REG-D1
MAN-REG-D1-03