Bosch REG-D1-875XE-01 Installation Instructions - Page 16
Color Overview Camera Lens, Setting
 |
View all Bosch REG-D1-875XE-01 manuals
Add to My Manuals
Save this manual to your list of manuals |
Page 16 highlights
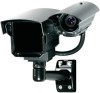
4. COLOR OVERVIEW CAMERA LENS SETTING The following steps show the installer how to access the camera board and the camera lens. Step 4.1 - Remove sunshield by loosening top bolt with a standard Philips screwdriver. Step 4.2 - Disconnect the power source to the camera and the video signal at the BNC connector. Step 4.3 - Remove the four cap screws with a 3mm Allen key. See Figure 4-1 on page 11. Step 4.4 - Carefully slide out the rear housing from the main enclosure. Make sure the gasket remains with the rear section. See Figure 4-2 on page 12. Step 4.6 - Carefully slide the rear section into the main enclosure and tighten the cap screws. - 10 -
-
 1
1 -
2
-
3
-
4
-
5
-
6
-
7
-
8
-
9
-
10
-
 11
11 -
 12
12 -
 13
13 -
 14
14 -
 15
15 -
 16
16 -
 17
17 -
 18
18 -
 19
19 -
 20
20 -
 21
21 -
22
-
23
-
24
-
25
-
26
-
27
-
28
 |
 |

- 10 -
4. COLOR OVERVIEW CAMERA LENS
SETTING
The following steps show the installer how to
access the camera board and the camera lens.
Step 4.1 -
Remove sunshield by loosening top
bolt with a standard Philips
screwdriver.
Step 4.2 -
Disconnect the power source to the
camera and the video signal at the
BNC connector.
Step 4.3 -
Remove the four cap screws with a
3mm Allen key. See
Figure 4-1
on
page 11.
Step 4.4 -
Carefully slide out the rear housing
from the main enclosure. Make sure
the gasket remains with the rear
section.
See
Figure 4-2
on page 12.
Step 4.6 -
Carefully slide the rear section into
the main enclosure and tighten the
cap screws.