Bosch TCA6001UC Use & Care Manual - Page 16
symbolise
 |
UPC - 825225835035
View all Bosch TCA6001UC manuals
Add to My Manuals
Save this manual to your list of manuals |
Page 16 highlights
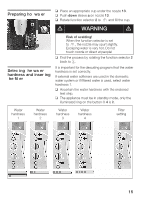
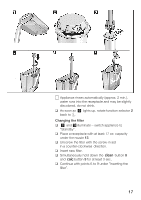
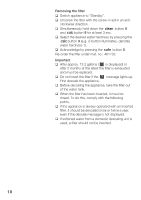
q Simultaneously hold down + 8 button and 4 9 descaling button for at least 3 seconds until k is indicated on the display. The number of illuminated rings around control buttons 4, 5, 8 and 9 symbolise the selected water hardness (see diagram). q Press 4 9 descaling button until the illuminated rings for the desired water hardness light up. If the illuminated ring for the 2 butĆ ton 5 flashes, the filter can be set. q Press 2 button 5 once. The selected water hardness is saved. d CAUTION d The appliance now switches on automatically. As soon as the illuminated rings on buttons d 4 and 2 5 as well as the c symbol on display 3 are lit, the appliance is ready to brew coffee again. i If the 4 9 descaling button is not pressed for longer than 90 seconds, the appliance switches to standby mode without saving the settings. The previously saved water hardness is retained. The filter 22 reduces calcification, protects the appliance and extends the service life of the appliance. Inserting the filter q Appliance must be in "Standby". q Place a receptacle with at least 17 oz. capacity under the nozzle 13. q Insert the filter according to the diagram. q Simultaneously hold down the + button 8 and 4button 9 for at least 3 sec. until klights up. q Keep pressing the 4button 9 until jlights up. q Acknowledge by pressing the 2 button 5. q Rotate function selector 2 to 0. 16
-
 1
1 -
2
-
3
-
4
-
5
-
6
-
7
-
8
-
9
-
10
-
 11
11 -
 12
12 -
 13
13 -
 14
14 -
 15
15 -
 16
16 -
 17
17 -
 18
18 -
 19
19 -
 20
20 -
 21
21 -
22
-
23
-
24
-
25
-
26
-
27
-
28
-
29
-
30
-
31
-
32
-
33
-
34
-
35
-
36
-
37
-
38
-
39
-
40
-
41
-
42
-
43
-
44
-
45
-
46
-
47
-
48
-
49
-
50
-
51
-
52
-
53
-
54
-
55
-
56
-
57
-
58
-
59
-
60
-
61
-
62
-
63
-
64
-
65
-
66
-
67
-
68
-
69
-
70
-
71
-
72
-
73
-
74
-
75
-
76
-
77
-
78
-
79
-
80
-
81
-
82
-
83
-
84
-
85
-
86
-
87
-
88
-
89
-
90
-
91
 |
 |
