Bose Lifestyle T20 Installation guide - Page 6
English, TAB 6, TAB 8, TAB 7, TAB 3, TAB 5, TAB 2, TAB 4 - power supply
 |
View all Bose Lifestyle T20 manuals
Add to My Manuals
Save this manual to your list of manuals |
Page 6 highlights
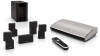
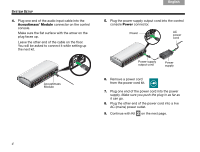
TAB 8 TAB 7 TAB 6 TAB 5 SYSTEM SETUP 4. Plug one end of the audio input cable into the Acoustimass® Module connector on the control console. Make sure the flat surface with the arrow on the plug faces up. Leave the other end of the cable on the floor. You will be asked to connect it while setting up the next kit. Acoustimass Module TAB 4 TAB 3 TAB 2 English 5. Plug the power supply output cord into the control console Power connector. Power AC power cord Power supply output cord Power supply 6. Remove a power cord from the power cord kit. 7. Plug one end of the power cord into the power supply. Make sure you push the plug in as far as it can go. 8. Plug the other end of the power cord into a live AC (mains) power outlet. 9. Continue with Kit 2 on the next page. 4
-
 1
1 -
 2
2 -
 3
3 -
 4
4 -
 5
5 -
 6
6 -
 7
7 -
 8
8 -
 9
9 -
 10
10 -
 11
11 -
 12
12 -
13
-
14
-
15
-
16
-
17
-
18
 |
 |
