Bose T8S ToneMatch Mixer English Owners Guide
Bose T8S ToneMatch Mixer Manual
 |
View all Bose T8S ToneMatch Mixer manuals
Add to My Manuals
Save this manual to your list of manuals |
Bose T8S ToneMatch Mixer manual content summary:
- Bose T8S ToneMatch Mixer | English Owners Guide - Page 1
T4S/T8S ToneMatch® Mixer Owner's Guide - Bose T8S ToneMatch Mixer | English Owners Guide - Page 2
power supply provided. • Do NOT place or install the bracket or product near any heat sources, such as fireplaces, radiators, heat registers or other apparatus (including amplifiers) that produce heat. • Do not use the ToneMatch® T4S/T8S mixer accordance with the instruction manual, may cause - Bose T8S ToneMatch Mixer | English Owners Guide - Page 3
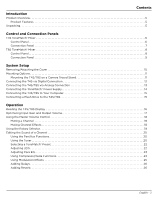
® Mixer 8 Control Panel 8 Connection Panel 9 System Setup Removing/Attaching the Cover 10 Mounting Options 11 Mounting the T4S/T8S on a Camera Tripod Stand 11 Connecting the T4S via Digital Connection 12 Connecting the T4S/T8S via Analog Connection 13 Connecting the ToneMatch® Power Supply - Bose T8S ToneMatch Mixer | English Owners Guide - Page 4
28 Loading and Saving Scenes 30 Sharing a Scene 33 Bose Scenes 35 Factory Settings 35 Singer/Songwriter 36 DJ/Playback 38 Full Band 40 Factory Settings Factory Settings 42 Care & Maintenance Troubleshooting 43 Cleaning 46 Technical Information 46 Additional Resources Contact Information - Bose T8S ToneMatch Mixer | English Owners Guide - Page 5
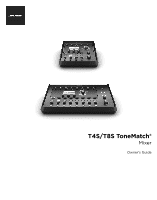
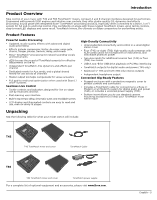
connectors • Includes a ToneMatch cable for connecting to a Bose L1 Model II or L1 Model 1S system for digital audio and power (T4S), or includes a universal power supply (T8S) • Bottom insert allows you to use standard camera mounting accessories to keep your ToneMatch mixer within reach Unpacking - Bose T8S ToneMatch Mixer | English Owners Guide - Page 6
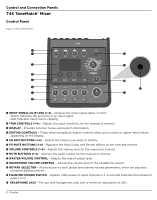
Control and Connection Panels T4S ToneMatch® Mixer Control Panel Figure 1. T4S Control Panel q w d e s i MUTE BUTTONS (1-4) - Silences the audio output for the respective channel. o MASTER PHANTOM POWER SWITCH - Applies +48V power to input channels 1-4. A red LED indicates that phantom power is - Bose T8S ToneMatch Mixer | English Owners Guide - Page 7
: Only used in stereo with Digital Main Output R. o POWER PORT/DIGITAL MAIN OUTPUT R - A digital output used by the L1 Model 1S/II system. Delivers power to the T4S mixer from the L1 Model 1S/II power stand. Can also deliver power from an AC outlet via a ToneMatch power supply (not included with the - Bose T8S ToneMatch Mixer | English Owners Guide - Page 8
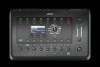
Control and Connection Panels T8S ToneMatch® Mixer Control Panel Figure 3. T8S Control Panel q w f e d s i MUTE BUTTONS (1-8) - Silences the audio output for the respective channel. o PHANTOM POWER SWITCH - Applies +48V power to input channels 1-8. A red LED indicates that phantom power is - Bose T8S ToneMatch Mixer | English Owners Guide - Page 9
balanced cables for stereo output. o DIGITAL POWER PORT - For use w/ ToneMatch power supply (see "Connecting the ToneMatch® Power Supply" on page 14). Note: The T8S is NOT designed to connect digitally to the L1® Model 1S/II. CAUTION: Although the ToneMatch port accepts a standard RJ-45 connector - Bose T8S ToneMatch Mixer | English Owners Guide - Page 10
System Setup Removing/Attaching the Cover The T4S/T8S ToneMatch® mixer comes out of the carton with a cover installed on the top panel. The cover is designed to protect the control panel while transporting or storing the mixer. To remove the cover: 1. Place thumbs on notches on front of cover and - Bose T8S ToneMatch Mixer | English Owners Guide - Page 11
Figure 8. Mounting T4S to tripod stand using bracket Figure 7. Bracket attached to T4S WARNING: Do not use the ToneMatch® T4S/T8S mixer with a tripod/stand that is unstable. The mixer is only designed for use on a 1/4" screw (6 mm), and the tripod/stand must be capable of supporting a device with - Bose T8S ToneMatch Mixer | English Owners Guide - Page 12
the T4S using a ToneMatch cable. 3. Turn on the mixer and then turn on the L1 Model 1S/II power stand. 4. Connect your instruments and adjust levels. Refer to "Optimizing Input Gain and Output Volume" on page 17. Figure 9. Two L1 model II systems connected to a T4S via digital connection USB AUDIO - Bose T8S ToneMatch Mixer | English Owners Guide - Page 13
the ToneMatch® Power Supply" on page 14. 4. Turn on the T4S/T8S mixer and then turn on the device. 5. Connect your instruments and adjust levels. Refer to "Optimizing Input Gain and Output Volume" on page 17. Figure 10. Two F1 systems connected to a T8S via analog connection USB AUDIO MAIN - Bose T8S ToneMatch Mixer | English Owners Guide - Page 14
System Setup Connecting the ToneMatch® Power Supply The ToneMatch power supply provides power for the T4S/T8S mixer. 1. Plug the power supply cable into the T4S/T8S Power port. 2. Plug one end of the AC power cord into the power supply. 3. Plug the other end of the power cord into a live AC power - Bose T8S ToneMatch Mixer | English Owners Guide - Page 15
To an L1 Model 1S/II system or an ToneMatch power supply Power switch USB cable (Type A to Type B) To computer USB port Connecting a Flash Drive to the T4S/T8S Plug in a USB 2.0/3.0 flash drive loaded with WAV/MP3 files into the USB 2.0 Type-A port to playback audio tracks to your mixer. Figure 13 - Bose T8S ToneMatch Mixer | English Owners Guide - Page 16
Reading the T4S/T8S Display The display provides you with an interface for operating the mixer. Figure the control toggles between parameters Ch 1 Type Digital Time 250ms Delay Fdbk. Mix 30% Identifies scene was modified All Channels Scenes *Bose Scene 01 Load Shared Save Indicates that - Bose T8S ToneMatch Mixer | English Owners Guide - Page 17
Reset Aux In Peak level indicator Input level indicator CAUTION: If you are using a device that requires phantom power (+48V), such as a condenser microphone, depress the Phantom power switch before adjusting the Trim control. Note: The input level meter in the Prefs menu can be helpful when - Bose T8S ToneMatch Mixer | English Owners Guide - Page 18
volume control adjusts the overall output level of the T4S/T8S ToneMatch® output and analog Master output. During normal operation, volume up or down from this position. Muting a Channel The Mute buttons silence the audio for the respective channel. • To mute a channel, press the Mute button once. - Bose T8S ToneMatch Mixer | English Owners Guide - Page 19
Operation Using the Rotary Selector The rotary selector provides access to the functions of the ToneMatch® mixer output. Figure 15 provides a summary of the nine channel-related functions and the three global functions. The following pages describe how to adjust each function. - Bose T8S ToneMatch Mixer | English Owners Guide - Page 20
that affect selected channels. The CH Edit functions are Pan/ Aux, Tuner, ToneMatch®, zEQ, Para EQ, Comp/Gate, Mod, Delay, and Reverb. To edit a channel: 1. Press the CH Edit 1, 2, 3, 4, (T4S and T8S) 5, 6, 7, or 8 (T8S only) button. The selected channel will be viewable in the upper-left corner - Bose T8S ToneMatch Mixer | English Owners Guide - Page 21
Operation Routing Input Signals to the Aux Outputs The Aux function allows you to route signals to two Aux outputs (T4S only) or four Aux outputs (T8S only) for various signal processing, recording, and sound reinforcement applications. The signal level is adjustable for each of the available Aux - Bose T8S ToneMatch Mixer | English Owners Guide - Page 22
for each channel. 1. Rotate the Category control to access the list of categories and highlight your choice. Ch 1 Utility Category ToneMatch Flat Preset Utility Vocal Mics Electric Guitars Acoustic Guitars Select Cancel Rotate Press 2. Press the Select control to select your choice, or - Bose T8S ToneMatch Mixer | English Owners Guide - Page 23
Operation Adjusting Para EQ The Para EQ function provides three parametric equalizations centered on a user-specified frequency within the range of 50 Hz to 16 kHz. Note: To bypass the Para EQ settings, press the Select control. Press it again to activate. 1. Press or rotate the Select control and - Bose T8S ToneMatch Mixer | English Owners Guide - Page 24
(slowest) to 100% (fastest). Using the KickGate The KickGate is a Bose® proprietary technology that allows you to raise the level of a kick drum . 1. Connect the appropriate type of microphone. 2. Select an appropriate ToneMatch® preset. 3. Adjust the channel input Trim control until the hardest - Bose T8S ToneMatch Mixer | English Owners Guide - Page 25
Using Modulation Effects The Mod function allows you to apply modulation effects. Note: To bypass the Mod settings, press the Type control. Press it again to activate. Ch 1 Type Chorus1 Modulator Mix 50% Speed Depth 50% Operation 1. Rotate the Type control to access the list of modulator types - Bose T8S ToneMatch Mixer | English Owners Guide - Page 26
250ms Delay Fdbk. Mix 30% 1. Rotate the Type control to access the list of Delay types and highlight your choice. A. Digital Delay - Straight digital delay effect where the repeats remain uncolored. Features adjustable mix, time, and feedback parameters. Works well with guitars, drums, and vocals - Bose T8S ToneMatch Mixer | English Owners Guide - Page 27
allow access to settings that affect the overall operation of the mixer and all of its channels. Selecting a Reverb Type The to select. 6. Rotating the Time control controls the decay time of the selected reverb model from its minimum decay time to its maximum decay time. At 0%, the decay time - Bose T8S ToneMatch Mixer | English Owners Guide - Page 28
(see "Optimizing Input Gain and Output Volume" on page 17). Press the Aux In control to monitor the level of the auxiliary inputs (For the T8S only, press the Ch 5-8 control to monitor the level of Inputs 5-8). Input Level Preferences Ch 1 Ch 2 Ch 3 Ch 4 Menu Reset Aux In Peak level indicator - Bose T8S ToneMatch Mixer | English Owners Guide - Page 29
source choices are Ch1-4 (Ch5-8 for T8S only), Aux In, Master, or Aux Out 1-2 (Aux Out 3-4 for T8S only). USB to PC Preferences Left : you to send USB left and right channels from your computer to a selected mixer destination (None, Aux In, or Master). USB from PC Preferences Left : Master - Bose T8S ToneMatch Mixer | English Owners Guide - Page 30
Stand - When connected to an L1® Model 1S/II power stand, Connected appears on the screen. L1 Stand Preferences Connected Menu Loading and Saving Scenes A scene is a snapshot of the state of the T4S/T8S ToneMatch® mixer. • A scene remembers all ToneMatch mixer settings, and the status of the - Bose T8S ToneMatch Mixer | English Owners Guide - Page 31
Shared Scene: A user-definable scene for saving settings you want to share with other T4S/T8S ToneMatch® mixer users. This scene can be uploaded to a computer using the L1® updater software available at www.Bose.com/livesound. To load a scene: 1. Select Scenes with the rotary selector. 2. Rotate the - Bose T8S ToneMatch Mixer | English Owners Guide - Page 32
Operation 3. If you pressed Select, use the Rename screen to edit the scene name, or press Save to use the name as displayed and go to Step 4. Rename Scenes My S c e n e 0 1 Save Cursor Select To change the scene name before saving: You can use the following editing options to change the - Bose T8S ToneMatch Mixer | English Owners Guide - Page 33
/T8S ToneMatch® mixer user, you can save that scene as a Shared Scene by saving it to the [To Shared Scene] slot. Using the L1® updater, you can upload the Shared Scene to your computer and then transfer the file to the computer of another T4S/T8S user. The other T4S/T8S user can download the scene - Bose T8S ToneMatch Mixer | English Owners Guide - Page 34
My Scene 07 Back Press Note: The T4S/T8S provides only one storage location for a Shared Scene. Saving a scene as a Shared Scene always overwrites the previously saved Shared Scene. Please visit www.Bose.com/livesound for details on using the L1 - Bose T8S ToneMatch Mixer | English Owners Guide - Page 35
made to the currently loaded scene. CH 1-4 (T4S/T8S) CH 5-8 (T8S) Active ToneMatch Utility Flat Bypass zEQ Low Mid High 0 dB 0 dB 0 dB Para EQ Bypass Comp/Gate Bypass Chorus1 Mod Bypass Chorus1 Delay Bypass Digital Reverb Bypass Digital Mute Aux Pre: With EQ & Fx Global - Bose T8S ToneMatch Mixer | English Owners Guide - Page 36
Operation Singer/Songwriter This scene is designed for a singer/songwriter playing keyboard or guitar and sometimes accompanied by an MP3 track. Figure 16. Example setup for Singer/Songwriter 36 - English - Bose T8S ToneMatch Mixer | English Owners Guide - Page 37
Active CH 2 Active CH 3 Active CH 4 Active ToneMatch Vocal Mics Handheld Mics Acoustic Guitar Steel String w/ piezo Keyboards Bypass Chorus3 Bypass N/A Chorus1 Delay Bypass Digital Bypass Digital Bypass Digital Bypass N/A Digital Active Active Bypass Bypass Reverb N/A Medium - Bose T8S ToneMatch Mixer | English Owners Guide - Page 38
Operation DJ/Playback The DJ/Playback scene is designed for a DJ event or any audio playback need. This setup uses two microphones and either a mobile device, mixer, or laptop computer. Figure 17. Example setup for stereo DJ/Playback 38 - English - Bose T8S ToneMatch Mixer | English Owners Guide - Page 39
DJ/Playback scene channel settings ToneMatch Source 1 Left CH 1 Active DJ/Playback Flat, zEQ Controls Source Bypass Chorus1 Bypass Chorus3 Bypass N/A Chorus1 Delay Bypass Digital Bypass Digital Bypass Digital Bypass N/A Digital Bypass Bypass Bypass Bypass Reverb N/A Medium (Global) - Bose T8S ToneMatch Mixer | English Owners Guide - Page 40
vocals, and MP3 player. Figure 18. Example setup for Drums and Bass INPUT 1 SIGNAL/CLIP VOLUME INPUT 2 SIGNAL/CLIP VOLUME SIGNAL INPUT MIC LINE LEVEL INPUT SYSTEM P O W E R / FA U LT LIMIT FRONT LED POWER LIMIT OFF EQ FULL RANGE WITH SUB LINE OUTPUT POWER ON OFF 100-240V~50/60Hz 1000W INPUT - Bose T8S ToneMatch Mixer | English Owners Guide - Page 41
Full Band scene channel settings ToneMatch Kick Drum CH 1 Active Percussion Kick, General Active zEQ L M H 0 0 0 Bypass Bypass Bypass Bypass Bypass Delay N/A Digital Digital Digital Digital Digital Digital Digital Digital Bypass Bypass Bypass Bypass Bypass Active Active - Bose T8S ToneMatch Mixer | English Owners Guide - Page 42
the T4S/T8S mixer when it left the factory. To restore your T4S/T8S at any time to these factory settings, load the Bose Factory 26% Phaser 1: Bright 0.50 Hz -76% Speed Depth Tremolo 5.00 Hz 50% Type Digital Analog Tape Delay Factory Settings Mix Time 30% 150 ms 30% 275 ms 30% 350 - Bose T8S ToneMatch Mixer | English Owners Guide - Page 43
the outlet using an AC outlet tester. If using the T4S with an L1® Model II or 1S system: • Make sure the ToneMatch® cable is properly connected to the mixer and the L1 power stand. • Verify that the power cord plug is fully inserted into the power stand and the AC (mains) outlet. • Make sure the - Bose T8S ToneMatch Mixer | English Owners Guide - Page 44
Care and Maintenance Problem What to do Poor quality sound from a microphone or instrument connected to the T4S/T8S. • Make sure there is no unwanted zEQ or Para EQ equalization applied. • Verify that you have selected an appropriate ToneMatch® mixer preset for your microphone/instrument. If you - Bose T8S ToneMatch Mixer | English Owners Guide - Page 45
Problem Microphone is encountering feedback. Aux output does not sound right. Unable to send T4S/T8S audio to a computer through a USB connection. T4S/T8S to the mixer and computer. • Try a different USB cable. • Make sure the mixer is turned on. • Verify that the desired mixer input channels - Bose T8S ToneMatch Mixer | English Owners Guide - Page 46
Care and Maintenance Problem Unable to send audio from a computer to the T4S/T8S via USB connection. What to do • Check that the USB cable is properly connected to the mixer and computer. • Try a different USB cable. • Make sure mixer is turned on. • Verify the computer is playing and that the - Bose T8S ToneMatch Mixer | English Owners Guide - Page 47
for other countries Additional Information Refer to the owner's guide (online at www.Bose.com) for more information about your product (including www.bose.com/au/warranty or www.bose.com/nz/warranty for details of the Australian and New Zealand warranty. Date of Manufacture The eighth digit in - Bose T8S ToneMatch Mixer | English Owners Guide - Page 48
©2017 Bose Corporation, All rights reserved. Framingham, MA 01701-9168 USA www.Bose.com All trademarks are the property of their respective owners AM801203 Rev. 00 November 2017
-
 1
1 -
 2
2 -
 3
3 -
 4
4 -
 5
5 -
 6
6 -
 7
7 -
8
-
9
-
10
-
11
-
12
-
13
-
14
-
15
-
16
-
17
-
18
-
19
-
20
-
21
-
22
-
23
-
24
-
25
-
26
-
27
-
28
-
29
-
30
-
31
-
32
-
33
-
34
-
35
-
36
-
37
-
38
-
39
-
40
-
41
-
42
-
43
-
44
-
45
-
46
-
47
-
48
 |
 |
T4S/T8S ToneMatch®
Mixer
Owner’s Guide