Brother International BAS-304 Programmer Instruction Manual - English - Page 33
consecutively
 |
View all Brother International BAS-304 manuals
Add to My Manuals
Save this manual to your list of manuals |
Page 33 highlights
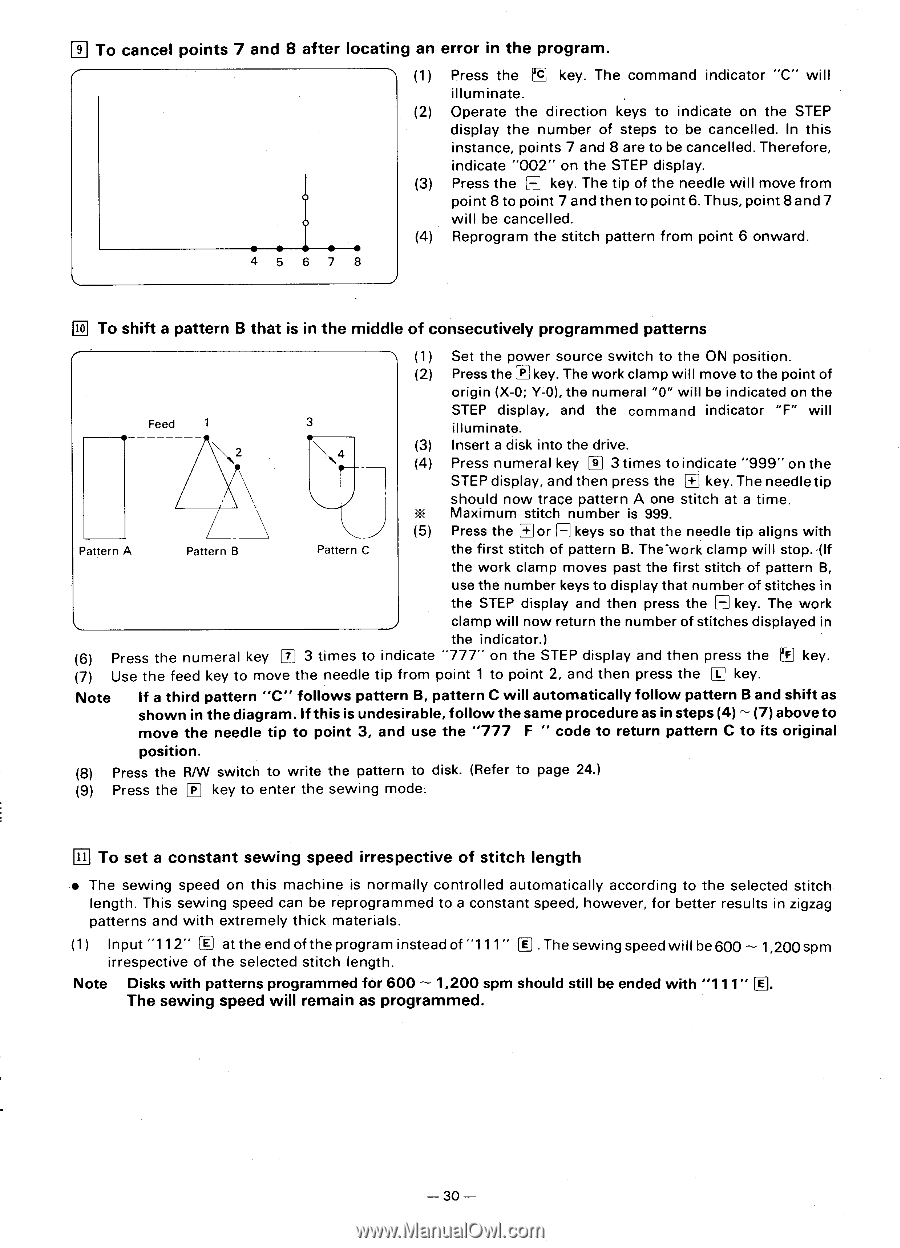
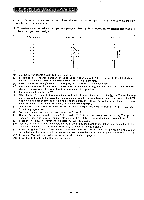
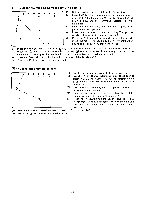
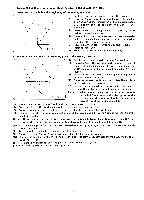
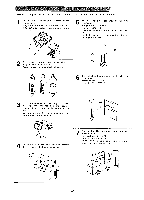
El To cancel points 7 and 8 after locating an error in the program. (1) Press the n key. The command indicator "C" will illuminate. (2) Operate the direction keys to indicate on the STEP display the number of steps to be cancelled. In this instance, points 7 and 8 are to be cancelled. Therefore, indicate "002" on the STEP display. (3) Press the H key. The tip of the needle will move from point 8 to point 7 and then to point 6. Thus, point 8 and 7 will be cancelled. (4) Reprogram the stitch pattern from point 6 onward. to To shift a pattern B that is in the middle of consecutively programmed patterns (1) Set the power source switch to the ON position. (2) Press the key. The work clamp will move to the point of origin (X-0; YLO), the numeral "0" will be indicated on the Feed 1 • STEP display, and the command indicator "F" will 3 illuminate. (3) Insert a disk into the drive. \4 (4) Press numeral key El 3 times to indicate "999" on the STEP display, and then press the E] key. The needle tip should now trace pattern A one stitch at a time. Maximum stitch number is 999. (5) Press the El or H keys so that the needle tip aligns with Pattern A Pattern B Pattern C the first stitch of pattern B. The-work clamp will stop. ,(If the work clamp moves past the first stitch of pattern B, use the number keys to display that number of stitches in the STEP display and then press the H key. The work clamp will now return the number of stitches displayed in the indicator.) (6) Press the numeral key El 3 times to indicate "777" on the STEP display and then press the El key. (7) Use the feed key to move the needle tip from point 1 to point 2, and then press the El key. Note If a third pattern "C" follows pattern B, pattern C will automatically follow pattern B and shift as shown in the diagram. If this is undesirable, follow the same procedure as in steps (4) - (7) above to move the needle tip to point 3, and use the "777 F " code to return pattern C to its original position. (8) Press the R/W switch to write the pattern to disk. (Refer to page 24.) (9) Press the El key to enter the sewing mode. El To set a constant sewing speed irrespective of stitch length • The sewing speed on this machine is normally controlled automatically according to the selected stitch length. This sewing speed can be reprogrammed to a constant speed, however, for better results in zigzag patterns and with extremely thick materials. (1 ) Input "112" [1] at the end of the program instead of "111" 0 . The sewing speed will be 600 - 1,200 spm irrespective of the selected stitch length. Note Disks with patterns programmed for 600 - 1,200 spm should still be ended with "111" [1]. The sewing speed will remain as programmed.
-
 1
1 -
2
-
3
-
4
-
5
-
6
-
7
-
8
-
9
-
10
-
11
-
12
-
13
-
14
-
15
-
16
-
17
-
18
-
19
-
20
-
21
-
22
-
23
-
24
-
25
-
26
-
27
-
 28
28 -
 29
29 -
 30
30 -
 31
31 -
 32
32 -
 33
33 -
 34
34 -
 35
35 -
 36
36
 |
 |