Brother International Entrepreneur Pro PR-1000 Users Manual - English - Page 170
Computer USB
 |
View all Brother International Entrepreneur Pro PR-1000 manuals
Add to My Manuals
Save this manual to your list of manuals |
Page 170 highlights
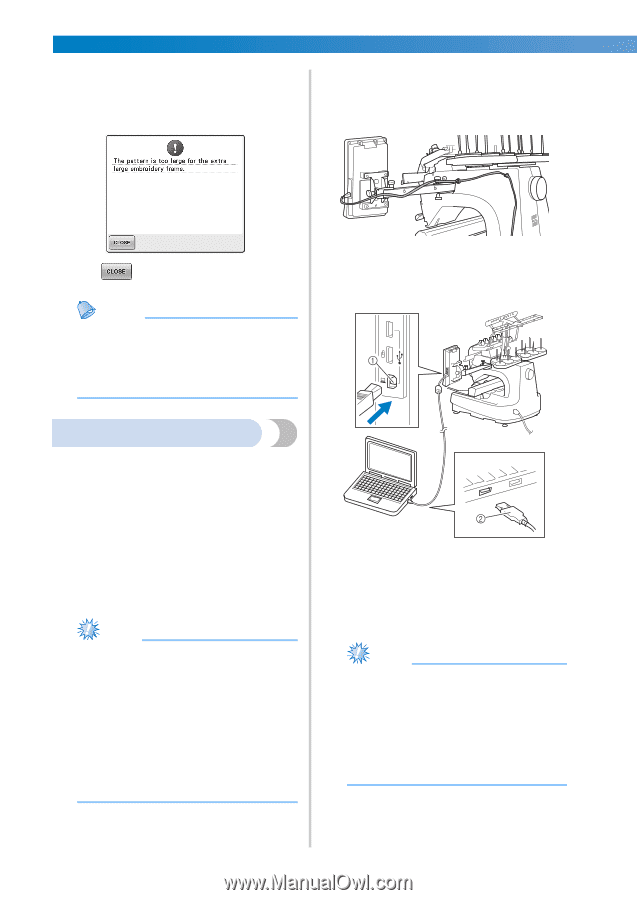
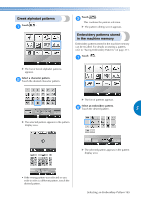
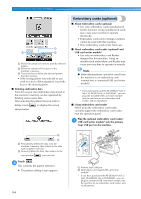
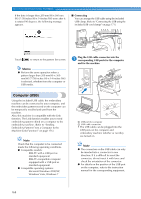
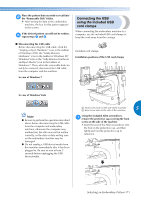
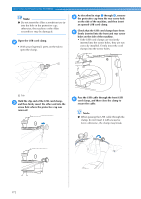
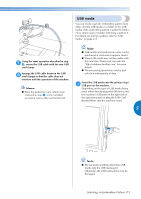
SELECTING/EDITING/SAVING PATTERNS If the data is larger than 200 mm (H) × 360 mm (W) (7-7/8 inches (H) × 14 inches (W)) even after it is rotated 90 degrees, the following message appears. ■ Connecting You can arrange the USB cable using the included USB clamp. (Refer to "Connecting the USB using the included USB cord clamps" on page 171.) Touch to return to the pattern list screen. Memo ● Perform the same operation when a pattern larger than 200 mm(H) × 360 mm(W) (7-7/8 inches (H) × 14 inches (W)) is selected, whether from the computer or USB media. Plug the USB cable connector into the 1 corresponding USB ports for the computer and for the machine. Computer (USB) Using the included USB cable, the embroidery machine can be connected to your computer, and the embroidery patterns saved on the computer can be temporarily recalled and used from the machine. Also, this machine is compatible with the Link function. The Link function enables you to send embroidery patterns edited on a computer to the embroidery machine. (Refer to "Sending Embroidery Patterns From a Computer to the Machine (Link Function)" on page 176.) Note Check that the computer to be connected meets the following operating conditions. ● Compatible models: IBM-PC with a USB port as standard equipment IBM-PC-compatible computer equipped with a USB port as standard equipment ● Compatible operating systems: Microsoft Windows 2000/XP, Windows Vista, Windows 7 1 USB port for computer 2 USB cable connector • The USB cable can be plugged into the USB ports on the computer and embroidery machine whether or not they are turned on. Note ● The connectors on the USB cable can only be inserted into a connector in one direction. If it is difficult to insert the connector, do not insert it with force and check the orientation of the connector. ● For details on the position of the USB port on the computer, refer to the instruction manual for the corresponding equipment. 168
-
 1
1 -
2
-
3
-
4
-
5
-
6
-
7
-
8
-
9
-
10
-
11
-
12
-
13
-
14
-
15
-
16
-
17
-
18
-
19
-
20
-
21
-
22
-
23
-
24
-
25
-
26
-
27
-
28
-
29
-
30
-
31
-
32
-
33
-
34
-
35
-
36
-
37
-
38
-
39
-
40
-
41
-
42
-
43
-
44
-
45
-
46
-
47
-
48
-
49
-
50
-
51
-
52
-
53
-
54
-
55
-
56
-
57
-
58
-
59
-
60
-
61
-
62
-
63
-
64
-
65
-
66
-
67
-
68
-
69
-
70
-
71
-
72
-
73
-
74
-
75
-
76
-
77
-
78
-
79
-
80
-
81
-
82
-
83
-
84
-
85
-
86
-
87
-
88
-
89
-
90
-
91
-
92
-
93
-
94
-
95
-
96
-
97
-
98
-
99
-
100
-
101
-
102
-
103
-
104
-
105
-
106
-
107
-
108
-
109
-
110
-
111
-
112
-
113
-
114
-
115
-
116
-
117
-
118
-
119
-
120
-
121
-
122
-
123
-
124
-
125
-
126
-
127
-
128
-
129
-
130
-
131
-
132
-
133
-
134
-
135
-
136
-
137
-
138
-
139
-
140
-
141
-
142
-
143
-
144
-
145
-
146
-
147
-
148
-
149
-
150
-
151
-
152
-
153
-
154
-
155
-
156
-
157
-
158
-
159
-
160
-
161
-
162
-
163
-
164
-
 165
165 -
 166
166 -
 167
167 -
 168
168 -
 169
169 -
 170
170 -
 171
171 -
 172
172 -
 173
173 -
 174
174 -
 175
175 -
176
-
177
-
178
-
179
-
180
-
181
-
182
-
183
-
184
-
185
-
186
-
187
-
188
-
189
-
190
-
191
-
192
-
193
-
194
-
195
-
196
-
197
-
198
-
199
-
200
-
201
-
202
-
203
-
204
-
205
-
206
-
207
-
208
-
209
-
210
-
211
-
212
-
213
-
214
-
215
-
216
-
217
-
218
-
219
-
220
-
221
-
222
-
223
-
224
-
225
-
226
-
227
-
228
-
229
-
230
-
231
-
232
-
233
-
234
-
235
-
236
-
237
-
238
-
239
-
240
-
241
-
242
-
243
-
244
-
245
-
246
-
247
-
248
-
249
-
250
-
251
-
252
-
253
-
254
-
255
-
256
-
257
-
258
-
259
-
260
-
261
-
262
-
263
-
264
-
265
-
266
-
267
-
268
-
269
-
270
-
271
-
272
-
273
-
274
-
275
-
276
-
277
-
278
-
279
-
280
-
281
-
282
-
283
-
284
-
285
-
286
-
287
-
288
-
289
-
290
-
291
-
292
-
293
-
294
-
295
-
296
-
297
-
298
-
299
-
300
-
301
-
302
-
303
-
304
-
305
-
306
-
307
-
308
-
309
-
310
-
311
-
312
-
313
-
314
-
315
-
316
-
317
-
318
 |
 |