Brother International HL-3075CW Quick Setup Guide - English - Page 5
Print a test
 |
View all Brother International HL-3075CW manuals
Add to My Manuals
Save this manual to your list of manuals |
Page 5 highlights
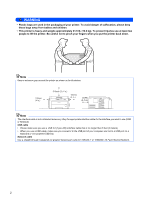
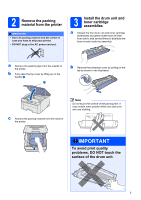
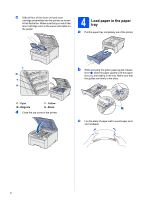
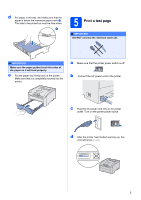
d Put paper in the tray, and make sure that the paper is below the maximum paper mark a. The side to be printed on must be face down. 5 Print a test page IMPORTANT DO NOT connect the interface cable yet. IMPORTANT Make sure the paper guides touch the sides of the paper so it will feed properly. e Put the paper tray firmly back in the printer. Make sure that it is completely inserted into the printer. a Make sure that the printer power switch is off. b Connect the AC power cord to the printer. c Plug the AC power cord into an AC power outlet. Turn on the printer power switch. d After the printer has finished warming up, the LCD will show Ready. 㻡 5
-
 1
1 -
 2
2 -
 3
3 -
 4
4 -
 5
5 -
 6
6 -
 7
7 -
 8
8 -
 9
9 -
 10
10 -
 11
11 -
12
-
13
-
14
-
15
-
16
-
17
-
18
-
19
-
20
-
21
-
22
-
23
-
24
-
25
-
26
-
27
-
28
 |
 |

5
d
Put paper in the tray, and make sure that the
paper is below the maximum paper mark
a
.
The side to be printed on must be face down.
e
Put the paper tray firmly back in the printer.
Make sure that it is completely inserted into the
printer.
5
Print a test page
a
Make sure that the printer power switch is off.
b
Connect the AC power cord to the printer.
c
Plug the AC power cord into an AC power
outlet. Turn on the printer power switch.
d
After the printer has finished warming up, the
LCD will show
Ready
.
IMPORTANT
Make sure the paper guides touch the sides of
the paper so it will feed properly.
IMPORTANT
DO NOT connect the interface cable yet.