Brother International LX-3125E Users Manual - English and Spanish - Page 33
Adjusting buttonhole, stitching
 |
View all Brother International LX-3125E manuals
Add to My Manuals
Save this manual to your list of manuals |
Page 33 highlights
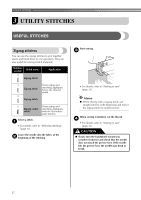
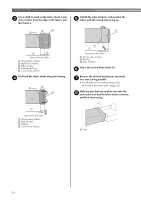
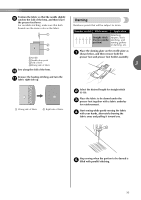
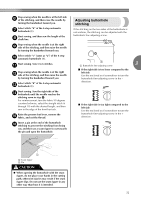
Stop sewing when the needle is at the left side f of the stitching, and then raise the needle by turning the handwheel toward you. Select stitch "b" of the 4-step automatic g buttonhole (1). Start sewing, and then sew the length of the h chalk line. Adjusting buttonhole stitching If the stitching on the two sides of the buttonhole is not uniform, the stitching can be adjusted with the buttonhole fine-adjusting screw. Stop sewing when the needle is at the right i side of the stitching, and then raise the needle by turning the handwheel toward you. Select stitch "c" (same as "a") of the 4-step j automatic buttonhole (1). Start sewing. Sew 5 to 6 stitches. k Stop sewing when the needle is at the right l side of the stitching, and then raise the needle by turning the handwheel toward you. Select stitch "d" of the 4-step automatic m buttonhole (1). 3 a Buttonhole fine-adjusting screw ■ If the right side is too loose compared to the left side Use the enclosed oval screwdriver to turn the buttonhole fine-adjusting screw in the direction. Start sewing. Sew the right side of the n buttonhole until the needle reaches the stitching sewn in step e. For reinforcement, turn the fabric 90 degrees counterclockwise, select the straight stitch (6 through 10) with the desired length, and then sew to the edge of the front bar tack. Raise the presser foot lever, remove the o fabric, and cut the thread. ■ If the right side is too tight compared to the left side Use the enclosed oval screwdriver to turn the buttonhole fine-adjusting screw in the + direction. Insert a pin at the end of the buttonhole p stitching to prevent the stitching from being cut, and then use a seam ripper to cut towards the pin and open the buttonhole. 2 1 a Seam ripper b Pin CAUTION ● When opening the buttonhole with the seam ripper, do not place your hands in the cutting path, otherwise injuries may result if the seam ripper slips. Do not use the seam ripper in any other way than how it is intended. 32
-
 1
1 -
2
-
3
-
4
-
5
-
6
-
7
-
8
-
9
-
10
-
11
-
12
-
13
-
14
-
15
-
16
-
17
-
18
-
19
-
20
-
21
-
22
-
23
-
24
-
25
-
26
-
27
-
 28
28 -
 29
29 -
 30
30 -
 31
31 -
 32
32 -
 33
33 -
 34
34 -
 35
35 -
 36
36 -
 37
37 -
 38
38 -
39
-
40
-
41
-
42
-
43
-
44
-
45
-
46
-
47
-
48
-
49
-
50
-
51
-
52
-
53
-
54
-
55
-
56
-
57
-
58
-
59
-
60
-
61
-
62
-
63
-
64
-
65
-
66
-
67
-
68
-
69
-
70
-
71
-
72
-
73
-
74
-
75
-
76
-
77
-
78
-
79
-
80
-
81
-
82
-
83
-
84
-
85
-
86
-
87
-
88
-
89
-
90
-
91
-
92
-
93
-
94
-
95
-
96
 |
 |
