Brother International MFC-7860DW Advanced Users Manual - English - Page 45
If you downloaded IFAX and E-mail options (MFC-7460DN and MFC-7860DW
 |
UPC - 012502627029
View all Brother International MFC-7860DW manuals
Add to My Manuals
Save this manual to your list of manuals |
Page 45 highlights
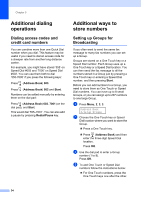
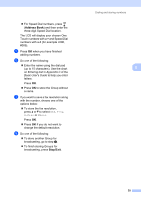
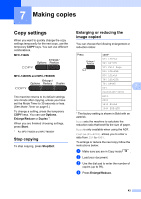
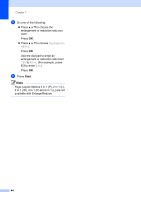
f If you want to change the fax resolution for the Group, press a or b to choose the resolution you want. Press OK. g Press Stop/Exit. If you downloaded IFAX and E-mail options (MFC-7460DN and MFC-7860DW) 5 If you try to change a Group number, the LCD will show the name or number already stored there. a Press Menu, 2, 3, 3. Address Book 3.Setup Groups b Choose the One Touch key or Speed Dial number where the Group number is stored. Do one of the following: Press the One Touch key. Press (Address Book) and then enter the three-digit Speed Dial number. Press OK. Note If the Group number you are trying to change has been set to a fax forwarding number, the LCD will ask you if you want to change the name or number. c Do one of the following: To change the stored Group information, press 1. Go to step d. To exit without making a change, press Stop/Exit. G01:*001*002#001 1.Change 2.Clear Dialing and storing numbers d Press a or b to select one of the following: Fax/IFAX Email Color PDF Email Color JPG Email Color XPS Email Gray PDF Email Gray JPG Email Gray XPS Email B&W PDF Email B&W TIFF Press OK. e Add or delete One Touch or Speed Dial numbers by following the instructions below: 5 To add One Touch numbers, press d or c to position the cursor just after the last number. Then press the One Touch key of the number you want to add. To add Speed Dial numbers, press d or c to position the cursor just after the last number. Then press (Address Book) and enter the three-digit Speed Dial location of the number you want to add. To delete One Touch or Speed Dial numbers, press d or c to position the cursor under the number you want to delete, and then press Clear. Press OK. f Edit the name as follows: To edit the name, press d or c to position the cursor under the character you want to change. Then press Clear to delete it, and enter the correct character using the dial pad. When you have finished editing, press OK. 39
-
 1
1 -
2
-
3
-
4
-
5
-
6
-
7
-
8
-
9
-
10
-
11
-
12
-
13
-
14
-
15
-
16
-
17
-
18
-
19
-
20
-
21
-
22
-
23
-
24
-
25
-
26
-
27
-
28
-
29
-
30
-
31
-
32
-
33
-
34
-
35
-
36
-
37
-
38
-
39
-
 40
40 -
 41
41 -
 42
42 -
 43
43 -
 44
44 -
 45
45 -
 46
46 -
 47
47 -
 48
48 -
 49
49 -
 50
50 -
51
-
52
-
53
-
54
-
55
-
56
-
57
-
58
-
59
-
60
-
61
-
62
-
63
-
64
-
65
-
66
-
67
-
68
-
69
-
70
-
71
-
72
-
73
-
74
-
75
-
76
 |
 |
