Brother International PE-DESIGN 10 Added Features of PE-DESIGN 10 Version 10.2 - Page 4
Save as FCM File, Send to ScanNCutCanvas
 |
View all Brother International PE-DESIGN 10 manuals
Add to My Manuals
Save this manual to your list of manuals |
Page 4 highlights
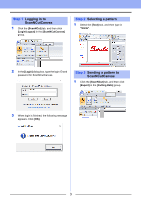
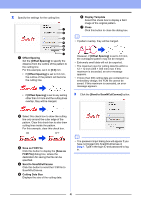
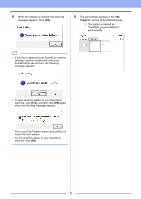
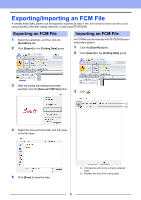
2 Specify the settings for the cutting line. a b c d e f g a Offset Spacing Set the [Offset Spacing] to specify the distance from the outline of the pattern to the cutting line. For this example, set it to [0.0] mm. • If [Offset Spacing] is set to 0.0 mm, the outline of the pattern will become the cutting line. • If [Offset Spacing] is set to any setting other than 0.0 mm and the cutting lines overlap, they will be merged. f Display Template Select this check box to display a faint image of the original pattern. g Close Click this button to close the dialog box. b • If patters overlap, they will be merged. However, if [Offset Spacing] is set to 0.0 mm, the overlapped pattern may not be merged. • Extremely small data will not be exported. • The maximum size for cutting data fits within a 12 × 12 inch (305 × 305 mm) mat. If this maximum is exceeded, an error message appears. • If more than 300 cutting data are contained in a embroidery design, the FCM file cannot be saved. If this maximum is exceeded, an error message appears. 3 Click the [Send to ScanNCutCanvas] button. b Select this check box to draw the cutting line only around the outer edge of the pattern. Clear this check box to also draw cutting lines inside the pattern. For this example, clear this check box. ON OFF c Save as FCM File Click this button to display the [Save as FCM File] dialog box, where the destination for saving the file can be specified. d Send to ScanNCutCanvas Click this button to send the FCM file to ScanNCutCanvas. e Cutting Data Size Displays the size of the cutting data. b • The password input dialog box will appear if you have not logged into ScanNCutCanvas in Step 1. Type in the login ID and password to log in. 4
-
 1
1 -
 2
2 -
 3
3 -
 4
4 -
 5
5 -
 6
6 -
 7
7
 |
 |
