Brother International PE-DESIGN 10 Added Features of PE-DESIGN 10 Version 10.2 - Page 5
Projects, b
 |
View all Brother International PE-DESIGN 10 manuals
Add to My Manuals
Save this manual to your list of manuals |
Page 5 highlights
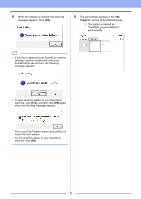
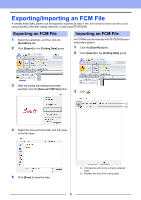
4 When the transfer is finished, the following message appears. Click [OK]. 5 The sent pattern appears in the "My Projects" screen of ScanNCutCanvas. • The pattern is named as "fromPED_yyyymmddhhmm" automatically. b • If you have registered your ScanNCut machine (wireless network models only) with your ScanNCutCanvas account, the following message appears. • To also send the pattern to your ScanNCut machine, click [Yes], and then click [OK] again when the following message appears. Then, touch the Transfer button on ScanNCut to import the sent pattern. • To not send the pattern to your ScanNCut machine, click [No]. 5
-
 1
1 -
 2
2 -
 3
3 -
 4
4 -
 5
5 -
 6
6 -
 7
7
 |
 |

5
4
When the transfer is finished, the following
message appears. Click
[OK]
.
5
The sent pattern appears in the
“My
Projects”
screen of ScanNCutCanvas.
•
The pattern is named as
“fromPED_yyyymmddhhmm”
automatically.
b
•
If you have registered your ScanNCut machine
(wireless network models only) with your
ScanNCutCanvas account, the following
message appears.
•
To also send the pattern to your ScanNCut
machine, click
[Yes]
, and then click
[OK]
again
when the following message appears.
Then, touch the Transfer button on ScanNCut to
import the sent pattern.
•
To not send the pattern to your ScanNCut
machine, click
[No]
.