Brother International PE-DESIGN2.0 Owner's Manual - English - Page 105
Selection Mode, Selecting patterns, the Tool Box.
 |
View all Brother International PE-DESIGN2.0 manuals
Add to My Manuals
Save this manual to your list of manuals |
Page 105 highlights
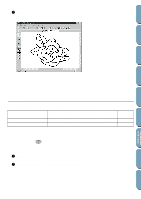
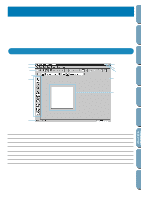
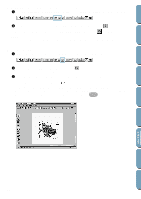
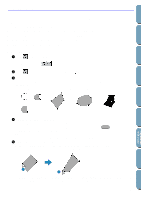
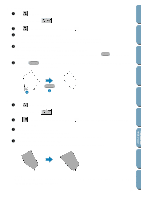
Contents Before Using Selection Mode To apply settings to an existing pattern, you must first select it.The cursor selection mode is used to select one or more patterns. Once a pattern is selected, you can move it, scale it, and change its direction by rotating it or inverting it. s Selecting patterns 1 Click on the Tool Box. The shape of the cursor changes to . 2 Click the pattern that you want to select. You know that the object is selected when handles are displayed. Handles Getting Started Design Center Layout & Editing File Utility The Status bar shows the dimensions (width and height) of the selection. 3 To deselect the pattern, select another one, click on the white space or click another tool button of the Tool Box. 4 To select an additional pattern, click that pattern while holding the Shift key down. Note that you can also select patterns by dragging the cursor across the Design Page. As you drag, a dotted rectangle appears. When you release the mouse button, all patterns that overlap that rectangle will be selected. If you select other patterns than you wanted to, click on the white space to deselect all, and start again. s Moving patterns 1 Move the cursor over a selected pattern or group of selected patterns. The shape of the cursor will change to . 2 You can now drag the pattern to another location. s Scaling patterns 1 Move the cursor over one of the handles of a selected pattern or group of selected patterns. The shape of the cursor will change to , , or , depending on the handle the cursor is on. 2 Drag the handle in the direction of the arrow to scale the pattern. is for scaling the width. is for scaling the height. and are for scaling both dimensions at the same time. As you drag the handle, you can check the changing size on the Status bar. Note that some patterns imported from cards cannot be scaled. When you scale imported patterns, the number of stitches remain the same, resulting in a quality loss. To maintain the quality of the embroidery, you need to adjust the number of stitches after scaling the pattern. This can be done in the Stitch to Block Sensitivity dialog, which you open by selecting the Sew - Stitch to Block command. For more information on how to select this function, see "Stitch to Block" on page 149. Programmable Stich Creator Quick Reference Alphabetic Index 95
-
 1
1 -
2
-
3
-
4
-
5
-
6
-
7
-
8
-
9
-
10
-
11
-
12
-
13
-
14
-
15
-
16
-
17
-
18
-
19
-
20
-
21
-
22
-
23
-
24
-
25
-
26
-
27
-
28
-
29
-
30
-
31
-
32
-
33
-
34
-
35
-
36
-
37
-
38
-
39
-
40
-
41
-
42
-
43
-
44
-
45
-
46
-
47
-
48
-
49
-
50
-
51
-
52
-
53
-
54
-
55
-
56
-
57
-
58
-
59
-
60
-
61
-
62
-
63
-
64
-
65
-
66
-
67
-
68
-
69
-
70
-
71
-
72
-
73
-
74
-
75
-
76
-
77
-
78
-
79
-
80
-
81
-
82
-
83
-
84
-
85
-
86
-
87
-
88
-
89
-
90
-
91
-
92
-
93
-
94
-
95
-
96
-
97
-
98
-
99
-
 100
100 -
 101
101 -
 102
102 -
 103
103 -
 104
104 -
 105
105 -
 106
106 -
 107
107 -
 108
108 -
 109
109 -
 110
110 -
111
-
112
-
113
-
114
-
115
-
116
-
117
-
118
-
119
-
120
-
121
-
122
-
123
-
124
-
125
-
126
-
127
-
128
-
129
-
130
-
131
-
132
-
133
-
134
-
135
-
136
-
137
-
138
-
139
-
140
-
141
-
142
-
143
-
144
-
145
-
146
-
147
-
148
-
149
-
150
-
151
-
152
-
153
-
154
-
155
-
156
-
157
-
158
-
159
-
160
-
161
-
162
-
163
-
164
-
165
-
166
-
167
-
168
-
169
-
170
-
171
-
172
-
173
-
174
-
175
-
176
-
177
-
178
-
179
-
180
-
181
-
182
-
183
-
184
-
185
-
186
-
187
-
188
-
189
-
190
-
191
-
192
-
193
-
194
-
195
-
196
-
197
-
198
-
199
-
200
 |
 |
