Brother International PE-DESIGN2.0 Owner's Manual - English - Page 58
Step 4 Saving the Edited Programmed Stitch, Step 5 Quitting Programmable Stitch Creator
 |
View all Brother International PE-DESIGN2.0 manuals
Add to My Manuals
Save this manual to your list of manuals |
Page 58 highlights
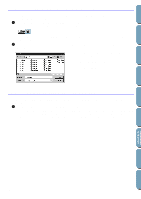
Contents Before Using Getting Started Design Center Layout & Editing Step 4 Saving the Edited Programmed Stitch In order to apply your edited stitch pattern to a region in Layout & Editing or Design Center, you must first save it as a pas file. To do this, proceed as follows. 1 Click File on the menu bar, then click Save on the submenu. You can also click on the button of the Toolbar shown below: Since the pas files that come with your program are "Read Only" files and cannot be overwritten, the Save as dialog opens. 2 Type in a file name and select another target folder if you want to save your own stitch pattern files separately. x Select the drive, the folder and type the file name. x Click Save to save. x Click Cancel to exit. Step 5 Quitting Programmable Stitch Creator Now that you have created a stitch pattern, you may close this application as you will no longer need it for this exercise. 1 Click File on the menu bar, then click Exit on the submenu. If you have saved your file as recommended in the previous step, the application will close immediately. If you have changed anything after the last time you saved the file, you will be asked whether you want to save the file. Click Yes, then proceed as explained in the previous step. 48 File Utility Programmable Stich Creator Quick Reference Alphabetic Index
-
 1
1 -
2
-
3
-
4
-
5
-
6
-
7
-
8
-
9
-
10
-
11
-
12
-
13
-
14
-
15
-
16
-
17
-
18
-
19
-
20
-
21
-
22
-
23
-
24
-
25
-
26
-
27
-
28
-
29
-
30
-
31
-
32
-
33
-
34
-
35
-
36
-
37
-
38
-
39
-
40
-
41
-
42
-
43
-
44
-
45
-
46
-
47
-
48
-
49
-
50
-
51
-
52
-
 53
53 -
 54
54 -
 55
55 -
 56
56 -
 57
57 -
 58
58 -
 59
59 -
 60
60 -
 61
61 -
 62
62 -
 63
63 -
64
-
65
-
66
-
67
-
68
-
69
-
70
-
71
-
72
-
73
-
74
-
75
-
76
-
77
-
78
-
79
-
80
-
81
-
82
-
83
-
84
-
85
-
86
-
87
-
88
-
89
-
90
-
91
-
92
-
93
-
94
-
95
-
96
-
97
-
98
-
99
-
100
-
101
-
102
-
103
-
104
-
105
-
106
-
107
-
108
-
109
-
110
-
111
-
112
-
113
-
114
-
115
-
116
-
117
-
118
-
119
-
120
-
121
-
122
-
123
-
124
-
125
-
126
-
127
-
128
-
129
-
130
-
131
-
132
-
133
-
134
-
135
-
136
-
137
-
138
-
139
-
140
-
141
-
142
-
143
-
144
-
145
-
146
-
147
-
148
-
149
-
150
-
151
-
152
-
153
-
154
-
155
-
156
-
157
-
158
-
159
-
160
-
161
-
162
-
163
-
164
-
165
-
166
-
167
-
168
-
169
-
170
-
171
-
172
-
173
-
174
-
175
-
176
-
177
-
178
-
179
-
180
-
181
-
182
-
183
-
184
-
185
-
186
-
187
-
188
-
189
-
190
-
191
-
192
-
193
-
194
-
195
-
196
-
197
-
198
-
199
-
200
 |
 |
