Brother International PS-2200 Users Manual - English - Page 62
corregir el cosido de los ojales, en funci
 |
View all Brother International PS-2200 manuals
Add to My Manuals
Save this manual to your list of manuals |
Page 62 highlights
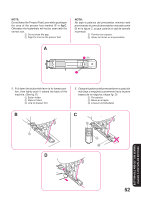
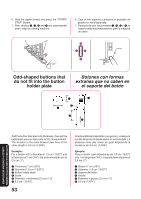
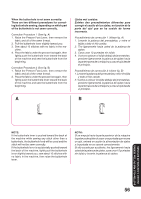
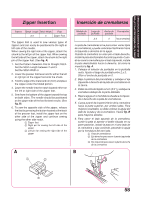
When the buttonhole is not sewn correctly: There are two different procedures for correcting buttonhole sewing, depending on which part of the buttonhole is not sewn correctly. Correction Procedure 1 (See fig. A) 1. Raise the Presser Foot Lever, then remove the fabric and all of the sewn thread. 2. Pull the buttonhole lever slightly toward you. 3. Sew about 10 stitches with no fabric in the ma- chine. 4. Place the fabric under the presser foot again, then lightly push the buttonhole lever toward the back of the machine and sew the buttonhole from the beginning. Correction Procedure 2 (See fig. B) 1. Raise the Presser Foot Lever, then remove the fabric and all of the sewn thread. 2. Place the fabric under the presser foot again, then lightly push the buttonhole lever toward the back of the machine and sew the buttonhole from the beginning. A Ojales mal cosidos: Existen dos procedimientos diferentes para corregir el cosido de los ojales, en función de la parte del ojal que se ha cosido de forma incorrecta. Procedimiento de corrección 1 (Véase fig. A) 1. Levante la palanca del prensatelas, y retire el tejido y todo el hilo cosido. 2. Tire ligeramente hacia usted de la palanca de ojales. 3. Cosa unas 10 puntadas sin tejido. 4. Vuelva a colocar el tejido debajo del prensatelas, presione ligeramente la palanca de ojales hacia la parte trasera de la máquina y cosa el ojal desde el principio. Procedimiento de corrección 2 (véase fig. B) 1. Levante la palanca del prensatelas y retire el tejido y todo el hilo cosido. 2. Vuelva a colocar le tejido debajo del prensatelas, presione ligeramente la palanca de ojales hacia la parte trasera de la máquina y cosa el ojal desde el principio. B BUTTONHOLE AND BUTTON SEWING OJALES Y COSTURA DE BOTONES NOTE: If the buttonhole lever is pushed toward the back of the machine while sewing any stitch other than a buttonhole, the buttonhole feed will be used and the stitch will not be sewn correctly. If the buttonhole lever is accidentally pushed toward the back of the machine, lightly pull the buttonhole lever slightly toward you, sew about 10 stitches with no fabric in the machine, then raise the buttonhole lever. NOTA: Si se empuja hacia la parte posterior de la máquina la palanca de ojales al coser una puntada que no sea un ojal, entrará en acción la alimentación de ojales y la puntada no se coserá correctamente. Si ello sucede por accidente, tire ligeramente hacia usted de la palanca de ojales, cosa unas 10 puntadas sin tejido y levante la palanca de ojales. 56
-
 1
1 -
2
-
3
-
4
-
5
-
6
-
7
-
8
-
9
-
10
-
11
-
12
-
13
-
14
-
15
-
16
-
17
-
18
-
19
-
20
-
21
-
22
-
23
-
24
-
25
-
26
-
27
-
28
-
29
-
30
-
31
-
32
-
33
-
34
-
35
-
36
-
37
-
38
-
39
-
40
-
41
-
42
-
43
-
44
-
45
-
46
-
47
-
48
-
49
-
50
-
51
-
52
-
53
-
54
-
55
-
56
-
 57
57 -
 58
58 -
 59
59 -
 60
60 -
 61
61 -
 62
62 -
 63
63 -
 64
64 -
 65
65 -
 66
66 -
 67
67 -
68
-
69
-
70
-
71
-
72
-
73
-
74
-
75
-
76
-
77
-
78
-
79
-
80
-
81
-
82
-
83
-
84
-
85
-
86
-
87
-
88
-
89
-
90
-
91
 |
 |