Brother International PS-2300 Users Manual - English - Page 63
Brother International PS-2300 Manual
 |
View all Brother International PS-2300 manuals
Add to My Manuals
Save this manual to your list of manuals |
Page 63 highlights
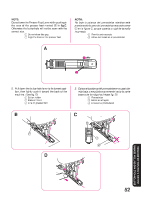
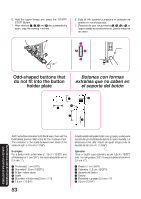
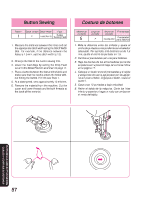
Button Sewing Pattern Stitch Length Stitch Width F Less than 5 Foot Button Sewing Foot Costura de botones Modelo de puntada Largo de puntada F Ancho de puntada Cualquiera Prensatelas Prensatelas para botones 1. Measure the distance between the holes and set the appropriate stitch width using the Stitch Width Dial. For example, if the distance between the holes is 1.5 mm, set the stitch width to 1.5. 2. Change the foot to the button sewing foot. 3. Lower the feed dogs by setting the Drop Feed Lever to the Down Position as shown on page 17. 4. Place a button between the foot and the fabric and make sure that the needle enters the holes without hitting the button. If it hits see Step 1. 5. At a slow speed, sew approximately 10 stitches. 6. Remove the material from the machine. Cut the upper and lower threads and tie both threads at the back of the material. 1. Mida la distancia entre los orificios y ajuste el ancho de puntada correspondiente con el selector adecuado. Por ejemplo, si la distancia es de 1,5 mm, ajuste el ancho de puntada en 1,5. 2. Cambie el prensatelas por uno para botones. 3. Baje los dientes de los alimentadores poniendo su palanca en la posición baja, tal como se indica en la página 17. 4. Coloque un botón entre el prensatelas y el tejido y asegúrese de que la aguja pase por los agujeros sin picar el botón. Si golpea el botón, véase el punto 1. 5. Cosa unas 10 puntadas a baja velocidad. 6. Retire el tejido de la máquina. Corte los hilos inferior y superior y haga un nudo con ambos en el revés del tejido. BUTTONHOLE AND BUTTON SEWING OJALES Y COSTURA DE BOTONES 57
-
 1
1 -
2
-
3
-
4
-
5
-
6
-
7
-
8
-
9
-
10
-
11
-
12
-
13
-
14
-
15
-
16
-
17
-
18
-
19
-
20
-
21
-
22
-
23
-
24
-
25
-
26
-
27
-
28
-
29
-
30
-
31
-
32
-
33
-
34
-
35
-
36
-
37
-
38
-
39
-
40
-
41
-
42
-
43
-
44
-
45
-
46
-
47
-
48
-
49
-
50
-
51
-
52
-
53
-
54
-
55
-
56
-
57
-
 58
58 -
 59
59 -
 60
60 -
 61
61 -
 62
62 -
 63
63 -
 64
64 -
 65
65 -
 66
66 -
 67
67 -
 68
68 -
69
-
70
-
71
-
72
-
73
-
74
-
75
-
76
-
77
-
78
-
79
-
80
-
81
-
82
-
83
-
84
-
85
-
86
-
87
-
88
-
89
-
90
-
91
 |
 |
