Brother International PT-P900W iPrint&Label Users Guide - Apple Devices - Page 5
Printing Using the Computer - driver download
 |
View all Brother International PT-P900W manuals
Add to My Manuals
Save this manual to your list of manuals |
Page 5 highlights
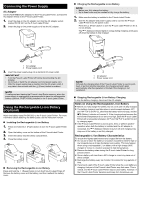
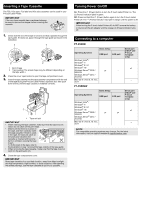
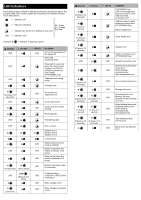
Battery indicator (Battery) (Off) O O (1 times in 4 seconds) O (2 times in 4 seconds) R R (Power) R G Condition Rechargeable battery power: full Charging complete Charging Rechargeable battery power: half Rechargeable battery power: low Rechargeable battery error Rechargeable battery power: empty Wi-Fi® indicator (Status) (Power) (Off) O (Off) O (Wi-Fi) R R Condition No available WPS access point was found WPS access point connection error (Off) R O (2 times in 1.8 Incorrect security settings seconds) (Off) O O WPS access point search (2 times in 1.8 error seconds) G Wi-Fi on, not connected G Wi-Fi on, connected G G Wi-Fi: WPS setting mode G G BT switching complete notification (Three times) (PT-P950NW Only) Printing Using the Computer Available Applications for Use with Computers Available Applications Features P-touch Editor Design and print custom labels with built in drawing tools, text using different fonts and styles, imported graphic images and barcodes. Cable Label Tool Create and print labels for cables, patch panels, faceplates, electrical equipment and more. Computer Windows® / Mac Windows® Connection Wi-Fi / USB / Wired Network For more information, see the User's Guide. Installing the Software and Printer Driver to a Computer To print from your Windows® computer or Mac, install the printer driver, P-touch Editor and other applications to your computer. 1. Visit our website (www.brother.com/inst) and download the installer for the latest software and manuals. 2. Double-click the downloaded .exe file and follow the on-screen instructions to proceed with the installation. NOTE To connect the P-touch Label Printer to a computer using a wireless connection, we recommend the following: • Configure the wireless network settings while installing the software. You can change the settings later using the Printer Setting Tool. For more information, see the User's Guide. • Install the software on a computer wirelessly connected to your network and configure the P-touch Label Printer using a USB cable. • Get the SSID (network name) and password (network key) of the wireless network in advance. • If your wireless access point/router supports WPS, you can use one-push WPS (Wi-Fi Protected Setup) to quickly configure the wireless network settings. 3. Close the dialog box when the installation is complete. Connecting the P-touch Label Printer to a Computer You can connect the P-touch Label Printer to a Windows® computer or Mac using a USB cable, wireless LAN, or wired LAN. For more information, see the User's Guide. Connecting Using USB 1. Connect the P-touch Label Printer end of the USB cable to the USB port on the back of the P-touch Label Printer. 2. Connect the other end of the USB cable to the USB port on the computer. 3. Turn on the P-touch Label Printer. Connecting Using Wi-Fi 1. Turn on the P-touch Label Printer. 2. Press and hold the (Wi-Fi) button on your P-touch Label Printer for one second to turn the Wi-Fi function on. The (Wi-Fi) indicator starts flashing in green once every three seconds. • Ad-Hoc Mode After installing the printer driver and other applications to your computer, set the Ad-Hoc mode using the Printer Setting Tool installed on the computer. (See the User's Guide.)
-
 1
1 -
 2
2 -
 3
3 -
 4
4 -
 5
5 -
 6
6 -
 7
7 -
 8
8
 |
 |
