Brother International QL-1060N Quick Setup Guide - English and Spanish - Page 33
Reference, Main Specifications - drive
 |
UPC - 012502618812
View all Brother International QL-1060N manuals
Add to My Manuals
Save this manual to your list of manuals |
Page 33 highlights
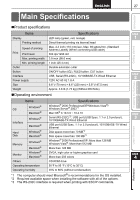
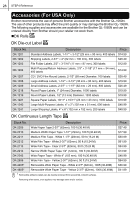
27 Reference Main Specifications Introduction Installing the Software For Macintosh® For Windows® „Product specifications Items Specifications Display LED lamp (green, red, orange) Printing method Direct thermal printing via thermal head Speed of printing Print Print head Max. 4.3 inch (110 mm)/sec, Max. 69 labels/min. (Standard Address Labels) (When connecting USB cable) 300 dpi/1296 dot Max. printing width 3.9 inch (98.6 mm) Min. printing length 1 inch (25.4 mm) Cutter Durable automatic cutter Button ON/OFF button ( ), FEED button, CUT button Interface USB, Serial (RS-232C), 10/100BASE-TX Wired Ethernet Power supply 120V AC 60 Hz 1.8 A Size 6.6" (170 mm) × 8.6" (220 mm) × 5.8" (147.5 mm) Weight Approx. 3.8 lb (1.73 kg) (Without DK Rolls) „Operating environment Items Windows® OS Macintosh® Interface Windows® Macintosh® Hard Disk Windows® Macintosh® Memory Monitor Windows® Macintosh® Windows® Macintosh® Specifications Windows® 2000 Professional/XP/Windows Vista®/ Windows Server® 2003*1 Mac OS® X 10.3.9 ~ 10.4.10 Serial (RS-232C)*3, USB port (USB Spec. 1.1 or 2.0 protocol), 10/100BASE-TX Wired Ethernet USB port (USB Spec. 1.1 or 2.0 protocol), 10/100BASE-TX Wired Ethernet Disk space more than 70 MB*2 Disk space more than 100 MB*2 Windows® 2000 Professional/XP: More than 128 MB Windows Vista®: More than 512 MB More than 128 MB SVGA, high color or higher graphics card More than 256 colors Others CD-ROM drive Operating temperature 50°F to 95 °F (10°C to 35°C) Operating humidity 20% to 80% (without condensation) *1 The computer should meet Microsoft®'s recommendations for the OS installed. *2 Required available space when installing the software with all of the options. *3 The RS-232C interface is required when printing with ESC/P commands. Reference Label Overview Getting started STEP 1 STEP 2 STEP 3 STEP 4
-
 1
1 -
2
-
3
-
4
-
5
-
6
-
7
-
8
-
9
-
10
-
11
-
12
-
13
-
14
-
15
-
16
-
17
-
18
-
19
-
20
-
21
-
22
-
23
-
24
-
25
-
26
-
27
-
 28
28 -
 29
29 -
 30
30 -
 31
31 -
 32
32 -
 33
33 -
 34
34 -
 35
35 -
 36
36 -
 37
37 -
 38
38 -
39
-
40
-
41
-
42
-
43
-
44
-
45
-
46
-
47
-
48
-
49
-
50
-
51
-
52
-
53
-
54
-
55
-
56
-
57
-
58
-
59
-
60
-
61
-
62
-
63
-
64
-
65
-
66
-
67
-
68
-
69
 |
 |
