Brother International RH-9820 Instruction Manual - English - Page 112
Adjusting the thread handler, STANDARD ADJUSTMENTS, NOTE: Principle of the thread handler
 |
View all Brother International RH-9820 manuals
Add to My Manuals
Save this manual to your list of manuals |
Page 112 highlights
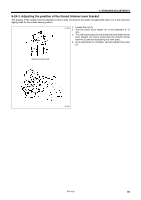
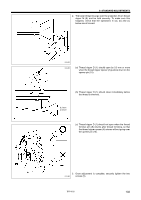
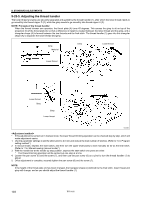
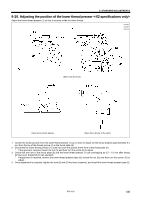
9. STANDARD ADJUSTMENTS 9-25-5. Adjusting the thread handler The lower thread and gimp are securely separated and guided by the thread handler (1), after which the lower thread needs to go smoothly into thread nipper D (2), while the gimp needs to go smoothly into thread nipper U (3). NOTE: Principle of the thread handler When the thread trimmer arm operates, the throat plate (4) turns 45 degrees. This causes the gimp to sit on top of the projection (5) of the throat plate (4) so that a difference in height is created between the lower thread and the gimp, and a triangular shape (A) is formed between the two threads and the final stitch. The thread handler (1) goes into this triangular shape (A) to separate the lower thread and gimp. Gimp Material Gimp Lower thread Lower thread Lower thread Gimp Gimp Lower thread 0525B * If this adjustment is carried out in manual mode, the lower thread trimming operation can be checked step by step, which will make adjustment easier. 1. Use the parameter settings to set the stitch pitch to 2.0 mm and reduce the total number of stitches. (Refer to "5-3. Program setting method".) 2. In manual mode, depress the start switch, and then turn the upper shaft pulley to sew manually as far as the final stitch. (Refer to "7-6. Manual sewing (manual mode)".) 3. With the needle bar at the needle up stop position, depress the start switch one press at a time. * The thread trimming operation will be carried out one step at a time. 4. Loosen the pan screw (6) and the screw (7), and then use the pan screw (6) as a pivot to turn the thread handler (1) to adjust. 5. Once adjustment is complete, securely tighten the pan screw (6) and the screw (7). NOTE: If the height of the throat plate (4) has been changed, the triangular shape (A) defined by the final stitch, lower thread and gimp will change, and so you should adjust the thread handler (1). 103 RH-9820
-
 1
1 -
2
-
3
-
4
-
5
-
6
-
7
-
8
-
9
-
10
-
11
-
12
-
13
-
14
-
15
-
16
-
17
-
18
-
19
-
20
-
21
-
22
-
23
-
24
-
25
-
26
-
27
-
28
-
29
-
30
-
31
-
32
-
33
-
34
-
35
-
36
-
37
-
38
-
39
-
40
-
41
-
42
-
43
-
44
-
45
-
46
-
47
-
48
-
49
-
50
-
51
-
52
-
53
-
54
-
55
-
56
-
57
-
58
-
59
-
60
-
61
-
62
-
63
-
64
-
65
-
66
-
67
-
68
-
69
-
70
-
71
-
72
-
73
-
74
-
75
-
76
-
77
-
78
-
79
-
80
-
81
-
82
-
83
-
84
-
85
-
86
-
87
-
88
-
89
-
90
-
91
-
92
-
93
-
94
-
95
-
96
-
97
-
98
-
99
-
100
-
101
-
102
-
103
-
104
-
105
-
106
-
 107
107 -
 108
108 -
 109
109 -
 110
110 -
 111
111 -
 112
112 -
 113
113 -
 114
114 -
 115
115 -
 116
116 -
 117
117 -
118
-
119
-
120
-
121
-
122
-
123
-
124
-
125
 |
 |
