Brother International XL-2027 Users Manual - English
Brother International XL-2027 Manual
 |
View all Brother International XL-2027 manuals
Add to My Manuals
Save this manual to your list of manuals |
Brother International XL-2027 manual content summary:
- Brother International XL-2027 | Users Manual - English - Page 1
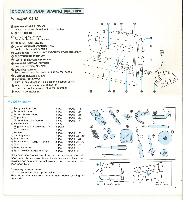
OPERATION MANUAL • Model XL2027 • - Brother International XL-2027 | Users Manual - English - Page 2
parts Accessories VARIOUS CONTROLS Pattern selector Electronic display Stitch length dial Reverse sewing button Foot controller Sew-light Free-arm model Twin needle Changing presser foot THREADING THE MACHINE Winding the bobbin Lower threading Upper threading To draw up lower thread Tension - Brother International XL-2027 | Users Manual - English - Page 3
KNOWING YOUR SEWING MACHINE Principal parts O BOBBIN WINDER DEVICE Winds the lower thread onto the bobbin. CO SPOOL HOLDER O STITCH LENGTH DIAL Controls the feed of stitches. O PRESSER FOOT LEVER • UPPER TENSION CONTROL DIAL Controls the upper tension. EXTENSION TABLE & ACCESSORIES COMPARTMENT - Brother International XL-2027 | Users Manual - English - Page 4
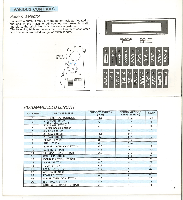
VARIOUS CONTROLS Pattern selector To select a stitch, simply turn the pattern selector located on the end of the machine. All stitches are preset in width, therefore, the stitch length is the only adjustment. The following table represents the preset width of each stitch and - Brother International XL-2027 | Users Manual - English - Page 5
below side of LCD for sewing guidance. The guidance message runs three times and automatically back to pattern name. When the machine is not properly set and a correction, is required, warning messages appear on the display and instruct you to correct. 1. When you set bobbin winder pin to right for - Brother International XL-2027 | Users Manual - English - Page 6
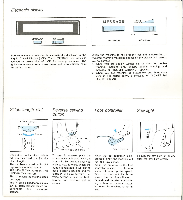
pin CD O4g. Extension table For sewing tubular and hard-toreach garment areas, free-arm sewing is convenient. To change your machine to a free-arm model, simply lift the extension table then slide it out. Your sewing machine is designed for twin needle sewing with Straight Stitch (Center) and - Brother International XL-2027 | Users Manual - English - Page 7
match with the spring on the shaft. 3. Loosen the Clutch Release Knob by turning toward you. 1. Deliver thread through the thread-guides as illustrated. Winding the bobbin (CONTINUED) Lower threading Slot Tension spring Metal finger Notch 0 0 z 4. Holding the thread end, depress the foot - Brother International XL-2027 | Users Manual - English - Page 8
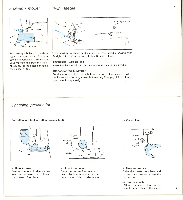
the spool. 6. Deliver the upper thread as illustrated. 11 Thread Take-up Lever '4; I I I 7. Make sure to guide the thread through thread-takeup lever 2. The upper thread has caught the lower thread in a loop. Pull the upper thread toward you and the lower thread will come up from the bobbin in a - Brother International XL-2027 | Users Manual - English - Page 9
Upper Tension Dial Increase tension. Raise number. or '3 Bobbin O 0 Increase tension Bobbin Ov Decrease tension 13 Correct tension Reverse Surface Correct tension is important because too much or too little tension will weaken your seams or cause puckers on your fabric. RELATIVE CHART OF SEWING - Brother International XL-2027 | Users Manual - English - Page 10
up the lower thread by turning the balance wheel toward you and pull both upper and lower thread to the back of presser foot. 3. Place fabric under the 6. Release the Reverse Sewing Button and start sewing in forward direction. 15 How to Change Sewing Direction 1. Stop the machine at the turn- ing - Brother International XL-2027 | Users Manual - English - Page 11
Width at 3.6 mm) 6 (Stitch Width at 4.8 mm) Stitch Length F-4 SIMPLE ZIGZAG STITCHING Select the Pattern number de- pending on the width you need and select the stitch length. (:) It is recommended to sew the straight stitch at the beginning and end of zigzag stitches. 17 SATIN STITCH When - Brother International XL-2027 | Users Manual - English - Page 12
straight stitches are sewn on seam line and zig zag stitches are sewn slightly over folded edge. 2. This work requires a little tighter upper thread tension than normal. 3. Sew at slow speed. 4. Edge of material will be picoted. Position the fabric under the presser foot so the right (zig zag) side - Brother International XL-2027 | Users Manual - English - Page 13
Pattern 12 Stitch Length F-1 21 Double action stitch Pattern 13 Stitch Length 1-2 This machine produces decorative stitch (Scallop) automatically. The "Scallop Stitch" may be used as a decorative edging. 1. Sew scallop stitch along edge of material. 2. If desired, trim around scallop with - Brother International XL-2027 | Users Manual - English - Page 14
be used as a decorative top stitch as well. BUTTONHOLE AND BUTTON SEWING Buttonhole Pattern 1 Stitch Length Foot F-2 Buttonhole foot NOTE: It is back slightly as per the illustration 8. Holding the upper thread gently , start the machine. 9. Buttonhole stitching is made in the orders of - Brother International XL-2027 | Users Manual - English - Page 15
the needle plate. 4. Place a button between the foot and fabric, and make sure that needle enters both holes without hitting the button. 5. At slow speed, sew approximately 10 stitches. 6. Remove the button from the machine. Cut upper and lower threads and tie both threads at back side. 26 - Brother International XL-2027 | Users Manual - English - Page 16
needle plate as illustrated. 2. Place portion to be darned under the presser foot together with fabric underlay for reinforcement. 3. Lower the presser foot. 4. Sew alternately drawing the work gently away from you and pulling it toward you. 5. Repeat this motion until the portion to be darned is - Brother International XL-2027 | Users Manual - English - Page 17
plate on the needle plate. 2. Set your sewing machine as per the above instructions. 3. Draw lettering (for monogramming) or design made by moving it slowly. Cloth guide Using cloth guide will help to sew parallel straight at edge of material. Attach cloth guide by placing it over the hole on - Brother International XL-2027 | Users Manual - English - Page 18
smooth sewing. 2. To check if needle is bent, place flat side of needle down as shown in illustration at right. Changing the bulb • Remove the power supply plug from the outlet. m no 11. Face plate 0 0 J Bulb 1. Loosen the screw. 2. Remove the face plate from 3. Replace the bulb. machine - Brother International XL-2027 | Users Manual - English - Page 19
2. Open the shuttle cover. 3. Take out the bobbin case. 4. Push latch levers outside and remove the with brush. 2. A cloth dampened with machine oil should be used to wipe shuttle race DOG 1. Take out the needle plate. 2. Clean the upper part of feed dog and shuttle race body with a brush. - Brother International XL-2027 | Users Manual - English - Page 20
, review the section of the instruction book that explains the operation you are performing to make sure you are using the machine correctly. If the problem still exists, the following check list may help you correct it. If you still have difficulties, contact your nearest service center. UPPER - Brother International XL-2027 | Users Manual - English - Page 21
list Principal parts Relative chart of sewing fabrics, needle and thread Repacking the machine Reverse sewing button Rick-rack stitch Scallop stitch Sew-light Shell tuck Stitch length dial Straight stitch Tension controls To draw up lower thread Twin needle Upper threading Winding the bobbin Zigzag - Brother International XL-2027 | Users Manual - English - Page 22
ENG 194201-012 Printed in TAIWAN
-
 1
1 -
 2
2 -
 3
3 -
 4
4 -
 5
5 -
 6
6 -
 7
7 -
8
-
9
-
10
-
11
-
12
-
13
-
14
-
15
-
16
-
17
-
18
-
19
-
20
-
21
-
22
 |
 |
OPERATION
MANUAL
•
Model
XL2027
•