Brother International XM3700 Users Manual - English
Brother International XM3700 Manual
 |
View all Brother International XM3700 manuals
Add to My Manuals
Save this manual to your list of manuals |
Brother International XM3700 manual content summary:
- Brother International XM3700 | Users Manual - English - Page 1
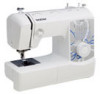
Operation Manual Sewing Machine Product Code: 885-X06/X08/X16/X18/X26/X28 Please visit us at http://solutions.brother.com where you can get product support and answers to frequently asked questions (FAQs). - Brother International XM3700 | Users Manual - English - Page 2
or careless movements, otherwise you may injure your back or knees. 4 Always keep your work area clear: • Never operate the machine with any air openings blocked. Keep ventilation openings of the machine and foot control free from the build up of lint, dust, and loose cloth. • Do not store objects - Brother International XM3700 | Users Manual - English - Page 3
first follow the troubleshooting table in the back of the operation manual to inspect and adjust the machine yourself. If the problem persists, please consult your local authorized Brother dealer. Use this machine only for its intended use as described in this manual. Use accessories recommended by - Brother International XM3700 | Users Manual - English - Page 4
CONTENTS IMPORTANT SAFETY INSTRUCTIONS 1 1. KNOWING YOUR SEWING MACHINE 4 ACCESSORIES 4 Optional accessories 4 THE MAIN PARTS 5 Flat bed attachment 5 USING YOUR SEWING MACHINE 6 Connecting plugs 6 Main power and sewing light switch 7 Foot controller 7 Checking the needle 7 Replacing - Brother International XM3700 | Users Manual - English - Page 5
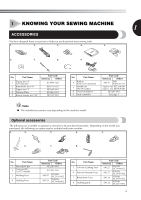
Name 6 Bobbin (One is on machine) 7 Needle set (90/14 needle) 8 Oval screwdriver 9 Foot controller Part Code Americas Others SA156 SFB: XA5539-151 3-piece set: XE5328-001 2-piece set: XE7064-001 XE5241-001 See page 5 Note ● The included accessories vary depending on the machine model - Brother International XM3700 | Users Manual - English - Page 6
to start and stop sewing. Foot Controller: Model KD-1902 for 110/120V area Model KD-2902 for 220/240V area The foot controller part code differs depending on the country or region. Contact your dealer or the nearest authorized service center. Flat bed attachment The accessories can be stored in - Brother International XM3700 | Users Manual - English - Page 7
for a long period of time. Otherwise a fire may result. Connecting plugs Connect the foot controller plug to the 1 machine. Connect the power supply plug to a wall 2 outlet. 2 1 Note ● If a power outage occurs while the sewing machine is being operated, turn off the main power and unplug the power - Brother International XM3700 | Users Manual - English - Page 8
When you take your foot off the foot controller, the machine will stop. ■ Checking the needle correctly Put the flat side of the needle on a flat surface. Check the needle from the top and the sides. Dispose of any bent needles safely. 1 2 1 Parallel space 2 Level surface (bobbin cover, glass, etc - Brother International XM3700 | Users Manual - English - Page 9
, otherwise certain parts of the sewing machine may be damaged. ● Always turn off the machine before you change the presser foot. If you leave the power on and step on the controller, the machine will start and you may be injured. ● Always use the correct presser foot for the stitch pattern you - Brother International XM3700 | Users Manual - English - Page 10
KNOWING YOUR SEWING MACHINE Lower the presser foot lever and fix the 5 presser foot onto the shank. If the presser foot is in the correct place, the bar should snap in. ■ Presser foot installation orientation 1 2 1 Shank 2 Bar THE CONTROLS CAUTION ● If the presser foot is not installed with - Brother International XM3700 | Users Manual - English - Page 11
Patterns and stitch names 1 ■ 37 Stitches ■ 27 Stitches (only available on certain models) 1 2 3 4 5 6 7 8 9 10 1 2 3 4 5 6 7 8 9 10 11 12 13 14 15 16 17 18 19 11 12 13 14 20 21 22 23 24 25 26 27 28 15 16 17 18 19 20 21 22 23 29 30 31 32 33 34 35 36 37 24 25 - Brother International XM3700 | Users Manual - English - Page 12
KNOWING YOUR SEWING MACHINE Pattern 37 Stitches 27 Stitches 13 13 Stitch Name BEAD STITCH 14 14 ARROWHEAD STITCH 15 - PARALLELOGRAM STITCH 16 - SCALLOP STITCH 17 - LIGHTNING STITCH 18 - SQUARE STITCH 19 - DECORATIVE STITCH 20 15 TRIPLE STRETCH STITCH 21 16 TRIPLE - Brother International XM3700 | Users Manual - English - Page 13
Width Length Reference Page 37 Stitches 27 Stitches (mm (inch)) (mm (inch)) 1 32 27 DECORATIVE STITCH 5 (3/16) Fixed 33 2.5 (3/32) 33 - DECORATIVE STITCH 5 (3/16) Fixed 33 2.5 (3/32) 34 - DECORATIVE STITCH 5 (3/16) Fixed 33 2.5 (3/32) 35 - LINK STITCH 5 (3/16) Fixed 33 - Brother International XM3700 | Users Manual - English - Page 14
foot controller. To sew forward, release the reverse sewing lever. The machine will then sew forward. 1 1 Reverse sewing lever THREADING THE MACHINE Winding the bobbin CAUTION ● We designed the bobbin that comes with this machine. If you use bobbins from other models, the machine will not work - Brother International XM3700 | Users Manual - English - Page 15
to pull out 7 to 10 cm (3-4 inches) of thread from the hole on the bobbin. While holding the thread from the spool 2 with your right hand, pass the thread toward you, in the groove on the thread guide. Then, pass the thread around the pre-tension disk and pull the thread in - Brother International XM3700 | Users Manual - English - Page 16
KNOWING YOUR SEWING MACHINE While holding the end of the thread, 6 gently press the foot controller to wind the thread around the bobbin a few times. Then stop the machine. CAUTION ● Not winding the bobbin properly may cause the thread tension to loosen, and may break the needle. Trim the - Brother International XM3700 | Users Manual - English - Page 17
from the cover toward the rear of the machine (as shown in the illustration). • Draw up the lower thread before starting sewing. Refer to "Drawing up the lower thread" on page 21 after threading the upper thread. Lower threading (for models equipped with a quick-set bobbin) Install the bobbin wound - Brother International XM3700 | Users Manual - English - Page 18
KNOWING YOUR SEWING MACHINE Note ● If the thread is not correctly inserted through the tension-adjusting spring of the bobbin case, it may cause incorrect thread tension. Replace the bobbin cover. Put the 3 projection into the race retainer groove and push closed. 12 1 1 Tension-adjusting - Brother International XM3700 | Users Manual - English - Page 19
on the thread guide. 1 • Make sure that the spring in the groove catches the thread. 1 Presser foot lever Raise the needle by turning the 3 handwheel toward you (counterclockwise) so that the mark on the wheel points up. • If the needle is not correctly raised, the sewing machine can not be - Brother International XM3700 | Users Manual - English - Page 20
bar thread guide Thread the needle from front to back 9 leaving a thread tail of about 5 cm (2 inch). • If your sewing machine is equipped with presser foot lever and the thread take-up lever before you feed the upper thread. ● If you incorrectly feed the thread you may cause sewing problems. 1 - Brother International XM3700 | Users Manual - English - Page 21
needle threader lever toward the front of the machine (toward you). The hook will pull the thread through the needle. 1 1 2 3 1 Needle holder 2 Needle threader lever 3 Guide Pull down the needle threader lever as 5 eye of the needle, start from step 3 again. Raise the presser foot lever. 9 20 - Brother International XM3700 | Users Manual - English - Page 22
machine under the presser foot. 1 1 5 cm (2 inches) Note ● If you incorrectly feed the thread you may cause sewing problems models equipped with a quick-set bobbin You can begin sewing immediately without drawing up the bobbin thread. When sewing • The bobbin cover should still be removed. Draw up the - Brother International XM3700 | Users Manual - English - Page 23
● Never use a thread weighted #20 or lower. It may cause machine malfunction. Memo ● The lower the thread number, the thicker the thread; Ball point needle Use the ball point needle when sewing on stretch fabrics or fabrics where skipped stitches easily occur. The factory recommended needle is " - Brother International XM3700 | Users Manual - English - Page 24
foot, otherwise the presser foot may be damaged. Starting sewing Raise the presser foot lever. 5 Turn on the machine. 1 1 Raise the needle by turning the 2 handwheel toward you (counterclockwise) so that the mark on the wheel points up. Turn the pattern selection dial to select a 3 stitch - Brother International XM3700 | Users Manual - English - Page 25
fabric, lower the presser foot lever, and then continue sewing. 1 1 Presser foot lever Slowly press down on the foot controller. 9 1 2 X The machine starts sewing. Take your foot off the foot controller. 0 X The machine stops sewing. • You can use reverse sewing for back tacking and reinforcing - Brother International XM3700 | Users Manual - English - Page 26
making decorative stitches. 1 1 Basting Stitching cylindrical pieces Removing the flat bed attachment makes it easier to sew cylindrical pieces removed, free-arm sewing is possible. 1 Twin needle 2 Extra spool pin CAUTION ● Use only twin needles that have been made for this machine (part code - Brother International XM3700 | Users Manual - English - Page 27
the twin needle, be sure to attach zigzag foot "J", otherwise the needle may break or the machine may be damaged. 1 Turn on the machine. 4 2 Select a stitch. 5 ■ Twin needle threading You should thread each needle separately. Note Models equipped with a needle threader ● You cannot use the - Brother International XM3700 | Users Manual - English - Page 28
stitches. You may need to adjust it when you change fabric or thread. Memo ● We recommend that you do a test sample on scrap of a fabric before you start to sew control dial to a higher number. Note ● If the bobbin thread was incorrectly threaded, the upper thread may be too tight. In this case, - Brother International XM3700 | Users Manual - English - Page 29
STITCHES Straight stitching Straight stitches are used for sewing plain seams. Stitch Name Pattern Stitch Stitch Length Width 37 27 [mm (inch)] [mm (inch)] We recommend that you sew using the Straight Stitch at the beginning and end of zigzag stitches. (This acts as a reinforcement stitch - Brother International XM3700 | Users Manual - English - Page 30
Normal fabric> Remove the flat bed attachment and make 6 free-arm sewing possible. • For details on free-arm sewing, refer to "Stitching cylindrical pieces" (Page 25). Slide the part that you wish to sew onto 7 the arm, make sure that the fabric feeds correctly, and then start - Brother International XM3700 | Users Manual - English - Page 31
so that it is 1 tighter than normal. Place the fabric under the presser foot so 2 that it will be sewn along the bias, with the straight stitches sewn on the seamline and the zigzag stitches sewn slightly over the folded edge. ■ Sewing elastic Pin the elastic tape to the wrong side of 1 the fabric - Brother International XM3700 | Users Manual - English - Page 32
of fabric 1 together and center them under the presser foot. Sew them together using the Elastic Stitch. 2 Make sure you keep the two fabric edges Stitch 1 2 3 1 Desired seamline 2 Straight Stitch 3 Double Action Stitch Fagoting Stitch Name Fagoting Stitch Pattern Stitch Stitch Length Width 37 - Brother International XM3700 | Users Manual - English - Page 33
the presser foot. This stitch works best with a seam allowance of approximately 5 mm (3/16 inch) as this allows the right (zigzag) side of the stitch to overlock the cut edge of the fabric. 1 2 Overedge stitching Stitch Name Elastic Shell Tuck Stitch Pattern Stitch Stitch Length Width 37 27 - Brother International XM3700 | Users Manual - English - Page 34
up and sew 1 1 cm (1/2 inch) from the edge of the fabric. Trim close to the stitching. 2 The stitch will prevent the fabric from unravelling. Decorative stitching Pattern Stitch Name 37 27 8 Scallop Stitch Stitch Name Decorative Stitch Pattern 37 27 30 25 Bead Stitch 13 Decorative Stitch 31 - Brother International XM3700 | Users Manual - English - Page 35
if the foot controller is accidentally pressed and the machine starts sewing. ■ Making a buttonhole Using tailor's chalk, mark the position and 1 length of the buttonhole on the fabric. 2 1 Making a buttonhole (1-step automatic buttonhole) 1 Marks on fabric 2 Buttonhole sewing Stitch Stitch - Brother International XM3700 | Users Manual - English - Page 36
The bar tacks of the buttonhole are sewn 8 in the order shown. 3 24 1 Stop the machine when buttonhole 9 stitching is finished. You need to sew the front bar tack first. 5 Lower the presser foot to align the marks on the foot with the mark on the fabric. 1 2 1 Starting mark on the fabric 2 Marks on - Brother International XM3700 | Users Manual - English - Page 37
, bring the two gimp thread ends to the front of the foot, insert them into the grooves, and then temporarily tie them there. 2 3 Set the stitch width to match the diameter 3 of the gimp thread. Start sewing. 4 1 Right side 2 Shorter 3 Longer After obtaining a satisfactory feed on the 3 right - Brother International XM3700 | Users Manual - English - Page 38
. Pull the upper thread at the end of the 8 stitching to the wrong side of the fabric, and then tie it with the bobbin thread. X Use scissors to cut the upper thread and the bobbin thread at the beginning of the stitching. Turn off the machine. 2 Change the foot to the button sewing foot 3 "M". 37 - Brother International XM3700 | Users Manual - English - Page 39
Turn off the machine. 2 Attach the zipper foot "I". ● Always turn off the machine before replacing the presser foot. Otherwise, injuries may occur if the foot controller is accidentally pressed and the machine starts sewing. Zipper insertion Stitch Name Stitch Stitch Pattern Length Width - Brother International XM3700 | Users Manual - English - Page 40
1 that the lower thread lies on the underside of the material. Sew a single row (or many rows) of 2 straight stitches. Pull the lower threads to gather the 3 material. Turn on the machine. 4 Begin sewing by alternating between 5 gently drawing the work away from you and pulling it toward you. Note - Brother International XM3700 | Users Manual - English - Page 41
ACCESSORIES Using the blind stitch foot ■ When sewing seams Turn off the machine. 1 Stitch Name Pattern Straight 2 Stitch Stitch Length [mm (inch)] Any Stitch Width [mm (inch)] Any Zigzag 3 Stitch 1-4 (1/16-3/16) 0-5 (0-3/16) Blind 4 Hem Stitch Stretch 7 Blind Hem Stitch - Brother International XM3700 | Users Manual - English - Page 42
unnecessary. If problems occur, such as difficulty turning the handwheel or an unusual noise, immediately stop using the machine, and contact your authorized dealer or the nearest authorized service center. Turn off the machine and unplug it. 1 Raise the needle and the presser foot. 2 Loosen the - Brother International XM3700 | Users Manual - English - Page 43
, the needle may break, or sewing performance may suffer. For a new bobbin case (part code: XE9326-001), contact your nearest authorized service center. ● Make sure that you fit the bobbin case properly, otherwise the needle may break. 3 6 1 ▲ mark 2 ● mark 3 Bobbin case • Make sure that the - Brother International XM3700 | Users Manual - English - Page 44
offers the latest FAQs and troubleshooting tips. Visit us at " http://solutions.brother.com ". If the problem persists, contact your dealer or the nearest authorized service center. Symptom The sewing machine does not work. Fabric being sewn with the machine cannot be removed. Possible cause - Brother International XM3700 | Users Manual - English - Page 45
bobbin case is scratched, or has a burr on it. Replace the bobbin case. Contact your retailer or the nearest authorized service center. - You have not used a bobbin that has been Use a bobbin that has been designed for designed for this machine. this machine. 13 You have not wound the bobbin - Brother International XM3700 | Users Manual - English - Page 46
Insert the needle properly. Attach the presser foot that is correct for the type of stitch that you want to sew. Adjust the tension of the upper thread. Remove the tangled thread. If the thread is tangled in the bobbin case, clean the bobbin case. Lengthen the stitch length. Remove the darning plate - Brother International XM3700 | Users Manual - English - Page 47
, thread, and needle combinations .......22 Fagoting 31 Feather stitching 33 Flat bed attachment 5 Foot controller 7 Free-arm style 25 G Gathering 39 H Handwheel 17 L Light switch 7 , Lower threading 15 quick-set bobbin 16 21 M Main parts 5 Main power 7 Maintenance 41 N Needle checking - Brother International XM3700 | Users Manual - English - Page 48
XF0490-001 English 885-X06/X08/X16/X18/X26/X28 Printed in China
-
 1
1 -
 2
2 -
 3
3 -
 4
4 -
 5
5 -
 6
6 -
 7
7 -
8
-
9
-
10
-
11
-
12
-
13
-
14
-
15
-
16
-
17
-
18
-
19
-
20
-
21
-
22
-
23
-
24
-
25
-
26
-
27
-
28
-
29
-
30
-
31
-
32
-
33
-
34
-
35
-
36
-
37
-
38
-
39
-
40
-
41
-
42
-
43
-
44
-
45
-
46
-
47
-
48
 |
 |
Please visit us at
where you can get product
support and answers to frequently asked questions (FAQs).
Operation Manual
Product Code: 885-X06/X08/X16/X18/X26/X28
Sewing Machine