Brother International XM3700 Users Manual - English - Page 37
Adjusting buttonholes
 |
View all Brother International XM3700 manuals
Add to My Manuals
Save this manual to your list of manuals |
Page 37 highlights
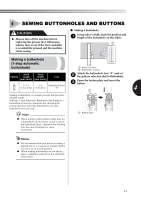
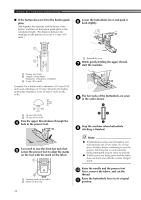
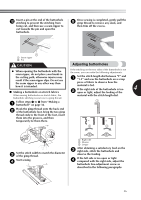
Insert a pin at the end of the buttonhole b stitching to prevent the stitching from being cut, and then use a seam ripper to cut towards the pin and open the buttonhole. 2 Once sewing is completed, gently pull the 5 gimp thread to remove any slack, and then trim off the excess. 1 1 Seam ripper 2 Pin CAUTION Adjusting buttonholes ● When opening the buttonhole with the If the stitching on the two sides of the buttonhole is not the same, you can make the following adjustments. seam ripper, do not place your hands in the cutting path, otherwise injuries may result if the seam ripper slips. Do not use Set the stitch length dial between "F" and 1 "1.5" and sew the buttonhole on a scrap the seam ripper in any other way than piece of fabric to observe how the how it is intended. material is fed. If the right side of the buttonhole is too 4 ■ Making a buttonhole on stretch fabrics 2 open or tight, adjust the feeding of the When sewing buttonholes on stretch fabric, the material with the stitch length dial. buttonhole stitching is sewn over a gimp thread. Follow steps 1 to 6 from "Making a 1 1 buttonhole" on page 34. Hook the gimp thread onto the back end 2 of the buttonhole foot, bring the two gimp thread ends to the front of the foot, insert them into the grooves, and then temporarily tie them there. 2 3 Set the stitch width to match the diameter 3 of the gimp thread. Start sewing. 4 1 Right side 2 Shorter 3 Longer After obtaining a satisfactory feed on the 3 right side, stitch the buttonhole and observe the feeding. If the left side is too open or tight 4 compared with the right side, adjust the buttonhole fine-adjustment screw as described in the following paragraphs. 36
-
 1
1 -
2
-
3
-
4
-
5
-
6
-
7
-
8
-
9
-
10
-
11
-
12
-
13
-
14
-
15
-
16
-
17
-
18
-
19
-
20
-
21
-
22
-
23
-
24
-
25
-
26
-
27
-
28
-
29
-
30
-
31
-
 32
32 -
 33
33 -
 34
34 -
 35
35 -
 36
36 -
 37
37 -
 38
38 -
 39
39 -
 40
40 -
 41
41 -
 42
42 -
43
-
44
-
45
-
46
-
47
-
48
 |
 |
