Brother International XR-35 Users Manual - Multi - Page 19
Onihoills, Ovzdiz, 1hdivells, Straight, Zigzag, Stitching, Puntadas, Rectas
 |
View all Brother International XR-35 manuals
Add to My Manuals
Save this manual to your list of manuals |
Page 19 highlights
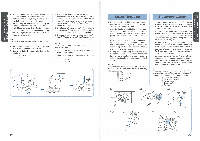
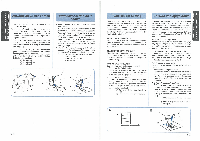
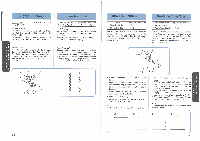
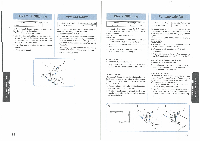
Changing Sewing Direction 1. Stop the machine at the point where you wish to change directions with the needle still in the fabric. 2. Raise the presser foot and turn the fabric to line up its new direction using the needle as a turning point. 3. Lower the presser foot and start sewing in the new direction. Cambio de sentido de costura 1. Pare la maquina en donde quiera cambiar de direcci6n, con la aguja picada en el tejido. 2. Levante el prensatelas y gire el tejido en la direcci6n que debe seguir, usando la aguja como placa giratoria. 3. Baje elprensatelasyempiecea coserenla nueva direccion tal como ilustrado. Removing the Material from the Machine 1. Stop the machine. 2. Raise the needle to its highest position and make sure that the thread take-up lever is also in its highest position. 3. Lift the presser foot and pull the fabric out gently to the left side. 4. Cut both threads using the thread cutter located on the back of the presser foot bar. 5. To prepare the machine for the next seam, pull about 10 cm (4") of thread through the toes of the presser foot toward the back of the machine. ® Thread cutter Para retirar el tejido de la maquina 1. Pare la maquina. 2. Levante la aguja a su posicion mas alta y asegurese de quelapalanca tirahilos este tambien en su posicion mas elevada. 3. Levante el prensatelas y saque suavemente el tejido por la izquierda. 4. Corte ambos hilos usando el cortador que se encuentra detras de la barra del prensatelas. 5. Con el fin de dejar la maquina preparada para la proxima costura, tire unos 10 cm (4') del hilo inferiorypaseloporlos salientes delprensatelas hacia la parte posterior de la maquina. Cortador de hilos OVZDIZA Sti.1931:1 SVGV.I.NrId ONIHOILLS OVZDIZ aNY 1HDIVELLS STRAIGHT AND ZIGZAG STITCHING PUNTADAS RECTAS Y ZIGZAG Finishing Sewing Reverse stitching is used to lock the threads at the end of the seam or wherever reinforcement is needed. 1. Stitch to the end of the seam and stop. 2. Push the Reverse Sewing Button and lightly touch the foot controller to stitch backwards for 1 cm (3/8") from the end of the fabric. Para terminar las costuras La puntada de retroceso se usa para trabar los hilos al final de una costura o en cualquier punto donde sea necesario reforzar la costura. 1. Cosa hasta el final de la costura y pare. 2. Apriete el pulsador de retroceso y presione suavemente elpedalpara coserhacia atrashasta 1 cm (3/8') de la orilla del tejido. 0 0 Top Stitching and Stretch Materials No. 2 (Straight Stitch) is used for top stitching and sewing lightweight fabrics. No.21 (Triple Stretch Stitch) is used for stretch fabrics. Puntadas en derecho y tejidos elasticos La puntada No 2 (Puntada Recta) se usa para costuras en el lado derecho y de materiales ligeros. La puntada No 21(Triple Puntada Pespunto) se usa para los tejidos elasticos. J 31 32
-
 1
1 -
2
-
3
-
4
-
5
-
6
-
7
-
8
-
9
-
10
-
11
-
12
-
13
-
 14
14 -
 15
15 -
 16
16 -
 17
17 -
 18
18 -
 19
19 -
 20
20 -
 21
21 -
 22
22 -
 23
23 -
 24
24 -
25
-
26
-
27
-
28
-
29
-
30
-
31
-
32
-
33
-
34
-
35
 |
 |
