Canon BJC-2100 Series Quick Start Guide
Canon BJC-2100 Series Manual
 |
View all Canon BJC-2100 Series manuals
Add to My Manuals
Save this manual to your list of manuals |
Canon BJC-2100 Series manual content summary:
- Canon BJC-2100 Series | Quick Start Guide - Page 1
BJC-2100 Series Quick Start Guide Step 1: Unpack The Printer 1. Remove all items from the box. • The Install Me First CD-ROM includes: o Microsoft ® Windows ® printer drivers o Macintosh ® printer driver o IS-22 Color Scanner Cartridge driver o Online User's Manual o Software applications o - Canon BJC-2100 Series | Quick Start Guide - Page 2
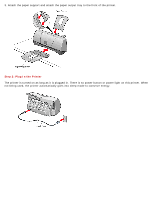
3. Attach the paper support and attach the paper output tray to the front of the printer. Step 2: Plug In the Printer The printer is turned on as long as it is plugged in. There is no power button or power light on this printer. When not being used, the printer automatically goes into sleep mode to - Canon BJC-2100 Series | Quick Start Guide - Page 3
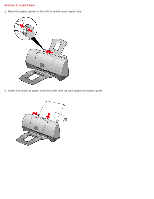
Section 3: Load Paper 1. Move the paper guide to the left to match your paper size. 2. Insert the stack of paper with the print side up and adjust the paper guide. - Canon BJC-2100 Series | Quick Start Guide - Page 4
Section 4: Install The BJ Cartridge 1. Open the front cover. • The cartridge holder moves to the left. 2. Make sure the blue lock lever on the cartridge holder is raised. 3. Remove the cartridge from its package. 4. You MUST remove these protective materials: • Orange cap • Orange tape - Canon BJC-2100 Series | Quick Start Guide - Page 5
5. Set the cartridge into the cartridge holder. 6. Lower the blue lock lever until it locks into place. Important! Before you close the front cover, write down the serial number (located inside the printer to the right of the cartridge holder). You'll need this for product registration. 7. Close the - Canon BJC-2100 Series | Quick Start Guide - Page 6
to the printer. • USB Cable Users: Please wait a few minutes while your computer performs steps necessary for completing USB installation. 6. After connecting the interface cable, click Next. 7. Continue to follow the on-screen instructions. • Setup includes: o Canon BJC-2100 Installation o Product - Canon BJC-2100 Series | Quick Start Guide - Page 7
depends on computer), and then connect it to the printer. 2. Turn on the computer. 3. The Found New Hardware Wizard screen appears. Click Next. Note: If you do not see this screen, skip to step 8 4. When this screen appears, choose "Search for a suitable driver for my device," and click Next. - Canon BJC-2100 Series | Quick Start Guide - Page 8
. Then click Next. 6. Once the driver is found, this screen appears. Click Next. 7. The next screen shows successful completion of this installation. Click Finish. 8. Setup starts automatically. Follow the on-screen instructions. • Setup includes: o Canon BJC-2100 Installation o Product Registration - Canon BJC-2100 Series | Quick Start Guide - Page 9
1. Connect the USB cable to the computer and then to the printer. 2. Turn on the computer, and insert the Install Me First CD-ROM into your CD-ROM drive. The following screen appears: 3. Click on "Install BJC-2100 Drivers." The License Agreement screen appears. 4. Read the agreement and click Agree
-
 1
1 -
 2
2 -
 3
3 -
 4
4 -
 5
5 -
 6
6 -
 7
7 -
8
-
9
 |
 |
BJC-2100 Series Quick Start Guide
Step 1: Unpack The Printer
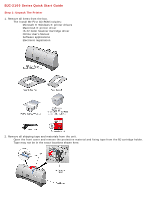
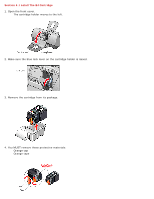
1. Remove all items from the box.
•
The Install Me First CD-ROM includes:
o
Microsoft ® Windows ® printer drivers
o
Macintosh ® printer driver
o
IS-22 Color Scanner Cartridge driver
o
Online User's Manual
o
Software applications
o
Electronic registration
2. Remove all shipping tape and materials from the unit.
•
Open the front cover and remove the protective material and fixing tape from the BJ cartridge holder.
•
Tape may not be in the exact locations shown here.