Canon EOS Rebel T1i Digital Photo Professional 3.8 for Macintosh Instruction M - Page 95
Reducing Noise, Adjust an image.
 |
View all Canon EOS Rebel T1i manuals
Add to My Manuals
Save this manual to your list of manuals |
Page 95 highlights
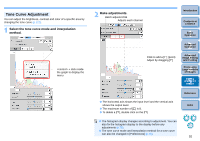
Reducing Noise You can reduce noise that arises in JPEG and TIFF images that have been shot at night or with a high ISO speed. 1 Select the [NR/Lens/ALO] tab sheet from the tool palette in the edit window or edit image window. 2 Click the [NR Preview] button. ¿ The [NR Preview] window appears. 3 Adjust an image. Navigator window Enlargement display position Drag the sliders NR check window O You can set a noise reduction level from within a range of 0 to 20. The larger the setting, the larger the noise reduction effect. O The noise reduction effect can be checked when an image is displayed at 100% in the NR check window. O You can change the display position of the NR check window by dragging the enlargement display position in the navigator window. 4 Click the [Apply] button. ¿ Noise reduction is applied to the image and the image is redisplayed. Introduction Contents at a Glance 1Basic Operation 2Advanced Operation 3Advanced Image Editing and Printing To set the same noise reduction level for several images After selecting multiple images in the main window, you can set the same noise reduction level for the images without displaying the [NR Preview] window, by adjusting the noise reduction level in the [NR/Lens/ ALO] tool palette (p.112) using the [Luminance noise reduction] and [Chrominance noise reduction] sliders, and then clicking the [Apply] button. 4 Processing Large Numbers of Images 5Editing JPEG/TIFF Images Reference O If [Luminance noise] has been set, resolution may be reduced along with reduction of noise. O If [Chrominance noise] has been set, color bleeding may occur along with reduction of noise. O You can set the batch processing settings for noise reduction beforehand, using [Default noise reduction settings] in the [Tool palette] tab sheet in the [Preferences] (p.76). This is particularly useful for applying noise reduction to all the images in a folder at once, such as batch noise reduction for images with high ISO speeds. However, where images have a recipe attached, the noise level recorded in the recipe is applied. O For a list of [NR Preview] window functions, refer to p.113. Index 94
-
 1
1 -
2
-
3
-
4
-
5
-
6
-
7
-
8
-
9
-
10
-
11
-
12
-
13
-
14
-
15
-
16
-
17
-
18
-
19
-
20
-
21
-
22
-
23
-
24
-
25
-
26
-
27
-
28
-
29
-
30
-
31
-
32
-
33
-
34
-
35
-
36
-
37
-
38
-
39
-
40
-
41
-
42
-
43
-
44
-
45
-
46
-
47
-
48
-
49
-
50
-
51
-
52
-
53
-
54
-
55
-
56
-
57
-
58
-
59
-
60
-
61
-
62
-
63
-
64
-
65
-
66
-
67
-
68
-
69
-
70
-
71
-
72
-
73
-
74
-
75
-
76
-
77
-
78
-
79
-
80
-
81
-
82
-
83
-
84
-
85
-
86
-
87
-
88
-
89
-
 90
90 -
 91
91 -
 92
92 -
 93
93 -
 94
94 -
 95
95 -
 96
96 -
 97
97 -
 98
98 -
 99
99 -
 100
100 -
101
-
102
-
103
-
104
-
105
-
106
-
107
-
108
-
109
-
110
-
111
-
112
-
113
-
114
-
115
-
116
-
117
-
118
-
119
-
120
-
121
-
122
-
123
-
124
-
125
-
126
-
127
-
128
-
129
 |
 |
