Canon EOS Rebel T1i Digital Photo Professional 3.8 for Macintosh Instruction M - Page 96
Trimming and Adjusting the Angle of an Image
 |
View all Canon EOS Rebel T1i manuals
Add to My Manuals
Save this manual to your list of manuals |
Page 96 highlights
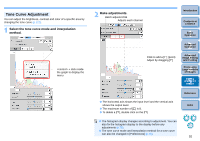
Trimming and Adjusting the Angle of an Image You can trim only the part of an image you need, or change the composition of an image where an image shot horizontally becomes vertical. You can also adjust the angle of an image before trimming. When aspect ratio information is attached to an image shot with EOS1D Mark IV, EOS-1Ds Mark III, EOS-1D Mark III or EOS 7D, the trimming range based on the aspect ratio information is displayed. 1 Select the image to be trimmed. 2 Open the trimming/angle adjustment window. O Select the [Tools] menu ` [Start Trimming/Angle Adjustment tool]. ¿ The trimming/angle adjustment window appears. ¿ Editing can be done once the trimming/angle adjustment window has reached a clear display. 3 Adjust the angle of the image as needed. Trimming/angle adjustment window Largest possible trimming range Click (rotate image left or right in 90-degree increments) Drag* (0.01-degree increments; adjustment range: -45 to +45 degrees) Use the mouse (click S/T) to adjust the angle or directly enter the adjustment angle* (0.01-degree increments; adjustable range: -45 to +45 degrees) * You cannot adjust the angle of images that exceed 6666 x 4444 pixels in size. O If you click [Center on Screen], you can display the trimming range in the center of the window. O If you click the [OK] button after adjusting only the angle of the image, the image will be trimmed at the largest possible trimming range. Introduction Contents at a Glance 1Basic Operation 2Advanced Operation 3Advanced Image Editing and Printing 4 Processing Large Numbers of Images 5Editing JPEG/TIFF Images Reference Index 95
-
 1
1 -
2
-
3
-
4
-
5
-
6
-
7
-
8
-
9
-
10
-
11
-
12
-
13
-
14
-
15
-
16
-
17
-
18
-
19
-
20
-
21
-
22
-
23
-
24
-
25
-
26
-
27
-
28
-
29
-
30
-
31
-
32
-
33
-
34
-
35
-
36
-
37
-
38
-
39
-
40
-
41
-
42
-
43
-
44
-
45
-
46
-
47
-
48
-
49
-
50
-
51
-
52
-
53
-
54
-
55
-
56
-
57
-
58
-
59
-
60
-
61
-
62
-
63
-
64
-
65
-
66
-
67
-
68
-
69
-
70
-
71
-
72
-
73
-
74
-
75
-
76
-
77
-
78
-
79
-
80
-
81
-
82
-
83
-
84
-
85
-
86
-
87
-
88
-
89
-
90
-
 91
91 -
 92
92 -
 93
93 -
 94
94 -
 95
95 -
 96
96 -
 97
97 -
 98
98 -
 99
99 -
 100
100 -
 101
101 -
102
-
103
-
104
-
105
-
106
-
107
-
108
-
109
-
110
-
111
-
112
-
113
-
114
-
115
-
116
-
117
-
118
-
119
-
120
-
121
-
122
-
123
-
124
-
125
-
126
-
127
-
128
-
129
 |
 |
