Canon FAXPHONE L75 Setup Instructions for FAXPHONE L75 - Page 2
Remove the shipping materials from the machine., Assemble the machine. - load paper
 |
View all Canon FAXPHONE L75 manuals
Add to My Manuals
Save this manual to your list of manuals |
Page 2 highlights
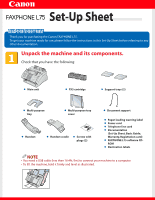
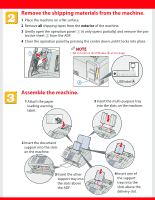
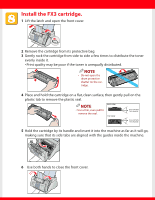
Remove the shipping materials from the machine. 1 Place the machine on a flat surface. 2 Remove all shipping tapes from the exterior of the machine. 3 Gently open the operation panel 1 (it only opens partially) and remove the pro- tective sheet 2 from the ADF. 4 Close the operation panel by pressing the center down until it locks into place. 1 2 NOTE • Do not remove the USB label A at this stage. A Assemble the machine. 1 Attach the paper loading warning label. USB label A 3 Insert the multi-purpose tray into the slots on the machine. 2 Insert the document support into the slots on the machine. 5 Insert the other support tray into the slots above the ADF. 4 Insert one of the support trays into the slots above the delivery slot.
-
 1
1 -
 2
2 -
 3
3 -
 4
4 -
 5
5 -
 6
6 -
 7
7 -
 8
8
 |
 |

Remove the shipping materials from the machine.
1
Place the machine on a flat surface.
2
Remove
all
shipping tapes from the
exterior
of the machine.
3
Gently open the operation panel
1
(it only opens partially) and remove the pro-
tective sheet
2
from the ADF.
4
Close the operation panel by pressing the center down until it locks into place.
Assemble the machine.
1
2
A
A
USB label
NOTE
•
Do not remove the USB label
A
at this stage.
1
Attach the paper
loading warning
label.
2
Insert the document
support into the slots
on the machine.
3
Insert the multi-purpose tray
into the slots on the machine.
4
Insert one of
the support
trays into the
slots above the
delivery slot.
5
Insert the other
support tray into
the slots above
the ADF.