Canon MF5770 User Guide
Canon MF5770 - ImageCLASS B/W Laser Manual
 |
UPC - 013803045048
View all Canon MF5770 manuals
Add to My Manuals
Save this manual to your list of manuals |
Canon MF5770 manual content summary:
- Canon MF5770 | User Guide - Page 1
CaHOH ima eCLASS M F 5 ? [} 8 Series SUPER Please read this guide before operating this equipment. After you finish reading this guide, store it in a safe place for future reference. | - Canon MF5770 | User Guide - Page 2
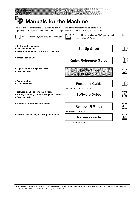
% • Fax InstrucUons • Troubleshooting • Software Installation and Instructions • Printing, Scanning and PC Faxlng InstrucUons • Troubleshooting • Remote User Interface Instructions • Network Connectivity and Setup Instructions l Facsimile Guide 1 Only for the MF5750/MF5770 models. l So,,wa - Canon MF5770 | User Guide - Page 3
F146500 (imageCLASS MF5730) F146502 (imageCLASS MF5750) F146502 (imageCLASS MF5770) Copyright Copyright © 2005 by Canon, Inc. All rights reserved. No part of this publication may be reproduced, transmitted, transcribed, stored in a retrieval system, or translated into any language or computer - Canon MF5770 | User Guide - Page 4
and UHQ TM is a trademark of Canon Inc. IBM ® is a registered trademark. Microsoft _ and Windows ® are registered trademarks of Microsoft based on Canon FAX Standard Chart No.l, (Standard Mode) at 33.6Kbps modem speed. The Public Switched Telephone Network (PSTN) currently supports 28.8Kbps - Canon MF5770 | User Guide - Page 5
Face Down Paper Output Area Face Up Paper Output Area Feeder) ....... 2-1 2-2 2-3 2-3 2-6 2-7 2-8 2-8 2-9 2-9 2-10 2-10 2-11 2-11 Document Handling Document Requirements 3-1 Problem Documents 3-1 Scanned Area o1 a Document 3-2 Setting Up Documents 3-2 Placing a Document on the - Canon MF5770 | User Guide - Page 6
the Machine by Car Troubleshooting Clearing Jams Removing ,Jamr'_led Paper from Inside the Machine Removing Jamr'_led Paper from the ADF LCD Messages Paper Feeding Problems Copying Problems Print Quality Problems Printing Problems Scanning Problems General Problems If You Cannot Solve - Canon MF5770 | User Guide - Page 7
Chapter 10 Chapter 11 Machine Settings Accessing the Machine Settings Menu Descriptions PAPER SETTINGS COMMON SETTINGS COPY SETTINGS PRINTER SETTINGS TIMER SETTINGS Appendix Specifications Index 10=1 10-1 10-1 10=2 10-4 10-5 10-5 11-1 11-3 - Canon MF5770 | User Guide - Page 8
Preface Thank you for purchasing the Canon imageCLASS MF5700 Series. Please read this manual thoroughly before operating the machine in order to familiarize yourself with its capabilities, and to make the most of its many functions. After reading this manual, store it in a safe place for future - Canon MF5770 | User Guide - Page 9
, illustrations used in this manual are those taken when no optional equipment is attached to the imageCLASS MF5770. The model imageCLASS MF5770 is used for illustration purposes in this manual, When there is any difference between MF5730, MF5750 and MF5770, it is clearly indicated in the text - Canon MF5770 | User Guide - Page 10
technology to provide trouble-free operation. If you encounter a problem with the machine's operation, try to solve it by using the information in Chapter 9, 'Troubleshooting." If you cannot solve the problem or if you think your machine needs servicing, contact your local authorized Canon dealer or - Canon MF5770 | User Guide - Page 11
cover Open it when you install the cartridge, or removeiammed paper. Multi-purpose feeder Used when printing paper one by one manually. 19 Cassette Holdstpe paper supply. i0 Telephone line Jack Ceiinect the telephorle cable. (Onlyfor the MF5750/MF5770 models.) il External device Jack Ceiinect art - Canon MF5770 | User Guide - Page 12
the USB (Universal Serial Bus) cable. 2 Ethernet port Connect the network cable. (Only for the MF5770 model.) Face up cover Open it when you output paper face up, or remove jarnn/ed paper. 4 Power socket Connectthepowerco_. i_ Extension cover Proteus paper - Canon MF5770 | User Guide - Page 13
job is stored in the memory. A Alarm Indicator Flashes red whell the machine has a £robbm (The error messege is displayed in g/e LCD.) such as a paper jam. COPY key Switches the staIIdby dispJay to the Copy mode. _4 FAX key Swgches the standby display to the Fax mode. SCAN key Switches the - Canon MF5770 | User Guide - Page 14
• MF5750 SUPER _3 C > # b L P C R_ • MF5730 ImageCLASS MFS?30 I C ._o 0 1-5 - Canon MF5770 | User Guide - Page 15
o _rl|rTlE|XT/PHOTOUI c Exposure • Scan Mode Image quality Copy quantity Z_ NOTE • When the machine is plugged in, the LCD displays for a while, then the standby display appears. • The standby display in the Fax mode appears only with the MF5750/MF5770 models. (See Chaplet - Canon MF5770 | User Guide - Page 16
: - Whenpdntingoutcopies, faxes*oro#lerpages - Whensendingorreceivingfaxes* - When scanning - Whi_eac_gyj_b_ssavedinthemem_ry_rwhen_eco_latecopy_r_therfunctionsareoperating_ In Use/Memory indicator lights up - Whenpaperjamsoccur - When an error message appears and the Alarm indicator flashes - Canon MF5770 | User Guide - Page 17
0 C 1-8 - Canon MF5770 | User Guide - Page 18
-quality copies, we recommend using paper and transparencies recommended by Canon. Some types of paper available at office supply stores may not curled or wrinkled paper • Transparencies designed for full-color copiers or printers • Paper which has already been copied using a digital full-color - Canon MF5770 | User Guide - Page 19
area for optimum print quality and the entire area where the machine can technically print from your computer. Printing area (light shade): Canon recommends that you print within this area. • Paper 03 C MAX. 5 mm MAX. 5 mm II II -1- MAX. 5 mm (u n Feeding direction • Envelope MAX. 5 mm - Canon MF5770 | User Guide - Page 20
• The paper in the multi-purpose feeder is fed prior to the paper in tile cassette. • The cassette holds up to approxirnately 250 sheets of 64 g/rr_ pape_ Loading Paper in the Cassette 1 Pull out the cassette completely. 2-3 - Canon MF5770 | User Guide - Page 21
to the mark Indicating the desired paper size. 03 C "l- EL O IMPORTANT If the paper guide is not adjusted correctly for the size of the paper, the quali_y of your printouts may be adversely affected. 3 Fan the paper st_ck first, then tap the edges - Canon MF5770 | User Guide - Page 22
together. ob "(3 "T" CL Make sure the paper stack does not exceed the load limit mark (A) and it is loaded under the hooks (B) on the 0- paper guides. IMPORTANT • Do not load different size and type of paper at ttle same time. • Do not load extra paper when there is still paper left - Canon MF5770 | User Guide - Page 23
one in the multi-purpose feeder. paper which is in the _ NOTE Tile paper irl tile multi-purpose feeder is fed prior to the paper in the cassette. 1 Slide the paper guides to the marl{ of the desired paper size. 03 C _D "1- On (11 II) ÷ A_I O IMPORTANT If the paper guides are not adjusted - Canon MF5770 | User Guide - Page 24
by one. O IMPORTANT Tile recommended envelopes are COM 10, MONARCH. DL, and ISO-CS. Using other envelopes may affect the quality of the printout. _ NOTE Tile envelope in the multPpurpose feeder is fed prior to the paper in the cassette. 1 Slide the paper guides to fit the size of the envelope - Canon MF5770 | User Guide - Page 25
or [_, (+)] to select the appropriate paper size _ press [OK], You can select from the following paper sizes: A4, BS, AS, EXECUTIM [Executive[, COM 10", MONARCH*, DL*, ISO-05", LTR [Letter), and LGL (Legal)*. * Only for the multi-purpose feeder. NOTE Select , , , or - Canon MF5770 | User Guide - Page 26
as the default paper type. [OK], ob You can select from the following paper types: - Plain paper (64 g/P_2l to 90 g/m2): , .1 Heavy paper , select . 6 Press [Stop/Reset] to return to the standby display. Orientation of the Document and the Paper - Canon MF5770 | User Guide - Page 27
Envelopes face up face down face up face down face up face down face up face down face up face down 1 sheet approx. 60 sheets (64 g/m 2 to 90 g/m 2) 1 sheet approx. 30 sheets (64 g/m 2 to 90 g/m 2) 1 sheet approx. 30 sheets (91 g/m 2 to 128 g/m 2) 1 sheet 10 sheets 1 sheet 10 sheets 2-10 - Canon MF5770 | User Guide - Page 28
which tend to curl, because the paper is delivered straight through out of the machine. Open the face up cover. • Remove the delivered paper one by one. O IMPORTANT • Do not pull the paper forcibl_z • This rrlachfaehas no face up output tray Remove the delivered paper wittl your hand • Do not place - Canon MF5770 | User Guide - Page 29
O3 C -iQ. 2-12 - Canon MF5770 | User Guide - Page 30
etc.) Book Plain paper (multiple page documents of the same size, thickness, and weight or one page documents) Size (W x L) Quantity Max. 216 mm x 297 mm 1 sheet °0, humidity: 20% to 80%) (reference) 64 g/m 2 to 105 g/m2/document .1 When scanning, copying, or sending a transparent document such - Canon MF5770 | User Guide - Page 31
platen glass or load them in the ADE Where you set up your documents depends on the size and type of documents you want to scan. (See "Document Requirements," on p. 3-1 .) Placing a Document on the Platen Glass 1 Open the platen glass cover. 2 Place your document face down on the platen glass - Canon MF5770 | User Guide - Page 32
shows how to place an A4=size document on the platen glass. "T @ E © 3 Gently lower the platen glass cover. The document is now ready for scanning. Loading Documents in the ADF 1 Fan the edges that will feed Into the machine first, then tap the edges of multiple page documents on a flat - Canon MF5770 | User Guide - Page 33
Adjust the document guides to the width of the document. O3 C "r g) E o= o tm 3 Load the documents face up in the ADF. ,_ NOTE • For muitiple page docurrlents, the pages are fed one by one from the top of the stack (from tbe first page). • - Canon MF5770 | User Guide - Page 34
The Paper Path of the ADF Z 1 -_ _._ 3..J The machine scans documents from the first page. unit I ' Scanning @C3 J ob NOTE • When documents are loaded in the ADE the scann#lg unit rrloves to the position shown above and stays there. "l- • When documents - Canon MF5770 | User Guide - Page 35
.mc I 4E E © C_ 3-6 - Canon MF5770 | User Guide - Page 36
box. (See the Software Guide for details on printing.) Follow this procedure if it is not selected: 1 Open the [Printers and Faxes] (Windows 98/Me/2000: [Printers]) folder. • On Windows XP/Server 2003: Click [start] on the Windows task bar _ select [Printers and Faxes]. • On Windows 98/Me/2000 - Canon MF5770 | User Guide - Page 37
(Windows 98/Me/2000: [Printers]) folder. E o • On Windows XP/Server 2003: o3 c Click [start] on the Windows task bar _ select [Printers and Faxes]. • On Windows 98/Me/2000: Click [Start] on the Windows task bar _ select [Settings] _ [Printers]. 2 Double-click the corresponding printer driver - Canon MF5770 | User Guide - Page 38
being dirty, wait about 1 print with a #-ierrrlal transfer printer using the sarrle sheet of scanning resolution. (See "Adjusting the Image Quality ]Resolution)," on p. 5-3.] • Press ]Exposure] to select the scanning exposure. (See "Adjusting press [Stop/Reset] _ follow the instructions in 91e - Canon MF5770 | User Guide - Page 39
INCH> or , the O preset copy ratios will be as follows: O INCH. 50%, 64%, 78%, 100% 129%and200%: A: 50% 70% 141%and200%. • Enlarging or reducing using entering the copy ratio, you can use [ ,_ (-)] or [_ (+)] to adjust the copy ratio. To increase the copy ratio, press [_ (+}]. To decrease - Canon MF5770 | User Guide - Page 40
. _ NOTE Image quality mode automaticalty changes to when is set. • Adjusting Manually 1 Press [Exposure] to select the manual mode. 2 Press [4 (-)] or [_,(+)] to adjust the copy exposure _ press ]OK]. For a lighter copy exposure, press [ _ (-]]. For a darker copy - Canon MF5770 | User Guide - Page 41
the LCD. _ NOTE If in of the Mer}uis set to , #'tocollate copy featureis automaticallyset. (See of 'Menu Descriptions,"on p. 10-4.) 3 Use the numeric keys to enter the number of copies you want. You can set up to 99 copies. 5-4 - Canon MF5770 | User Guide - Page 42
6 to scan all documents, and prints only 1 copy of each document Press [OK]. The machine begins pdntin/rest of copies. _ NOTE Wherl scar}nir}g rrlultiple page documents, may appear in the L CD and scar}rlir}g is car}celed. In this case, press [Stop/Reset] to return to the standby - Canon MF5770 | User Guide - Page 43
Use the 2 on 1 copy function to reduce two sheets to fit on one sheet. Documents Copy m 2on 1 ¢ ======== ,_ NOTE O3 • This up to 99 copies. 4 Press [Start]. NOTE If appears in ttle LCD while scanblng, the document being scanned stops in the ADE Press [OK] 1o make the - Canon MF5770 | User Guide - Page 44
OK Press [Start]. .c Repeat steps 5 and 6 to scan all documents. £3© After scanning every two sheets, the quantity of copies of the document photos, will appear in the LCD and copying will be canceled. If this happens, press [Stop/Reset] to return to the standby display And - Canon MF5770 | User Guide - Page 45
NOTE Tile machine can store up to 10 copy jobs in memory. 1 Press [Stop/Reset] twice to return to the standby display while the machine Is printing out clear the paper jam in the ADE All of the scanned docurr;ents will be erased if appears, so divide the document and copy each part - Canon MF5770 | User Guide - Page 46
-Up Sheeter Chapter 1, "Installation," in the Software Guide. Check if the scanner driver is installed in your computer by following this procedure. 1 Open the [Scanners and Cameras[ folder (Windows 98/Me/2000: the [Scanners and Cameras Properties] dialog box). • On Windows XP: Click [start] on the - Canon MF5770 | User Guide - Page 47
Scanning starts. The MF Toolbox and the MF Toolbox settings dialog box will open, but the document will be scanned without pressing [Start]. The scanned time, a folder with the scanning date will be created in the ] folder, the folder with the scanning date will be created in the [My Documents] - Canon MF5770 | User Guide - Page 48
RX LOG - TX/RX LOG* - PRINT STATUS - PRINT STATUS - REPORT STATUS - REPORT STATUS - COPY STATUS * Only for the MF5750/MF5770 models. z_ NOTE [Status Monitor] is disabled in the Scan mode. Confirming and Deleting a Fax Job Follow the procedure below to confirm the sending or receiving status - Canon MF5770 | User Guide - Page 49
Stop/Reset] to return to the s_ndby display. _ NOTE For detailed faformation on all fax features, see the Facsimile Guide. [_ (+)] to confirm the sending or receiving results. 4 Press [Stop/Reset] to return to the standby display. Confirming and Deleting a Copy Job 1 Press [Status Monitor]. - Canon MF5770 | User Guide - Page 50
Press [Stop/Reset] to return to the standby display. Confirming and Deleting a Print Job 1 Press [Status Monitor]. 2 Press [4 [-)] or [_[+)] to select _ press [OK]. NOTE • If there is no job, is displayed. • If there is only one - Canon MF5770 | User Guide - Page 51
0 03 7-4 - Canon MF5770 | User Guide - Page 52
machine, replace the toner cartridge, and repack and MF5770 models, print any received faxes stored In the memory before disconnecting the power cord, since the documents In the memory cloth moistened with water or diluted Cleaning the Scanning Area Wipe the scanning area (shaded area) with a clean, - Canon MF5770 | User Guide - Page 53
to wipe the read area clean. Take particular the locations where the black lines are appearing on copies. care to clean at If you have trouble getting the glass clean, wipe with a cloth moistened detergent, and then wipe the glass dry with another cloth. with water or a mild neutral Paste, ink - Canon MF5770 | User Guide - Page 54
from the machine. 2 Rock the cartridge 5 or 6 times to distribute the toner evenly. d_ O 3 Reinstall the cartridge In the machine. 4 Make a few test copies. • If the copies appear normal: You can keep using the cartridge. However, a new one will be needed soon. • If white streaks or - Canon MF5770 | User Guide - Page 55
Yield Canon genuine Cartridge U: Approx, 2,500 printouts (A4 at 5% dot coverage*). * The term "A4 at 5% dot coverage" denotes a document on which the area covered with toner is 5% of the total area of an A4-size sheet. • The actual number of printouts that can be made per cartridge depends in part - Canon MF5770 | User Guide - Page 56
that the side wi#_ the instructions (,4) faces up. Do not forcefalty m')ve or push the drum protective shutter (B) in any wa/ A B • Storage Precautions ,_WARNING Do not store cartridges or copy paper in places exposed to open flames, as this may cause the toner or copy paper to Ignite, resulting - Canon MF5770 | User Guide - Page 57
• Storing Partially Used Cartridges If you remove a cartridge from the machine, store the cartridge as described below. Place the cartridge in its protective bag so that the side with the written instructions faces up. Then, place the cartridge into its shipping box. Be sure to securely close the - Canon MF5770 | User Guide - Page 58
from the machine. 4 Rock the cartridge 5 or 6 Umes to distribute the toner evenly. 5 Place the cartridge on a flat and stable surface. Fold the lab (A) on the sealing tape (B) as shown below, and pull It out straight while supporting the cartridge. Make sure that the tab itself is detached - Canon MF5770 | User Guide - Page 59
to the guides (B) in the machine, then gently slide the cartridge into the machine as tar as It will go. Be sure to position the arrow mark (C) on the cartridge towards the inside of the machine. A B B \ o c 7 Close the tront cover. z_ NOTE If the LCD displays , reset the - Canon MF5770 | User Guide - Page 60
may be adversely affected. 1 Unplug the power cord. 2 If the machine Is connected to a telephone or your computer, remove the telephone line or printer cable. 3 Open the front cover. 4 Grip the end of the cartridge, and remove It from the machine. In order to avoid direct sunlight, place - Canon MF5770 | User Guide - Page 61
purchased i_ • When using the original shipping box, c#) not place the power cord or other objects on the ADF: this may damage the ADE a_ o C 8-10 - Canon MF5770 | User Guide - Page 62
what to do if you cannot solve the problem by yourself. This section describes how to remove There are some areas Inside the machine and cartridge which are subject to high voltages and high from inside the machine, take care not to allow the toner or} the jamrrled paper to come into contact wi#l - Canon MF5770 | User Guide - Page 63
the machine. These items might be damaged if they come into contact with the parts inside #le machine. • To avoid possible dare,age to the machine, c2) . _ NOTE Do not expose the cartridge to light for more #_an 5 rrfinutes. If necessary, put the cartridge in its original protective bag or wrap - Canon MF5770 | User Guide - Page 64
Roll the leading end of the paper outwards so that the printed surtace is on the inside of the roll, then gently pull the rolled up paper out of the machine. It the leading edge of the paper is visible but has not entered the imaging area, pull the paper forwards and roll It Inwards. 03 c - Canon MF5770 | User Guide - Page 65
• DO not pull #Tejammed paper upward, the toner on the paper will stain the machine and cause a permanent reduction in print qualit_ 7 Gently pull the Jammed paper between the output rollers until the - Canon MF5770 | User Guide - Page 66
folded, similar to the folds of an accordion, ease the jammed paper loose and then pull it out of the machine. 9 Close the front cover. 10 Pull out the cassette completely. 11 Hold both sides of the Jammed paper and slowly pull It out In the dlrecUon of the arrow. • When - Canon MF5770 | User Guide - Page 67
Te levers are left pushed down, the paperjarrl error will not be resolved. • Never push Cartridge," on p. 8=6. IMPORTANT After you replace the cartridge and close the front cover, the machine should be ready for operating. If the rr}achirle returns to the ready stale for operaling, troubleshooting - Canon MF5770 | User Guide - Page 68
they stop, and remove the paper so as not to be caught by the guides. Open the ADF and gently remove the Jammed paper from the ADF. Open the ADF and gently remove the Jammed paper from the document output - Canon MF5770 | User Guide - Page 69
an error. This section describes the general messages and those related to copy and print functions. For the messages related to fax functions, see Chapter 7. "Troubleshooting," in the Facsimile Guide. ADJUSTING WAITING TO SCAN The machine is not ready for copying because you have just connected - Canon MF5770 | User Guide - Page 70
tly. (See "Replacing the Cartridge," on p. 8-6.) MEMORY FULL The machine's memory is full because the collate copy or 2 on 1 copy function was set when a large document is loaded. Divide the d......... t and copy each part separately. If appears while scanning documents using the ADF - Canon MF5770 | User Guide - Page 71
error of some kind has occurred in the machine. Unplug th ..... hine from the p ........ pply and wait ap[)roximately it in again. If this does not solve the problem, unplug the machine Canon dealer orthe Canon help line. 3 rninutes to 5 minutes, then plug and contact your R)cal authorized TONER - Canon MF5770 | User Guide - Page 72
== o o Is only one type of paper loaded in the cassette or multi-purpose feeder? Load only one type of paper. Mak transp ...... y in the multbpurpose feeder is loaded properly, and that the paper guides are adjusted correctly. (See "Loading Paper," on p. 2-3.) Is the proper transparency loaded - Canon MF5770 | User Guide - Page 73
...... hkle is b_stalled k_ the proper location. (For information about specificati ..... ,the machine, see "Specifications," on p. 11-1. For safety warnings and cautions, see Chapter 1, "Safety Instructions," in the Quick Reference Guide.) 9-12 - Canon MF5770 | User Guide - Page 74
cartridge," in the Set-Up SheeL) Is the cassette inserted completely into the machine? Insert the cassette as far as it wiil go. (See "Load paper," in the Set-Up SheeL) Did you connect the power cord to the machine just now? Wait for a while. After connecting the power cord, the machine cannot scan - Canon MF5770 | User Guide - Page 75
.(See"lnstal]cartddge,"intheSet-UpSheet.) Is any toner left in the cartridge? See "When to Replace the Cartridge," on p. 8-3, and replace the cartridge if necessary. (See "Replacing the Cartridge," on p. 8-6.) Is the exposure adjusted correctly? Adjust the exposure correctly using [Exposure]. (See - Canon MF5770 | User Guide - Page 76
fly using [Exp ..... ]. (See "Adjusting the Exp ..... (Density)," on p. 5-3.) Is the machine in the toner saver mode? Set to in of the Menu. (See of "Menu Descriptions," on p. 10-3.) The printouts are partly missing or shaded when - Canon MF5770 | User Guide - Page 77
jam, see "Clearing Jams," on p. 9-1. For instructions on loading paper, see "Loading Paper," on p. 2=3.) ,ft.h....h. ,n.e..h..pap..e..r.,.p.aper,s,o.o..d..e.tdt..,.n..t.h,thporp..o.._.p.e,fueged the machine and wait approximately 3 minutes to 5 minutes, then plug it in again. If the problem is fixed - Canon MF5770 | User Guide - Page 78
. If this happens, disconnect the power cord, and reconnect it correctly after a minute or more. (See "Connect power cord," in the Set-Up SheeL) If the LCD remains blank, unplug the machine and wait approximately 3 minutes to 5 minutes until the temperature inside the machine lowers, then plug it in - Canon MF5770 | User Guide - Page 79
/MF5750/MF5770 • Serial number The serial number is on the label located at the back of the machine. _aHOl]l F XXXXXX 03 C o© Serial No,('XXXXXXXX') • CARPS software version number See the Software Guide to check the software version number. • Place of purchase • Nature of problem • Steps - Canon MF5770 | User Guide - Page 80
10 This chapter explains how to adjust you press [Stop/Reset] before [OK] is pressed, the item you have selected will not be registered. • Press [Stop/Reset] to exit froth Settings," in the Facsimile Guide. (Only for the MF5750/MF5770 models.) NOTE For details default setting is in bold face.' 10-1 - Canon MF5770 | User Guide - Page 81
CONTROL 1. KEYPAD VOLUME 2. ALARM VOLUME 3. TX DONE TONE 03 ERROR ONLY .c: OFF ON Selects the Copy, Scan, or Fax* mode for the machine's default mode. When the power cord is plugged in, or after the auto clear function activates, the standby display of the selected mode appears. The Copy mode - Canon MF5770 | User Guide - Page 82
DONE TONE Sets the scanning end tone settings. ERROR ONLY A scanning end tone sounds only when any error occurs while scanning. 1 to 3 (1) OFF The scanning end tone does not sound. ON A scanning end tone sounds. 1 to 3 (1) 7. CALLING VOLUME Adjusts the ring volume when the machine detects - Canon MF5770 | User Guide - Page 83
% Preset copy ratios: 50%, 70%, 100%, 141%, 200% The sharpness setting of an image can be adjusted. When you want to make characters and lines clear, select a larger value. When you make copies of photographs, select a smaller value. 1 to 9 (5) (The factory default setting is in bold face.) 10-4 - Canon MF5770 | User Guide - Page 84
300SEC (15SEC) The error time out is off. 1. DATE/TIME SETTING* 2. DATE SETUP* 3. AUTO CLEAR ON OFF Sets the the standby mode. Sets the time until the machine returns to the standby mode. 1MIN. to 9MIN. (1MIN.) The auto clear MF5770 models. (The factory default setting is in bold face.) 10-5 - Canon MF5770 | User Guide - Page 85
09 Q) .__ .C 10-6 - Canon MF5770 | User Guide - Page 86
including curled sheets (temperature: 15°O to 27°0, humidity: 20% to 80%) (reference) Organic Photosensitive Conductor Indirect Electrostatic Transfer System Toner Projection System Canon's RAPID Fusing System TM Approx. 600 dpi x 600 dpi 256 Platen glass: Up to A4 size Sheets, books, and three - Canon MF5770 | User Guide - Page 87
plugged in until the standby display appears) • direct, Manual Exposure cartridge) MF5770: Approx. 15 kg (including cartridge) < Features are subject to change without notice due to product improvements. For high-quality copies, we recommended using paper and transparencies recommended by Canon - Canon MF5770 | User Guide - Page 88
setting, 10-5 DATE/TIME SETTING settings, 10-5 DEFAULT SETTINGS setting, 10-2 DISPLAY LANGUAGE settings, 10-3 Document feeder tray, 1-1 k)ading, 3-3 orientation, 2-9 output tray, 1-1 placing, 3-2 printing, 4-1 problem, 3-1 quantity, 3-1 requirements, 3-1 scanned area, 3-2 scanning, 6-1 setting - Canon MF5770 | User Guide - Page 89
Print yield, 8-4 PRINTER DATA ERROR message, 9-9 Printing areas, 2-2 beforehand, 4-1 canceling, 4-2 documents, 4-1 problems, 9-16 Problems cannot solve, 9-18 copying, 9-13 document, 3-1 general, 9-17 paper feeding, 9-10 print quality, 9-14 printing, 9-16 scanning, 9-16 Q Quality adjusting the image - Canon MF5770 | User Guide - Page 90
19-4 Stop/Reset key, 1-4 SUMMER TIME setting, 10-5 O- SUPPLY REC. PAPER message, 9-10 SYSTEM ERROR message, 9-10 T Telephone line jack, 1-2 Toner in the cartridge, 8-3 TONER SAVER MODE setting, 10-3 TONER SUPPLY LOW message, 9-10 Transporting, 8-9 Tray output, 1-2 Troubleshooting, 9-1 TX DONE - Canon MF5770 | User Guide - Page 91
, Ohta-ku, Tokyo 146-8501, Japan CANON U.S.A., INC. One Canon Plaza, Lake Success, NY 11042, U.S.A. CANON CANADA INC. 6390 Dixie Road Missisaauga, Ontario LST 1P7, Canada CANON EUROPA N.V. Bovenkerkerweg 59-61 1185 XB Amstelveen, The Netherlands CANON FRANCE S.A.S. 17, quai du Pr6sident Paul
-
 1
1 -
 2
2 -
 3
3 -
 4
4 -
 5
5 -
 6
6 -
 7
7 -
8
-
9
-
10
-
11
-
12
-
13
-
14
-
15
-
16
-
17
-
18
-
19
-
20
-
21
-
22
-
23
-
24
-
25
-
26
-
27
-
28
-
29
-
30
-
31
-
32
-
33
-
34
-
35
-
36
-
37
-
38
-
39
-
40
-
41
-
42
-
43
-
44
-
45
-
46
-
47
-
48
-
49
-
50
-
51
-
52
-
53
-
54
-
55
-
56
-
57
-
58
-
59
-
60
-
61
-
62
-
63
-
64
-
65
-
66
-
67
-
68
-
69
-
70
-
71
-
72
-
73
-
74
-
75
-
76
-
77
-
78
-
79
-
80
-
81
-
82
-
83
-
84
-
85
-
86
-
87
-
88
-
89
-
90
-
91
 |
 |
CaHOH
ima
eCLASS
M
F
5
?
[} 8 Series
SUPER
Please read this guide before
operating
this equipment.
After you finish reading
this guide,
store it in a safe place
for future reference.
|